Welcome < Navigating Zetta® < Navigating the Main Application
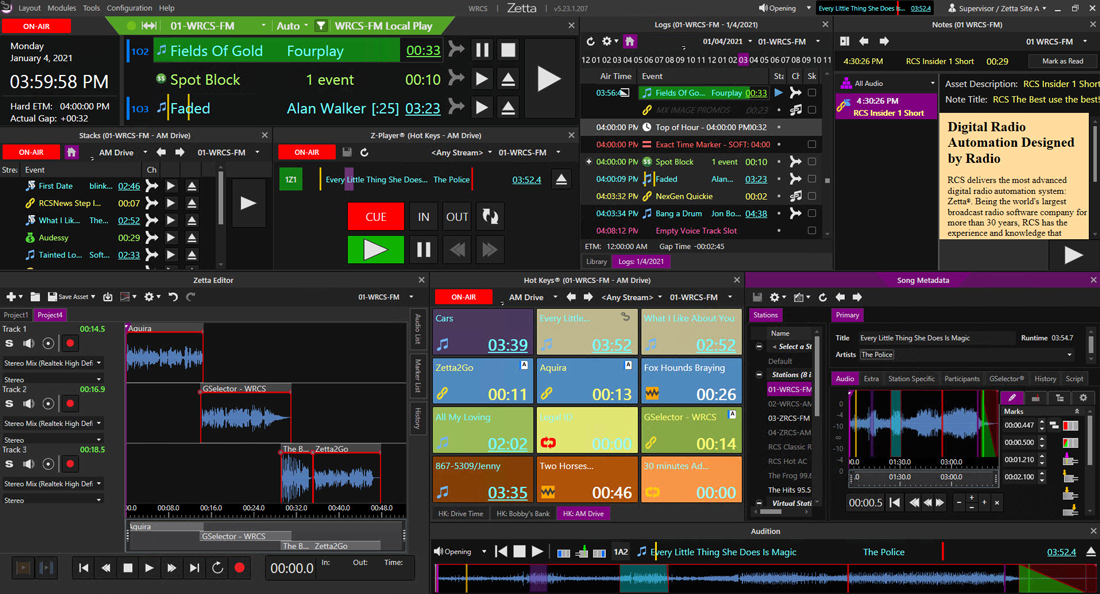
Upon successful login to the Zetta® User Interface, the main application window is displayed. Using the Zetta application menu the user can Configure Zetta, open Modules, create Layouts and access one of the many useful Tools that Zetta has to offer. Across the top of the application is the menu bar, Zetta logo, Licensee, audition microbar, logged in user and optionally the site name.
Click any area in the Zetta menu bar of this image for help
Click any area in the Zetta menu bar of this image for help
In this Topic: show/hideshow/hide
The Zetta Menu provides easy access to Layout options, Modules, Tools, Configuration, Help, and System Warnings. Using the CTRL + Tab a user can easily see the windows that are open and select the desired window. The ALT key on the keyboard can also be used to access the menus.
From the Main Application Window, the following menus are available:
The Layout Menu (ALT+L) is used to Create, Edit, Delete and select Custom Layouts in Zetta.
Lock the Layout - The Lock Layout option allows the user to lock their layout so changes can't be made to the docking or size of the modules. This is also useful when the administrator wants to lock down the layout for specific users. See the section Lock Down User Layouts in the Managed Layouts section of this guide.
New Layout - New Layout opens a dialog allowing the user to name the current layout as a new layout.
Save Layout - The Save Layout option saves the current layout. For more information on modifying layouts, see the Configuring Layouts section of this guide.
Save Layout As - The Save Layout As is used to save the current layout to a new or an existing layout. For more information on using the Save Layout As option, see the Configuring Layouts section of this guide.
Layouts - Lists the Saved Layouts available. From this list the user can easily reload the current layout, to revert the layout to the saved configuration, simply by clicking on the layout with the check mark next to it. For more information on customizing Layouts, see the Configuring Layouts section of this guide.
Active Layout: <Named Layout> - Use the Active Layout to close open modules and save modules to a custom layout.
Global - The Global section of the toolbar shows any windows currently open that are not applied to the Active (Saved) Layout.
Manage Layouts - The Manage Layouts section allows the user to set the Layout to be public so everyone who logs in can see and use the layout. It also allows the user to lock the layout so it cannot be changed. A User can be prevented from changing these settings using the Privileges tab of the Role the user belongs to or by using the Rights Overview tab of the User Account. See the section Lock Down User Layouts in the Managed Layouts section of this guide.
The Modules Menu (ALT+M) is used to quickly gain access and control the media assets in Zetta. Any number of modules can be opened at one time and saved to a Layout. Drag and drop is supported for all modules allowing the user to load and play audio assets easily.
On-Air – The On-Air module is used to see the currently playing item on a station and the next two events queued to play, as scheduled in the Station Log. This Module allows the user to modify segue information (Live Assist Mode only), view Station and Player status information, and individually play or eject events.
Hot Keys – The Hot Keys® module is used to configure “banks” of events that can be played on-air, outside of a station log. This window can be used to add, copy, edit, delete or play a Hot Keys bank.
Stacks – The Stacks module allows the user to copy, create and delete a stack of events. This stack of events allows the user to play a sequence of events without programming them into the Log.
Z-Player – The Z-Player is designed to allow a user to drag and drop an audio item from anywhere in Zetta and load it onto a very specific playback stream. The Z-Player allows the user to queue up the audio and set Loop markers for looping a section of the audio. The Z-Player audio can be set to play in Audition mode or On-Air by simply clicking a button.
Audition - The Audition Module allows the user to view the auditioning of any audio asset in Zetta. The Audition module shows a progress bar with the transitions and count down similar to the On-Air module. It also shows the marks and waveform in the graph section of the module with a timeline across the bottom. The look and feel of the Audition Module is controlled and customized by each user based the size of the module and the user's preferences.
Multitrack Editor - The Multitrack Editor is a digital audio editor, featuring multi-track non-destructive and destructive editing, with a waveform view and unlimited undo/redo history across editing sessions.
Quick Record - The Quick Recorder is a useful tool when the On-Air personality needs to create a quick recording of an on the spot event, such as phone calls or impromptu interviews, then edit and play them On-Air. The Quick Record module is not just a Recorder but also includes some quick editing options.
Live Metadata Send - The Live Metadata Send module can be used to manually send a Live Export message for the specified station. Zetta will use the defined Live Metadata instances in the Live Metadata tab of the System Configuration to Send the Live Metadata message.
Library – The Library module allows the addition, deletion and audition of Songs, Spots, Links Quick Records, Voice Tracks and custom Asset Types to the Library.
Logs – The Logs module displays the audio sequence that will be played by the Computer assigned to the Station. The contents of the Log may be programmed from GSelector®, Flat File Assignment or events may be entered directly into the Log from the Consideration window or the Media Library. For more information on using GSelector Integration to program the Log, see the Configure Systems Options and GSelector Integration section of this guide.
Clocks - The Clocks module contains "templates" used by the system to create logs. A clock schedule is created for each day of the week for each station, and contains all recurring events that typically happen throughout the day.
Notes - The Notes module allows the user to see the upcoming notes, scripts and Live Event assets scheduled in the station log. Any note/script can be clicked on and read as needed. The notes window follows the progression of the station log. As an asset with a note is played, the window is updated.
The Tools Menu (ALT+T) allows users with access to the following tools:
Media Import – Media Import allows the user to import audio from different locations.
Reports - The Reports tool can be used to pull information from the database about User Activity and Missing Audio.
ZCast Transfers - The ZCast Transfer Tool is used to view Inbound and Outbound ZCast Transfers. From this window the user can see Pending, Completed, Failed and In Progress transfers.
Recorder Logs - Recorder Logs are used with Recorder Clocks for accomplishing Background Task such as recording a Show or Network Feed for play in a stations log at a later date or time.
Recorder Clocks - The Recorder Clocks Module is similar to the Clocks module in the adding a removing of events into the clock. The Record Clocks module contains "templates" used by the system to create Recorder Logs. A clock schedule is created for each day of the week for each Background Recorder, and contains recurring events.
Hour Restrictions Manager - The Hour Restrictions Manager is used to create, edit or delete hour Restriction Grids. Hour Restriction Grids restrict associated assets from playing during the restricted hour in a Zetta playout module. Modules in Audition mode are not restricted by the Hour Restriction Grid.
Stream Group Monitor – The Stream Group Monitor opens a window allowing the user to select a configured stream group to view what is playing. For more information on configuring Stream Groups, see the Stream Groups Configuration section of this guide.
GPIO History – The GPIO History shows the activity history of the configured GPIO devices. It also shows the History of Splits events when the Splits feature is enabled.
External Edits – The External Edit Tool shows the audio that is currently being edited by an external Editor and who is editing it. This only shows those assets opened by selecting an External Editor in the Zetta Library.
Hot Spare Manager - Zetta has the ability to switch the On-Air or Sequencer computer to a pool or dedicated standby computer to run the log. This allows the site to stay on the air in case anything goes wrong with the primary computer such as hardware failure. This option can also be used when performing upgrades or scheduled maintenance of Zetta.
Metadata Import - The Metadata Import tool is used to import asset metadata into Zetta using a spreadsheet or tab delimited file.
Sync Assets with GSelector - Zetta contains a Tool that will check the synchronization between Zetta and GSelector. This tool can also be used to synchronize assets between the two products.
Database Management - RCS Database Management Service (DBMS) is a windows service that works with Zetta to provide an easier mechanism to switch between SQL Servers.
The Configuration Menu (ALT+C) is used to configure the many options of Zetta.
System – The System section is used to configure system-wide settings.
Computers – The Computers section is used to add and configure computer specific settings.
Stream Groups – The Stream Groups configuration is used to add and configure different players.
Stations – The Station section is used to add and configure specific station settings.
Content Stores – The Content Stores configuration is used to setup the storage locations for housing audio, redundant audio and data backups.
Station Groups - The Station Groups configuration window is used to create groups of stations. This allows the administrator for the site to limit the stations the user can access. Station Groups are used when assigning users to a Role when creating an Account. Station Groups are also used to create groups of stations for Multisite Voice Tracking. Station Groups are used with Site Replication to select the stations to include in the replication.
Roles - The Roles configuration is used to create and setup Zetta or Windows User Groups, and to add specific rights for the groups to modules, tools and configuration in Zetta.
Accounts – The Accounts configuration allows the user to create accounts using a Zetta login or a Windows login and specify specific user rights.
Talent Grids - The Talent Grids allow the administrator to Daypart the user's rights to specific hours of the log for editing. The user right Full Log Access must be unchecked.
Macros - The Macro configuration is used to create macros to execute several command events as if they were one event.
Background Recorders - The Background Recorders configuration window is used to setup background sequencer computers to run a log that contains a sequence of control events or macros for Background Recording events such as Network shows or any other audio feed.
Virtual Stations - The Virtual Station configuration in Zetta is used to add a Virtual station for use with ZCast between stations.
ZCast Connections - The ZCast Connection configuration window is used to create Inbound and Outbound connections to other Zetta Databases for the transfer of asset audio and metadata over a wide area network.
Site Replication Manager - Site Replication is used to sync two or more Zetta sites to create redundant Zetta systems or to sync selected stations. These replicated systems can be local or remote allowing for synchronization across a wide area network.
Multisite VT Destinations - The Multisite VT Destinations are used to assign the Station Groups to different times in the day. This is used for personalities who voice track different stations depending on the time of day.
Hot Spares – The Hot Spares configuration is used to setup computers to be used when a primary On-Air computer fails or needs updated.
Flat File Assignments - The Flat File Assignments in the Configuration Menu is used to configure a flat file load or reconciliation for Traffic and Music from external systems.
Preferences – The Preferences are used to create and configure user preference profiles.
Themes & Appearances - The Themes & Appearances allow the user to create their own Zetta User Interface Theme, by changing the Color Font and Font size of many of the modules.
Backup Database - The Backup Database option allows users to create a backup of the Zetta database.
Restore Database - The Restore Database option allows users to restore a backup of the Zetta database.
Licensing - The Licensing option displays the licensing information. From this window, the Licensee can be changed and the License can be renewed. Contact RCS Support for assistance.
Zetta2GO Active Sessions - The Zetta2GO Active Sessions window can be used to terminate the Session of users that are logged into Zetta2GO using a seat.
The Help menu (ALT+H) is comprised of the following sections:
Zetta Help – Accesses this Help Guide. Use F1 for context sensitive help.
RCS Connect - Connects the user to the RCS website with the latest news on our products.
About – Provides information about the currently installed version of Zetta.
The Audition Microbar is enabled by default and is found in the Zetta header of the main application window. This microbar can be used to play the audio of an asset on an audition play stream in Zetta. Simply middle-click the title of an asset in the Library, Logs, Hot Keys, Stacks or On-Air modules to Audition the asset. Middle-click the same asset again to stop the audition play of the audio. Optionally, drag and drop an asset from another module to the Audition Microbar. Right-click the Audition Microbar to eject the asset. Double-click the Audition microbar to open the Audition Module. Hide the microbar bar by deselecting the Display Audition Microbar in the Audition tab of the Preferences window. When an asset is auditioned the station normalization and any audio stretch/squeeze values set in the Misc tab of the metadata card are applied.
The Audition Microbar shows the countdown of the audio time and the color change reflecting the transitions in the audio similar to the On-Air module. Using the mouse the user can adjust the play position allowing the user to seek to a position in the audio. Click anywhere in the progress bar to jump to that position.

The Audition button context menu, shown by clicking the drop-down arrow to the right of the button, is configured in the Context Menu Customization section of the Auditioning tab in the Preferences Configuration window. The default options in this menu are Audition, Go To Start, Stop, Play-Pause, Opening, Segue and Closing. The top options are used for playback of the audio and the bottom options are used to select the marking point at which the audio will play. Clicking a marking point option from the menu will play the audio from the point selected. The By Default Audition from option is the checked option in the list of positions. This means when the Audition button is clicked, the default action is to audition the asset from this checked marking point. If the default marker is not set for the selected asset the audio will start from the Opening. To stop the play of the audio, simply click the button again. This default can be changed temporarily by right-clicking on the context menu option that is to be set as default. This will change the default for all of the Audition context menus in Zetta for this users Zetta session.
See the Audition Module topic for more details on Auditioning in Zetta.
The logged in Users name is shown in the top right corner of the Menu Title bar of the main application window. When the name is clicked the following menu options are displayed:
User Preferences - The User Preferences menu option is visible when the Allow the User to Customize User Preferences option is enabled in the users Accounts tab. This menu option will open the User Preferences window for the user.
Log Off - The Log Off option will end the Zetta session and display the Login window.
Exit - The Exit option will close the Main Zetta Program, but will not stop the Startup Manager from running.
The name of the site is shown in the header of the main application window when the Append Site Name to the Account Name option, in the General tab of the System Configuration window, is enabled.
Many of the drop-down fields in Zetta will allow the user to simply start typing to filter the contents to quickly locate the setting needed.
The Multiselect Fields in Zetta allow the user to type or select multiple values from a list of predefined options. These fields also have filtering similar to the Quick Search Fields.
To remove an item form the fields simply right-click the item and select Remove.
Zetta has many tool tips for its buttons, fields and drop-down menus. Simply hover the mouse over the button, field or drop-down and a tool tip will display some quick and useful information or instruction.
The Warnings  /
/  appear where Zetta finds issues. It will appear after the Help menu in the Application menu bar to indicate there is a problem with the system. Clicking on the Warning will display a window that describes the issue. To copy and paste the warnings to an Email, simply select the warning and press CTRL+C to copy and then CTRL+V to paste it into an Email. Use the SHIFT or CTRL keys to select multiple warnings.
|
Important Note! |
There could be discrepancies in the First notified column across machines because the time is when the message was sent out and not when the event occurred. If DB Notify is not running, a machine coming up later will show a different time than a machine that had been up and received the message earlier. |
When this warning appears in other places in Zetta such as the Playback tab of the Station Configuration, simply hover the mouse over the warning icon to view a tool tip that will assist in the resolving of the warning.

For more information on using the Warnings and Errors window, see the Viewing Warnings and Errors in Zetta section of this guide.
Zetta will show pop-up messages when an action is taken that needs more information. The message could be an alert, informational or a question, click OK/Cancel or Yes/No to proceed.
Examples:
Welcome < Navigating Zetta® < Navigating the Main Application
© 2007-2024 RCS. All Rights Reserved.
