Welcome < Modules < Quick Record < Zetta Editor (Legacy)
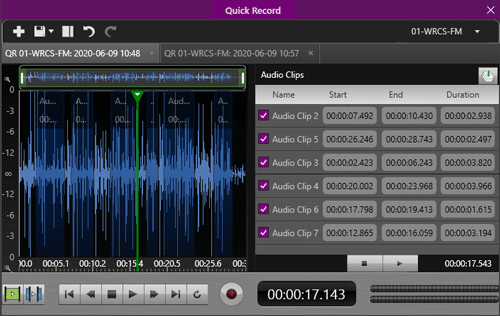
The Zetta Editor (Legacy) can be accessed from the Quick Record menu option in the Modules menu. The Zetta Editor (Legacy) must be selected as the Quick Recorder Type in the Miscellaneous section of the General tab of the User Preferences window.
Click in the image for more help.

Click in the image for more help.
In this Topic: show/hideshow/hide
Quick Recorder Keyboard Shortcuts
Create an Audio Clip in the Clips Editor
Remove an Audio Clip from the Clips Editor
Edit the Start and End points of an Audio Clip
 |
Open New Tab - The Open New Tab button will open an additional QR tab so a user can create a new recording. |
 |
Save/Save As - The Save and Save As tools are available in a drop-down menu from this button. The Save will save the recording in the currently selected tab with the current title. The Save As will allow the user to save the current Quick Record with another Title, Asset Type and Station assignment and allows the user to enter the number of Days to Keep the Asset before it is erased. Removing the number of day's entry will save the asset indefinitely. If the button is simply clicked after creating a recording, the recording will be saved with the default settings based on the Title Mask settings in the Voice Track and Quick Record tab of the System Configuration window. If the Quick Record has been saved and the button is clicked again the Quick Record Save As window will open.
Quick Record assets, by default, are stored in the Quick Records tab of the Library Module. Quick Records are not synchronized with GSelector unless they are saved as a Song or Link Asset type. |
 |
Show/Hide audio clips pane - The Show/Hide audio clips pane opens and closes the Audio Clips window allowing the user to assemble clips of audio together creating one audio file. The Audio Clips are represented in the editor waveform and in the Zoom and Pan bar using a darker shade of blue, with the clip number and the length for easy visibility. To play the Audio Clip after it is added, click the play button below the Audio Clips Editor. If more than one audio clip is in the Audio Clips Editor, the audio clips will play in the order they appear. Use the check box to the left of each clip to disable the audio from playing in the sequence. |
 |
Undo - The Undo button will Undo an action in the Quick Recorder. |
 |
Redo - The Redo button will repeat an action after using the Undo button. |
 |
Make recording active in this station - The station select drop-down is used to select the station that the recording will be set to active. When the Quick Recorder is opened the station will default to the Default Station, for the logged in user, which is set in the Accounts Details tab. When the Station selection drop-down is clicked a cursor is made available allowing the user to type and quickly locate the desired station. |
Quick Recorder Keyboard Shortcuts
The Zoom and Pan controls allow the user to Zoom into the audio both horizontally and vertically and pan from Left to right in the editor.
|
Zoom In - The Zoom In button is located in the upper left portion of the audio editing window and allows the user to Zoom In to the audio vertically. |
|
|
Zoom Out - The Zoom Out button is located in the lower left portion of the audio editing window and allows the user to Zoom out of the audio vertically. |
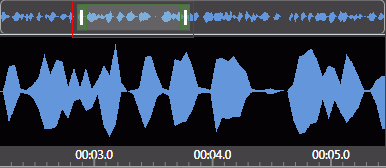
Pan and Zoom - The Pan and Zoom is located directly above the audio editing window and allows the user to zoom in/out of the audio horizontally then pan to the left or right. The mouse wheel can also be used to zoom in and out of the audio horizontally.
The Play and Record Controls are used to control the play and record of the selected audio event. The following buttons are used:
|
|
Play inside selection - The Play inside selection option will play the audio within the highlighted selection. |
|
|
Play outside selection - The Play outside selection option will play 2 seconds of audio on each side of the highlighted selection. |
|
|
Go to start of audio – Use the Go to start of audio button to move to the beginning of the audio event. |
|
|
Rewind – Use the Rewind button to move back in the audio file by 5 seconds. |
|
|
Stop audio - Stop audio will stop the play or record of audio. |
|
|
Play – The Play button plays the selected audio event. |
|
|
Pause - The Pause button is displayed after the Play button is pressed. The pause button can be used to pause the audio that is being played or recorded. |
|
|
Fast Forward – The Fast Forward option moves the play marker ahead in the selected audio file by 5 seconds. |
|
|
Go to end of audio – Use the Go to end of audio button to move to the end of the selected audio event. |
|
|
Loop mode – The Loop mode button will cause the audio event to start over if it reaches the end while playing back. This loop function also works with the Play In and Play Out options. |
|
|
Record – Use the Record button to start or stop recording. |
There are a few existing Keyboard Shortcuts already defined for the Zetta Editor (Legacy).
|
Keystroke |
Function |
|
Ctrl + X |
Cut |
|
Ctrl + V |
Paste |
|
Ctrl + C |
Copy |
|
Delete |
Delete |
|
Space |
Start/Stop Play |
The Zetta.OpenQuickRecorder task can be added using the Command Mappings tab in the System Configuration window.

To highlight a section of audio for editing, simply click and drag the mouse over the desired area. To deselect a highlighted selection of audio, simply double-click the selected area or select a new area of the audio waveform. To add the selection to another Zetta module, such as Logs, Stacks or Hot Keys®, simply drag and drop the selection to the module.
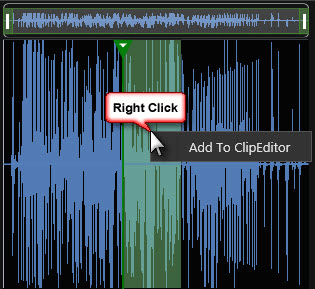
The Audio Clips feature is used to playback, arrange and assemble specific pieces of an audio file without modifying the original file. The Show/Hide audio clips pane  button opens the Audio Clips window, to the right of the waveform. The Audio Clips are represented in the editor waveform and in the Zoom and Pan bar using a darker shade of blue, with the clip number and the length. Simply right-click a highlighted section of audio and select Add to ClipEditor.
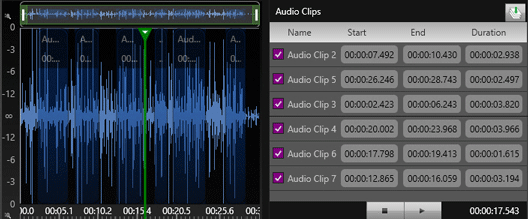
To play the Audio Clip after it is added, click the play button below the Audio Clips Editor. If more than one audio clip is in the Audio Clips Editor, the audio clips will play in the order they appear. Use the check box to the left of each clip to disable the audio from playing in the sequence. The Audio Clips can be rearranged by dragging and dropping the clips in the order desired. The clips can then be combined into a new record tab using the Assemble Clips ![]() button.
button.
The following Step-by-Step topics can be used to guide the user through using the Audio Clips Editor:
Create an Audio Clip in the Clips Editor
Delete an Audio Clip from the Clips Editor
Edit the Start and End points of an Audio Clip
Preview and Assemble a New Audio File from Audio Clips
|
|
To create an audio clip, perform the following steps: |
 button to preview the highlighted audio.
|
|
To remove an audio clip, perform the following steps: |
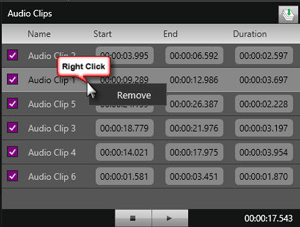
|
|
To edit the Start and End Points of an Audio Clip in the Clips Editor, perform the following steps: |
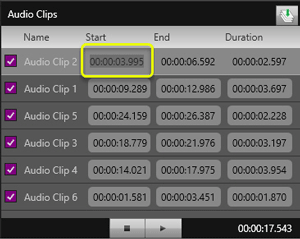
|
|
To create a new audio file from existing audio clips, perform the following steps: |
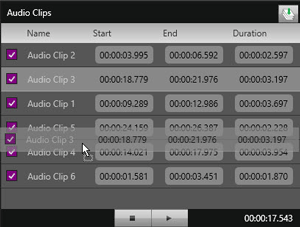
|
|
To Configure Zetta for use of the Zetta Editor (Legacy) perform the follow steps: |
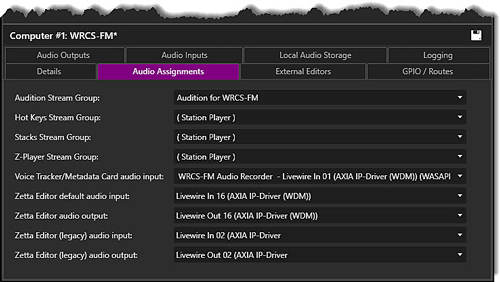
Tip: The Zetta Editor (Legacy) is the old Quick Record that is still used by some customers.
Welcome < Modules < Quick Record < Zetta Editor (Legacy)
© 2007-2024 RCS. All Rights Reserved.