Welcome < Modules < Library Module
Library Module Overview
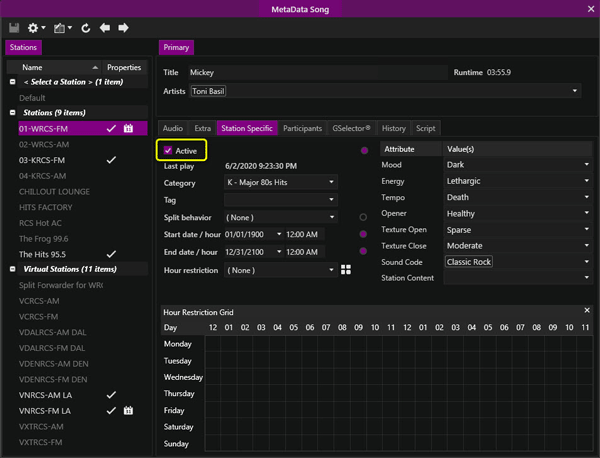
The Library Module is used to make additions, deletions, changes and audition the Media Assets in the Library. Zetta® can be configured where the assets metadata scope is set to Global, Station or Cuts. The default configuration is a Metadata Scope of Station where the metadata for the asset is stored in two different types of fields, Global and Station specific. This concept is useful when assets are shared in a multi-station environment, yet there still is a need for each asset to have a place where only data that is specific to a station is stored. When an Asset type is configured to a Metadata Scope of Cuts the assets will have a Cut Specific tab instead of a Station Specific tab. This is useful for sites that have multiple cuts of the same asset for a single station or multiple stations. An Asset type that is set to a Metadata Scope of Global will have a Global tab instead of a Station or Cut Specific tab. A Global asset can play on any station when it is active. The Metadata Scope is set in the Asset Types tab of the System Configuration window.
A system that is integrated with GSelector® will have the default Metadata scope of Station for all assets and the Metadata Scope cannot be changed.
|

Important Note!
|
When GSelector or ZCast are enabled in the System Configuration General tab, the Metadata Scope of the asset cannot be changed and defaults to Station. It is recommended that RCS Support be contacted before changing the Metadata Scope for existing Assets as the asset may lose its station activation.
|
The default Station metadata scope offers a concept of default station specific values, with the ability to override these on the station level. Zetta has a virtual Default station. The Default station always exists in the system without a need to be defined by the user; however the Default station is only accessible in windows where the asset is managed, such as the Media Library, Metadata card, and Audio Utility. The values defined in the Station Specific tab of an Asset's Metadata card, for the Default station, are automatically shown as station specific values on all regular stations. This allows the user to enter the value once, and have it mirrored into each station, without having to enter the value for each station. Within the station specific tab of the metadata card, for a selected station, the settings that can be Global (set on Default station) or Station Specific have a dot  next to each field. If the dot is colored
  the default value is Overridden and the setting is specific to the selected station. Click the blue dot to display a menu to Reset the field to the same as the default station or set it as Default for the Default station. Use the mouse to hover over the dot to see if the setting is a Default or Overridden setting. For more information on the Station Specific tab see the Songs, Links, or Spots section of the guide.
An Asset can be auditioned from the Library module by simply middle-clicking the desired asset, clicking the Audition toolbar button or by clicking a desired play action or marking point from the right-click menu. Imaging, Shows and Mini-Logs cannot be auditioned from their respective tabs or from the All Audio tab. To audition the assets from within these elements, open the container asset and use the Audition button from the events toolbar in the Imaging, Shows or Mini-Logs Editor. If Tags or Rotations are auditioned from the Library toolbar or context menu the Next to Play asset from within the selected Tag or Rotation will be auditioned.
Click any area in this image for help
Click any area in this image for help
|
Important Note!
|
Be aware, when working with a very large library, when the Library Module is opened, the Library needs to load audio from the Content Store. As the module loads audio, progress bars will display at the bottom of the window. Audio that has not yet loaded into the library may be visible in the list, but may not be edited.
|
Topics in this section:
show/hide
show/hide
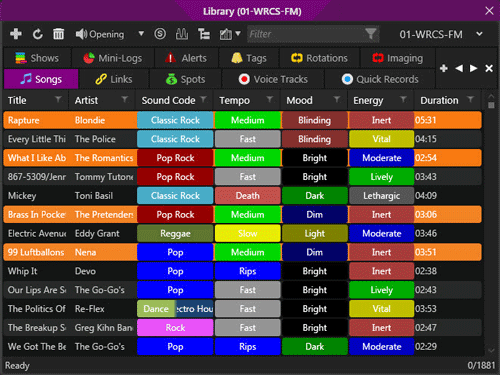
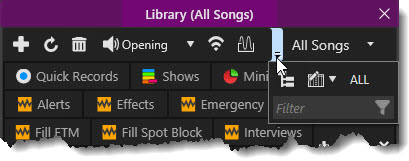
Library Toolbar
The Library Toolbar is similar for the Songs, Spots, Links and Custom Asset Types. When the window is reduced in size the toolbar buttons will be hidden and a drop-down will be shown to allow access to these hidden toolbar buttons. The toolbar is used to perform the following tasks:
 |
Add new media – Use the Add new media button to manually add new assets, Tags, Rotations, Imaging, Shows or Mini-Logs to the Library.
|
 |
Refresh - Use the refresh to refresh the Library List.
|
 |
Delete Selected Media – Use the Delete button to delete selected asset(s), Tags, Rotations, Imaging, Shows or Mini-Logs. For more information on removing media from the Library, see the Deleting Media Assets section of this guide. When an asset is deleted that has a metadata scope of Cut, using this button, the entire asset is deleted including all Cuts.
|
 |
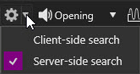
Advanced - The Supervisor can designate, per asset type, whether Client-side or Server-side Search method should be used. With the client-side search, the asset for the asset type are shown when the asset tab is selected in the Library. With the server-side search, no assets are shown up front in Library, and the user needs to type in the search criteria first. The Supervisor can also select whether the Search method is switchable thus allowing the user access to this Advanced button to switch the method used.
|
 |
Audition – The Audition button will allow the user to listen to a selected piece of audio locally without it going over the air. Using the arrow drop-down, the user can select the play action or the marking point of the audio to start playing based on the preferences specified in the Auditioning tab of the Preferences Configuration window. An Audition Stream Group and stream must be defined and an audio event must be selected. Optionally, simply middle-click the title of the asset to be auditioned and the asset will be auditioned based on the default marking point (shown on the button). If the default marker is not set for the selected asset the audio will start from the Opening. To stop the play of the audio simply middle-click the same asset or click the Audition button again. See the Audition Context Menu options section of this topic and the Audition Module topic of this guide for more information on auditioning assets. Shows and Mini-Logs cannot be auditioned from their respective tabs or from the All Audio tab. To audition the assets from within these elements open the container asset and use the Audition button in the Imaging, Shows or Mini-Logs Editor. If Tags, Imaging or Rotations are auditioned, the Next to Play asset from within the selected Tag, Imaging asset or Rotation will be auditioned.
|
 |
GSelector® Export– The GSelector button is visible after a station has been selected that is integrated with GSelector. When GSelector is enabled for a station Zetta will automatically send adds and changes to GSelector. The GSelector Export button can be used to force changes immediately to GSelector. This option is only available in the Songs and Links tab. To Sync Assets with GSelector for new systems or newly integrated stations use the Sync Tool.
|
 |
Send selected media to ZCast site - The ZCast button is used to send selected library assets to an Outbound ZCast Connection. This option is not available in the Tags, Rotations or Imaging tabs.
|
 |
Launch Audio Utility – The Launch Audio Utility will open an Audio Utility window that can be used to change or analyze selected assets. This option is not available in the Tags or Rotations tab.
|
 |
Show Group Area - The Show Group area will display the group by area in the Library module. The Group by area will allow the user to group the Asset list pane by the column headers. This makes locating an asset easier. The grouping area is hidden from view, but can be accessed by clicking this button.
|
 |
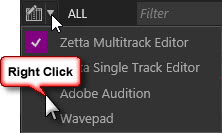
Edit Media – The Edit Media drop-down is used to choose an available audio editor. The default editor used, when the button is selected, is the Zetta Multitrack Editor. The Zetta Single Track Editor and any configured External Editors are also available using the drop-down to the right of the button. The Default Editor is set in the Details tab of the Computer Configuration window. To override the default editor, right-click the editor of choice in the Edit Media menu to move the check mark. This override change can then be saved to a Layout.
|
|

|
Publish - The Publish button uses the Publish Configurations to Publish the selected content of the Show or Mini-Log. Use the drop-down arrow to view and select a publish instance. Right-click a publish instance from the list of instances in the drop-down to set the default instance that is used when the button is clicked. This button is only available in the toolbar of the Shows and Mini-Logs tab.
|
|

|
Show All - The Show All button switches between Show All Media and Show All Media Waiting for Approval  when a filter is selected in the Defined Filter when a filter is selected in the Defined Filter  drop-down that has audio that needs approval before airing. When a specific station is selected the button switches between Show All Media Waiting for Approval and Approved drop-down that has audio that needs approval before airing. When a specific station is selected the button switches between Show All Media Waiting for Approval and Approved  to display the desired assets. (These buttons are only available if at least one station has the Audio needs approval before airing option selected for the station. See Station Configuration Playback tab for more information on this setting). to display the desired assets. (These buttons are only available if at least one station has the Audio needs approval before airing option selected for the station. See Station Configuration Playback tab for more information on this setting).
|
|

|
Filter - The Filter field is shown when the Asset Type selected is set to Client Side Search Method and is used for dynamic quick searches. Simply open the Library and start typing, Zetta will start filtering for the characters typed and highlight them in the assets found that match. Optionally, to put focus in this field press CTRL+F on the keyboard. To clear the filter field, press the ESC key (Note: The Library must have focus for these quick key actions). The footer of the Library window will display the number of items rendered by the filter. The filter acts on the displayed columns only, therefore to search for a vocalist or composer the column will needed to be added to the Library window.
|
|

|
Search - The Search field is shown when the Asset Type selected is set to Server Side Search Method and can be used in conjunction with the Column header search to locate the asset to view from the selected asset type tab. Simply open the Library and start typing, press enter to start the search. Optionally, to put focus in this field press CTRL+F on the keyboard. To clear the filter field, press the ESC key (Note: The Library must have focus for these quick key actions). The footer of the Library window will display the number of items rendered by the search. The search values are retained in the search fields as the Defined Filter is changed, thus allowing the user to search across stations. Tip: use "quotes" for an exact match or an asterisk * for any value. See the All Audio section, in this topic, for additional details on the Server side search method.
|
|
|
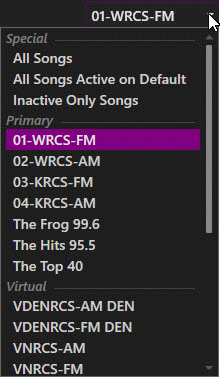
Defined Filters - The Defined Filters drop-down can be used to select a predefined filter for the asset tab selected. The Special Filters section allow the user to select filters based on the Asset tab selected and the users access to the stations regardless of the stations active status. If the User has access to all stations they will see three filters for 'All', 'Active on Default' and 'Inactive Only' for the asset type selected. If the user has access to only some stations they will see the one filter 'on My Stations' for the asset type selected. The following table illustrates which special filter option (3 vs 1) gets used based on the permissions granted/denied and Real Station/Virtual Station active/inactive. The permission drives this logic, and stays in effect even when a station gets deactivated.
| LIBRARY - SPECIAL FILTER WITH 3 OPTIONS |
LIBRARY - SPECIAL FILTER WITH 1 OPTIONS
|
| STATIONS |
PERMISSION |
ACTIVE |
STATIONS |
PERMISSION |
ACTIVE |
|
REAL
|
|
|
REAL
|
|
|
|
1
|
TRUE
|
TRUE
|
1
|
TRUE
|
TRUE
|
|
2
|
TRUE
|
TRUE
|
2
|
FALSE
|
TRUE
|
|
3
|
TRUE
|
TRUE
|
3
|
TRUE
|
TRUE
|
|
VIRTUAL
|
|
|
VIRTUAL
|
|
|
|
4
|
TRUE
|
TRUE
|
4
|
TRUE
|
TRUE
|
|
5
|
TRUE
|
TRUE
|
5
|
TRUE
|
TRUE
|
| LIBRARY - SPECIAL FILTER WITH 3 OPTIONS |
LIBRARY - SPECIAL FILTER WITH 1 OPTIONS
|
| STATIONS |
PERMISSION |
ACTIVE |
STATIONS |
PERMISSION |
ACTIVE |
|
REAL
|
|
|
REAL
|
|
|
|
1
|
TRUE
|
TRUE
|
1
|
TRUE
|
TRUE
|
|
2
|
TRUE
|
FALSE
|
2
|
TRUE
|
TRUE
|
|
3
|
TRUE
|
TRUE
|
3
|
FALSE
|
FALSE
|
|
VIRTUAL
|
|
|
VIRTUAL
|
|
|
|
4
|
TRUE
|
TRUE
|
4
|
TRUE
|
TRUE
|
|
5
|
TRUE
|
TRUE
|
5
|
TRUE
|
TRUE
|
|
LIBRARY - SPECIAL FILTER WITH 3 OPTIONs
|
| STATIONS |
PERMISSION |
ACTIVE |
|
REAL
|
|
|
|
1
|
TRUE
|
TRUE
|
|
2
|
TRUE
|
TRUE
|
|
3
|
TRUE
|
TRUE
|
|
VIRTUAL
|
|
|
|
4
|
TRUE
|
TRUE
|
|
5
|
TRUE
|
FALSE
|
The Station Filters allow the user to see the active assets for a specific station for which the user has access. The Virtual Station Filters allow the user to see the active assets for a specific virtual station for which the user has access. The Station Group Filters allow the user to see the active assets for the defined Station Group(s) for which they are a member. When the Defined Filters drop-down is clicked a cursor is made available allowing the user to type and quickly locate the desired filter. If a Default Station is selected for the users Account, when the user opens the Library it will automatically be filtered by that station.
Selecting a filter when adding a new asset will automatically mark the asset as active for all stations within the filter.
Example: If 'All Songs Active on Default' is selected as the filter the new song will automatically be set to active on all stations. If 'Songs on My Stations' is selected the new song will be set to active on all the stations for which the user has access. If a specific station is selected the new song will automatically be set to active on just that station. If a Station Group is selected the new song will be active on all stations within that selected Station Group.
Note: If the 'Activate newly created assets on My Stations & Station Groups' option in the MetaData Card section of the Preferences is disabled, the new asset will only be set to active if a user selects a specific station. If the user selects a Special Filter or Station Group the asset will not be set to active for any station. This option is enabled by default.
|
The toolbar adjusts with the window size giving a drop-down  button for toolbar button selection.
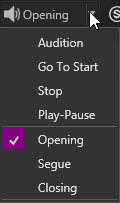
Audition context menu options
Right-click an asset in the Library to view the Audition context menu options. These audition options are configured in the Context Menu Customization section of the Auditioning tab in the Preferences Configuration window. The audition section of this menu is used to play the audio on an audition play stream. The default options in this menu are Audition, Go To Start, Stop, Play-Pause, Opening, Segue and Closing. The top options are used for playback of the audio and the bottom options are used to select the marking point at which the audio will play. Clicking a marking point from the menu will play the audio from the point selected. The By Default Audition from option is the checked option in the list of marking points. This means when the Audition button in the toolbar is clicked, the default action is to audition the asset from this checked marking point. If the default marker is not set for the selected asset the audio will start from the Opening. This default can be changed temporarily by right-clicking on the context menu option that is to be set as default. This will change the default for ALL of the Audition context menus in Zetta for this users Zetta session. Optionally, the user can simply middle-click the title of the asset to be auditioned and the asset will be auditioned based on the default marking point. See the Audition Module section of the guide for more information on auditioning assets. Imaging, Shows and Mini-Logs cannot be auditioned from their respective library tabs or from the All Audio tab. To audition the assets from within these elements open the container asset and use the Audition button in the Imaging, Shows or Mini-Logs editor. If Tags or Rotations are auditioned the Next to Play asset from within the selected Tag or Rotation will be auditioned.
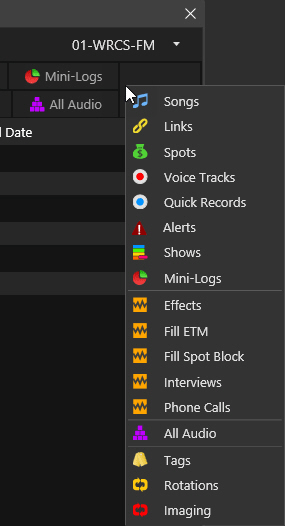
Library Media Asset tabs
The Library holds each asset type in a separate tab accessible above the Library toolbar. The user can view and access the asset list for each of the following media types:
Songs
Spots
Links
Voice Tracks
Quick Records
Alerts
Shows
Mini-Logs
Custom Asset Types
All Audio
** Additional tabs in the Library include the Tags, Imaging and Rotations tab. These tabs are used to setup groups of assets for Splits, Network Mode, Shifts and asset Rotation. An Alerts tab is show if an EAS Emergency Alert System is configured.
Tab Navigation
The Navigation buttons to the right of the tabs in the Library are used to navigate between tabs, close selected tabs and open tabs. The add tab button displays the default Zetta tabs first then the custom asset tabs created in the Asset Types of the System Configuration window, an All Audio tab option and finally the Tags, Imaging and Rotations tab. The Tags tab is used with the Splits option that is enabled in the General tab of the System configuration window. Use the Close selected tab to close a highlighted tab. Optionally, right-click a tab to open or close tabs from the resulting menu.
All Audio
The All Audio Tab can be used to search for any asset type. The All Audio tab uses the server-side search method when at least one asset type is set to Server-side Search Method, in the Asset Types tab of the System Configuration. With the server-side search, no assets are shown up front in All Audio tab so the user needs to type in a search criteria first. If the station filter is set to All Audio then all assets in the Library will be displayed in the tab.

With the Server-side search method, users can use the top Search bar or the Search field available at the top of these column headers:
- Title
- Artist / Sponsor (Searching in the Artist/Sponsor field will resolve any artist or sponsor in the field. I.e. Artist 1 or Artist 2 etc.)
- Products
- External ID*
- ISCI
- Category**
- File Name**
- GUID (Asset)
* only search the asset External ID, not the SSD External ID (Cuts)
** not searchable via the Search bar
The search can be executed in any one of the following combinations:
- Per-field search, e.g. Title contains "Born"
- Combine multiple per-field criteria search, i.e. Artist contains "Springst" and Title contains "Born"
- Search bar -only option which searches subset of fields (in bold above)
- Cross-field search via the Search bar – this would look for the string across any currently visible columns (only the supported ones listed above can be searched)
- Combine top search bar and column search. If a column has criteria entered, that column is excluded from the "Search bar" cross-field search
For #3 and #4, logical AND will be used. Both search methods will use the contains filter.
Tags, Imaging and Rotations are not viewed in this tab. Based on the User rights, multiple assets can be deleted using the All Audio tab. Simply select the assets to delete and click the delete key on the keyboard. When an assets metadata card is opened from the All Audio tab and the assets are grouped the Previous  and Next
  buttons will move through assets in the grouped list before moving to the next list that the tab is grouped by.
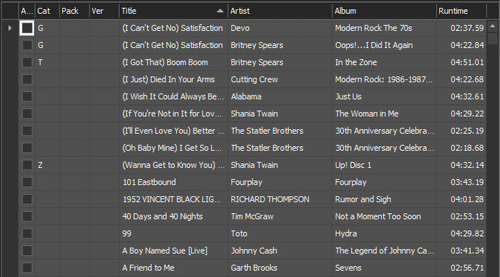
Asset List Pane
The Media Library asset list allows the user to browse and access Media assets contained in Zetta. If a station is selected, only the Active assets for the station will be displayed, however, if All is selected all assets in the system will be displayed for the selected asset type.
The following is a list of available columns that can be inserted or removed from many of the Library module tabs:
Title - The title column displays the title given to the asset.
Artist - The Artist column is a default column and displays the artist for the asset.
Sponsors – The Sponsors column shows the sponsor of the asset, this attribute is normally used with spots, but is also available with links and custom asset types.
Products – The Products column is used for spots, links and custom asset types to list the product the asset represents.
Runtime - The Runtime field will display the amount of time the asset will take to play from Trim In to Segue. The Runtime value will be underlined if there is a Time Stretch Adjustment specified in the metadata card.
External ID - The External ID displays an external alpha-numeric identification used for the asset by an external source. An External ID is a unique string, a warning prompt will display when a duplicate External ID is entered. The External ID in Zetta matches up to the Media ID in GSelector when integration is enabled. External IDs can be unique Per Asset Type or Globally unique throughout Zetta. To set how External ID's are handled in Zetta use the External ID tab of the System Configuration window. To have Zetta automatically assign an asset an External ID, enable the Automatically generate Asset External ID in the External ID tab of the System Configuration window then define an Asset External ID mask.
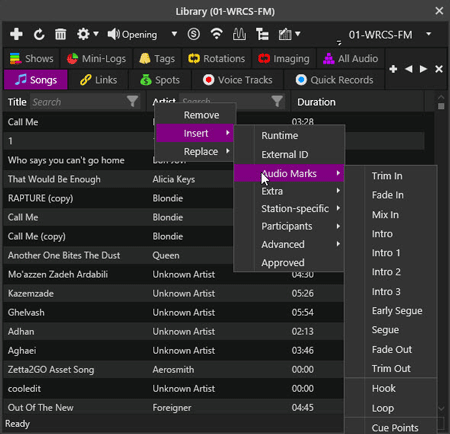
Audio Marks
The Audio Marks submenu shows a list of column options for fields and settings found in the Audio Marks tab of the Metadata card.
Trim In – The Trim In value displays the first part of the audio that will be ignored when playing the asset.
Fade In - The Fade In column shows the length value of the Fade In marker for the asset.
Mix In - The Mix In column shows the position of the Mix In marker in the audio of the asset.
Intro – Intro shows the highest intro value of Intro1, 2, and 3.
Intro 1 - Intro1 is the first intro value of the asset.
Intro 2 – Intro2 is the second intro value of the asset, if set.
Intro 3 – Intro3 is the third intro value of the asset, if set.
Early Segue - The Early Segue is the point in the audio that is used when linking media events using the Chain type Link-Song.
Segue – The Segue displays the point in the audio that the asset will segue into the next event.
Fade Out - The Fade Out column shows the length value of the Fade Out marker for the asset.
Trim Out – The Trim Out displays the last part of the audio that will be ignored when playing the asset.
Hook – The Hook column will give the start and end time of the hook associated with the asset.
Loop - The Loop column shows the start and end time of the Loop set in the asset.
Cue Points - If the asset has a cue point marker the column will show true, if the asset does not have a cue point marker the column will show false.
Extra
The Extra submenu shows a list of column options for fields and settings found in the Extras tab of the Metadata card.
Duration - The duration field will display the amount of time the asset will take to play from Trim In to Trim Out. The duration value will be underlined if there is a Time Stretch Adjustment specified in the metadata card.
Overall Length – Overall Length shows the overall length of the asset
Playback Method - The Playback Method is the playback method selected in the Metadata | Extra tab.
File Name – The File Name is the Current file name. When Content Stores are used the original import file name (Short File Name) will be changed, that changed name will be displayed in this column.
Album - Album is the name of the album the songs were ripped from.
Album_2 - Album_2 is a secondary Album field.
Artist 2 – Artist 2 is a secondary artist field.
Publisher - The Publisher column displays the Publisher for the asset as defined in the Extra tab of the asset.
Label - The Label column displays the Label information for the Song.
Opening - The Opening field is used for an optional two letter text description of the start of the Song.
Ending - The Ending field is used for an optional two letter text description of the end of the Song.
ISRC - ISRC is a unique and permanent identifier for a specific recording.
ISCI - ISCI is a unique code that represents the advertiser and the spot version.
Bed Type - The Bed Type column will display (None), Bed With Auto-Fade, Bed No Fade (Donut). This option is only available for Links and Custom Assets. Beds in Zetta make it possible for a voice track to be spoken over the top of the beds audio.
Kill Date - The Kill Date is the day the asset is removed from the Zetta database.
Date Created - The Date Created column will show the date the asset was created in the database.
Last Modified – The Last Modified is the date the asset was last modified
Comments – Comments field allows the user to add a comment to the asset.
Live - The Live column shows True is the Asset has been set as a Live Event
Version - The Version field displays the version information found in GSelector when Zetta is integrated.
Attributes - These are the attributes listed in the Extra tab Assets. Attributes can be highlighted in the library using a configured Appearance.
Station-specific
The Station specific sub-menu shows a list of column options for fields and settings found in the Station-Specific tab of the Metadata card. This section also shows a list of the common options for fields and settings found in the Global and Cuts Specific tabs.
Active – The Active column will show if the Asset is active or inactive on the selected Station, displays a check mark if the asset is active for the selected station.
Last Play - The Last Play column displays the Date and Time the asset played on the selected station. A station must be selected for this column to display a value.
Category – The category column will display the category for the asset. When integrated with GSelector® the categories for Songs and Links are sent from GSelector to Zetta. A Category assignment can be changed, for an asset from within the assets metadata card in Zetta, however adding, editing or deleting a Category must be done in GSelector. When Zetta is integrated with GSelector the Short and Long name for the category are shown.
Category Group - A group of categories, generally containing songs that are similar in nature or function. Category Groups only exist when Zetta is integrated with GSelector and they are assigned, added, edited and delete in GSelector.
Tags - The Tags column displays the names of the Tags that the asset assigned to in the Tags tab. Tags are typically used when working with Splits.
Split Behavior - The Split Behavior column shows the selected split behavior of the asset. The Split Behavior column is visible when Splits are enabled in the System Configuration | General tab. The Split Behavior of an asset is used when working with Splits.
Start Date – The Start Date shows the date the asset is scheduled to be available for play on air.
End Date – The End Date is the end date that the audio will stop playing on the air.
Hour Restriction - The Hour Restriction column will show the assigned Hour restriction for the asset.
Attributes - These are the attributes listed in the Station Specific tab or Cuts Specific tab for Assets. Attributes can be highlighted in the library using a configured Appearance.
Participants
Participants are a list of names and roles that participated in creating or performing the song: composers, conductors, producers, arrangers, vocalists, writers/lyricist and musicians are all Participants. Participants are defined and assigned to Songs using the participants tab of the metadata card.
Arrangers - Mainly used by Classical and Jazz stations, this Participant field is used to associate Arranger information with Songs.
Composers - Mainly used by Classical stations, this Participant field is used to associate Composer information with Songs.
Conductors - Mainly used by Classical stations, this Participant field is used to associate Conductor information with Songs.
Musicians - The Musicians column displays any musician Participants that are associated with the song.
Orchestras - The Orchestra Participant field is used to associate Orchestra information with Songs.
Producers - The Producer Participant field is used to associate Producer information with Songs
Vocalists - The Vocalists column displays any vocalist Participants that are associated with the song.
Writer/Lyricists - The Writer/Lyricists column displays any writer or lyricist Participants that are associated with the song.
Advanced
The Advanced sub-menu shows advanced fields and settings for the assets in the database.
Asset Type - The Asset Type field shows the name of the asset type as defined in the Asset Types tab of the System Configuration. This column is typically used in the All Audio tab.
ID (Asset) – The ID (Asset) is a unique number for the asset in the Zetta database.
ID (Station Specific) - The ID (Station Specific) is an internal ID for an asset's station/cut related data in the Zetta database.
GUID (asset) - The GUID is a unique identifier used in GSelector Integration to keep the events in sync.
Play Rate - The Play Rate column displays the percentage of Time Stretch configured for the asset.
Ignore Song Pitching - The Ignore Song Pitching is set in the Adjustments tab of a song asset. This column will show 'True' when Ignore Song Pitching is enabled for a song.
Short File Name - The Short File name is the name of the audio file when it was initially imported into Zetta (vs. The File Name which is the Current filename after it is Content Managed by Zetta.)
File Path - The File Path displays the location of the audio file for the asset.
Import Location – The Import Location is the location the asset was imported from
File Checksum - File Checksum is a hash value representing the audio file in a brief form (16 bytes / 128 bits). It is extremely unlikely that another file (let alone audio file) with the same hash value exists anywhere in the world. Zetta uses this File Checksum to determine whether the audio file needs to be updated when imported into the system.
Audio Format - The Audio Format will display the format for the audio file such as MP3, PCM or MPG.
Bit Rate - The Bit Rate column will display the bit rate for the audio file.
Channels - The Channels column will show if the audio is stereo or mono.
Sample Rate - The Sample Rate column displays the Sampling Rate in hertz of the audio asset.
VBR - The VBR column displays the VBR status of the asset.
Absolute Peak – Absolute Peak shows the value of the Absolute Peak for the audio
Root Mean Square – The Root Mean Square shows the calculated Root Mean Square value for the audio.
Filtered Peak – The Filtered Peak will give the dB value of the peak.
Average Peak – Average Peak shows the value of the Average Peak for the audio
Loudness (EBU-R128) - The Loudness (EBU-R128) shows the calculated Loudness (EBU-R128) value for the audio
Loudness (Gated) - The Loudness (Gated) shows the calculated Loudness (Gated) value for the audio
Calculated Gain – The Calculated Gain shows the calculated gain value that Zetta uses when normalizing the audio.
Normalize – The Normalize column displays a check box to show if the audio is normalized
Normalize Target – The Normalize Target column displays the normalized value for the asset, set in Tools | Station configuration
Approved - The Approved column will display if the asset is approved or Waiting Approval. This column is only available if one or more of the stations has the Audio needs approval before airing flag checked in the station configuration playback tab.
Cut Name - The Cut Name is an alpha-numeric field used to identify the Cut.
Cut External Id - The Cut External ID displays an external alpha-numeric identification used for the asset by an external source. A Cut External ID is a unique string, a warning prompt will display when a duplicate Cut External ID is entered. To have Zetta automatically assign an assets cut a Cut External ID, enable the Automatically generate Cut External ID in the External ID tab of the System Configuration window then define a Cut External ID mask.
The columns can be sorted in ascending or descending order. The columns can also be reorganized using Grouping to fit the user’s needs and the data can be customized using Zetta Filtering.
Attribute Management
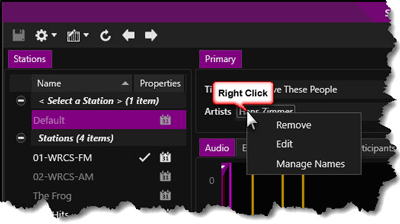
There are a number of attribute fields within the metadata card for each type of asset. From these fields the user can add, remove or manage selected attributes in the Zetta database. Some attributes are Station Specific, such as Category and some are Global attributes, such as Artist, Album, Participant, Sponsors and Products. To Manage these attributes use the Manages Names window for the selected attribute.
To access the Manage window, simply right-click the desired field and select Manage Names from the resulting menu. From this window a corresponding attribute can be added, edited or deleted from Zetta. See also the Custom Fields topic to create new fields in the Metadata card.
|
Important Note!
|
When Zetta is integrated with GSelector the categories for songs and links cannot be managed or edited from Zetta, however existing categories can be assigned. See the GSelector help guide to manage or edit these categories.
|
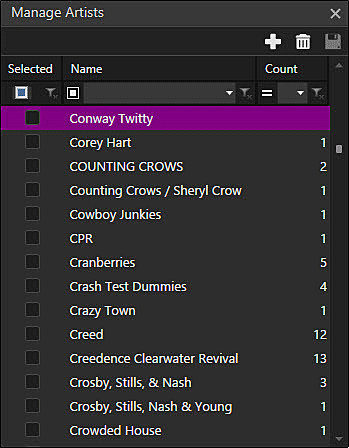
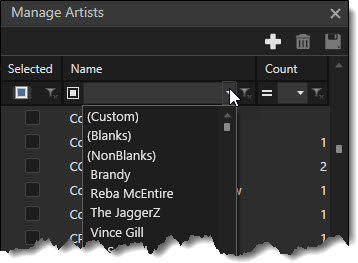
The Manage window displays the Selected attribute(s), a list of available attributes in the Name column and the number of assets using the attribute in the Count column. The selected column will show a checkbox when multiple attributes can be selected and a radio button (circle) when a single attribute can be selected. All these columns can be sorted by clicking on the header of the column. The row just below the column headers is used to filter the list. The default field when entering the Manage window is the Name search, this allows the user to immediately begin typing to search for an existing name. See Managing Attributes of the Step-By-Step section of this topic for more information on this row. See the Custom Filtering section for additional information on using the custom filtering option available when clicking the down arrow of the Name column in this row.
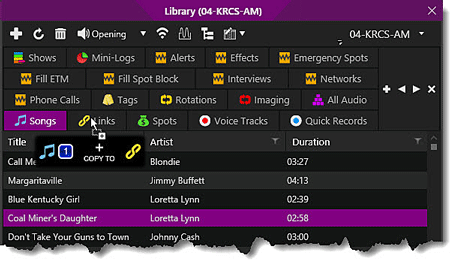
Copy/Move Assets
Assets can be moved or copied to another asset type by dragging and dropping the asset to a different asset tab from within the Library, from any module where the asset is listed (Logs/Stacks/Hot Keys) to the asset tab or by using the Audio Utility toolbar option in the Library. It is recommended the Audio Utility be used when moving or copying multiple assets. Assets can also be copied from within the metadata card of the asset to be copied.
|
Important Note!
|
If Zetta is integrated with GSelector, assets cannot be moved into Songs and Links they can only be copied.
|
Move
To Move an asset from one type to another, simply click and drag the asset from the location to the desired tab in the Library module. When the Move action below is displayed drop the asset. A prompt will display confirming the Move.
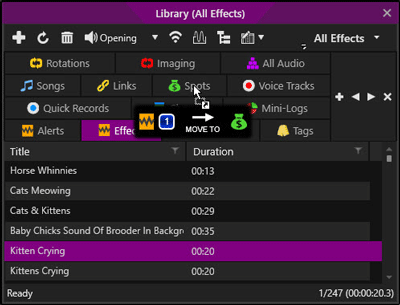
Copy
To Copy an asset from one type to another, simply click and drag the asset from the location to the desired tab, press the CTRL key on the keyboard. Note the Move action changes to a Copy action. When the copy action below is displayed drop the asset. A prompt will display confirming the Copy.
|
Important Note!
|
When assets are moved or copied between asset types the format is not changed. To convert the asset to a different format use the audio utility.
|
Library Module Step-by-Step Topics
This section provides step-by-step instructions for using and maintaining the Library. See the Songs, Spots, Links and Tags topics for more information on individual Asset Types.
In this section: show/hideshow/hide
Managing Attributes
The Manage Attributes windows are used to add, delete, edit and search for attributes such as Artist, Album, Category, Participant, Sponsors and Products. The following topics give step-by-step instructions on working with attributes.
Searching for Attributes
Add Attributes
Delete Attributes using the Manage Names window
Remove Metadata Card Attribute
Searching for Attributes
|

|
To manage the attributes in Zetta, perform the following steps:
|
- From the Modules menu, click Library.
- Select an Asset tab from the Library. (In this example we will use Songs)
- Double-click a song to edit the metadata card.
- Right-click in the Artist field.
- Select Manage Names from the resulting menu.
- Begin typing to search for an existing Artist.
- Use the box to the left of the Name search to change the Operator.
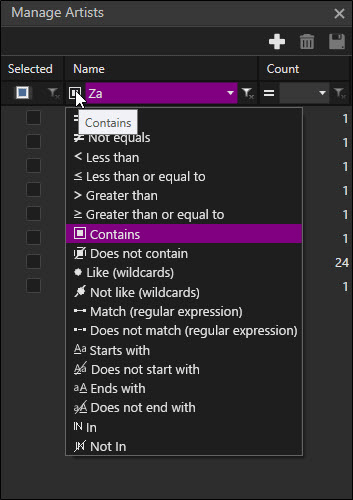
- Click the Box just below the Selected column once to view the names in the list that are not selected.
- Click the selected box again to view the artist(s) that are selected.
- Click the Close Filter
 button to return the window to its default view.
- Use the Count Filter to search for a specific count.
- Click the "=" next to the Count Filter field to change the operator.
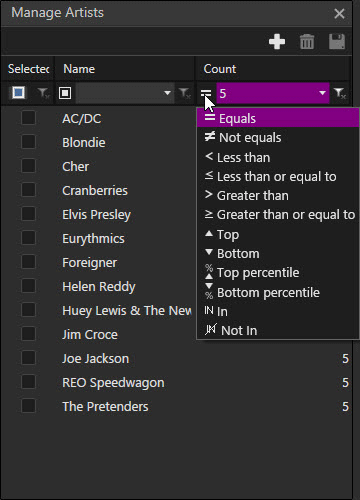
- Click the Close Filter button to return the window to its default view.
Add Attributes using the Manage Names window
|
|
To add an asset attribute such as Artist, Album, Category, Sponsors or Products, perform the following steps:
|
- From the Modules menu, click Library.
- Select an Asset tab from the Library. (In this example, we will use Songs)
- Add or Double-click a song to edit the metadata card.
- Select the Artist field
- Type in the Artist Name. As the name is typed Zetta will search for an existing name to match.
- If the name is not found, simply finish typing the name, then Save the Metadata card. The new attribute will be added to the Zetta database.
- Optionally, Right-click in the Artist field or existing Artist name.
- Select Manage Names from the resulting menu.
- Click the Add button. This will add a new line to the window.
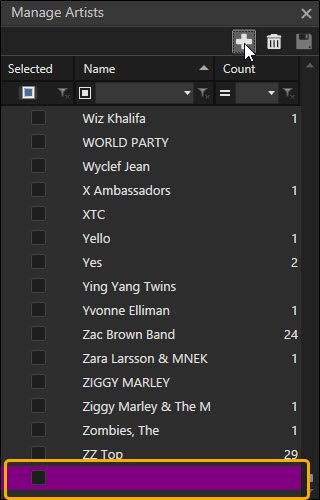
- Type in the Name to add the attribute.
- Press enter when finished or move to another field.
- Repeat for each additional artist.
- Click Save

Delete Attributes using the Manage Names window
The following steps will delete the attribute from the Zetta Database. To remove an attribute from a metadata card see the remove metadata card attribute step-by-step instructions.
|
|
To Delete an asset attribute, such as Artist, Album, Category, Sponsors or Products, using the Manage Names window, perform the following steps:
|
- From the Modules menu, click Library.
- Select an Asset tab from the Library. (In this example, we will use Songs)
- Double-click a song to edit the metadata card.
- Right-click in the Artist field.
- Select Manage Names from the resulting menu.
- Locate and highlight the attribute to delete from Zetta.
- Click the Delete button.
- Click Save
Remove Metadata Card Attribute
Using these steps will remove the artist from the metadata card. It will not remove the artist record from the Zetta Database.
|
|
To Remove an asset attribute such as Artist, Album, Category, Sponsors or Products, from a metadata card field, perform the following steps:
|
- From the Modules menu, click Library.
- Select an Asset tab from the Library. (In this example, we will use Songs)
- Double-click a song to edit the metadata card.
- Place the Cursor next to the existing artist name and press the backspace button on the keyboard.
- Optionally, Right-click in the name of the artist in the Artist field.
- Click Remove
- Add another artist or click save.
Using the CD Ripper
Before using the CD Ripper feature in the metadata card, review the CD Extraction settings and the System Managed Formats section in Audio Format tab of the System Configuration window.
|
|
To add audio to an asset using the CD ripper in the Extra tab, perform the following steps:
|
- From the Modules Menu, click Library
- Select the desired Asset tab
- Add or select an asset
- Select the Extra tab
- Select the CD Ripper
 button
- If using more than one CD drive, select the drive from the drop-down to view the tracks.
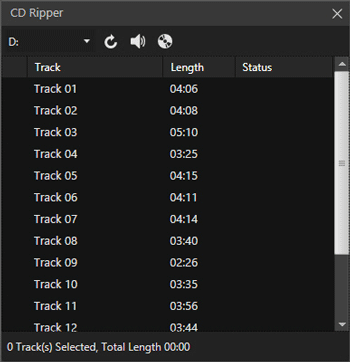
- To preview a selected track, highlight the track and click the preview selected track
 button or simply double-click the track.
- Select the tracks to rip, use the SHIFT and CTRL keys to select multiple tracks.
- Click the Extract Selected Tracks button to rip the tracks to the content store or to the path destination specified in the Audio Format tab of the System Configuration.
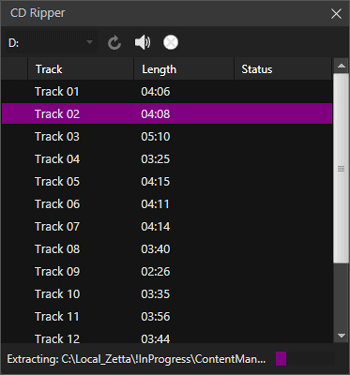
- After the audio has ripped, the CD Ripper window will close. Use the Marks Editor the set the mark values for the audio.
Tip: To rip multiple tracks and merge them into one audio piece, hold the CTRL key while selecting the tracks to merge; make sure to click songs in the correct order. The number of tracks and total runtime of the selected tracks will be visible in the footer of the CD Ripper window. There will be no gaps in between the tracks; this is ideal if the station plays several songs of one particular artist in a row.
Deleting Media Assets
|
|
To delete media assets, perform the following steps:
|
- Highlight the asset to delete.
- Click the Delete the Media button in Library toolbar.
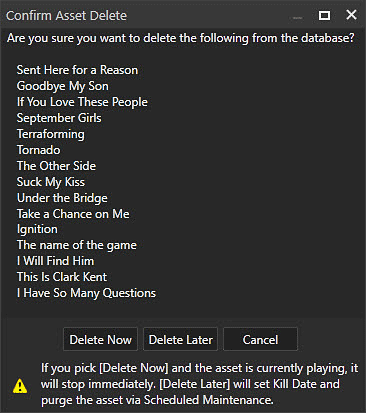
- Click the Delete Now button to delete the asset(s) immediately. This will delete the media asset and remove it from the Library even if the asset is currently playing. Click the Delete Later button to have Zetta set the current date as the Kill Date and then purge the asset(s) when Scheduled Maintenance runs. The Delete Later is hidden for Tags, Rotations, Imaging, Shows and Mini-Logs. Optionally, click Cancel or press Esc, to cancel the delete action and close the window.
|
Important Note!
|
The asset deleted in Zetta by default will only be deactivated in GSelector. However this process can be changed by using the Treat asset deletion from Zetta as: Deactivate or Delete option in the Interfaces window of the Tools menu in GSelector.
|
Audition Library Assets
|
|
There are several ways to audition a Library asset. To audition a Library asset, perform the following steps:
|
- Highlight the asset to preview.
- Click the Audition button. The audio is played back on the Audition Player configured for the computer; see Player Configuration for more details configuring an audition player.
- Clicking the down arrow next to the audition button will give the options that are configured in the Context Menu Customization section of the Auditioning tab in the Preferences Configuration window. The default options in this menu are Audition, Go To Start, Stop, Play-Pause, Opening, Segue and Closing. The top options are used for playback of the audio and the bottom options are used to select the position at which the audio will play. Clicking a position option from the menu will play the audio from the position selected.
- Optionally, simply middle-click the title of the asset to be auditioned and the asset will be auditioned based on the default position. See the Audition Module section of the guide for more information on auditioning assets.
Activating Assets in Zetta®
There are 3 ways to active assets in Zetta
Method 1 - Activate a Single Audio Asset
Method 2 - Activate Multiple Audio Assets
Method 3 - Activate Audio Assets using the GSelector Multi Song Changer
Method 1 - Activate a Single Audio Asset
|
|
To activate an audio asset in Zetta, follow these steps:
|
- Select Library from the Modules menu.
- Double-click the desired Song to open the metadata card
- Select the Station in the Stations tab.
- Select the Station Specific, Cut Specific or Global tab. If an asset is set to active in the Global tab then that asset can play on any station in the database.
- Select the Active check box
- Click Save
- Close the metadata card window
Method 2 - Activate Multiple Audio Assets
|
|
To activate multiple audio assets in Zetta, follow these steps:
|
- Select Library from the Modules menu.
- Select the desired Asset tab
- Select the desired Assets use the SHIFT or CTRL keys to select multiple assets
- Click the Launch Audio Utility button
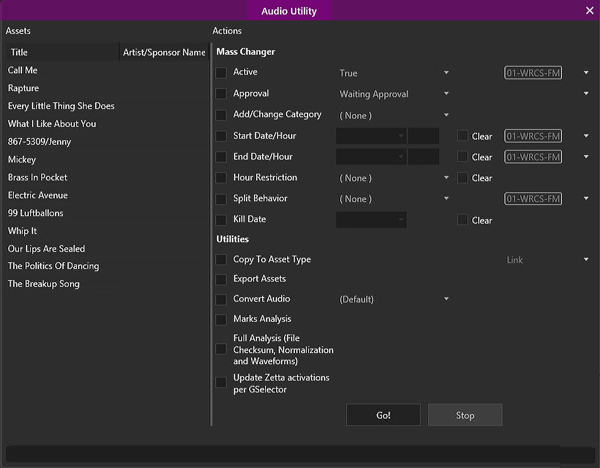
- Select the Active checkbox.
- Select True from the drop-down
- Select the Station from the station drop-down, to activate the audio for all stations select the Default option.
- Click Go!
- Repeat steps to Activate additional audio assets for each asset category.
Method 3 - Activating Audio Assets using the GSelector® Multi Song Changer
If Integrated with GSelector and the Auto Send Audio Changes option is checked, the assets will be sent to GSelector as they are created or imported into Zetta. Using the GSelector Multi song Changer allows the user to activate the asset easily. This tool is useful when also needing to make additional changes such as Category, Attributes and Daypart restrictions. See the GSelector Help guide for more information on these additional features.
|
|
To active songs in GSelector, perform the following steps:
|
- In GSelector, click the Library tab
- Click the Browse tab
- Click Advanced Search

- Click the Add
 button
- For the Attribute Active change the Search Type to False
- Click the Search button
- The Inactive Songs will appear in the right window as selected. Click the checkmark next to the song(s) that are not to be activated to deselect them.
- Select the Multi Song Changer Tab
- Under the Station Coding section select Active radio button
- Select the Category radio button
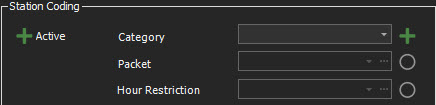
- Select a Category from the drop-down menu
- Click Save

- Click Yes to confirm the changes to the Song(s)
- Click Library | Browse
- Click Close Advanced Search
- Repeat for Links using the Linker | Browse | Advanced Search button
Approving Assets for On-Air Play
|
Important Note!
|
Audio will only need approved if a station has the Audio needs approval before airing option selected for the station. See Station Configuration Details tab for more information on this setting.
|
|
|
To Approve multiple assets in Zetta, follow these steps:
|
- Select Library from the Modules menu.
- Select the desired Asset Category
- Select the Station to view from the Defined Filters drop-down
- Select the Show All Media button to change the view to show all the media Waiting for Approval. (This button is only available if at least one station has the Audio needs approval before airing option selected for the station. See Station Configuration Details tab for more information on this setting).
- Select the desired Assets use the SHIFT or CTRL keys to select multiple assets
- Click the Launch Audio Utility button
- Select the Approval checkbox (this option is only necessary if the Audio needs approval before airing option is selected for the station. See Station Configuration Details tab for more information on this setting).
- Select Approved from the action drop-down
- Select the Station from the drop-down, to approve the assets for all stations select the Default option.
- Click Go!
- Repeat steps to Approve additional audio assets for each asset category
Export Selected Assets to GSelector
|
|
To export selected asset changes to GSelector, follow these steps:
|
- Highlight the media to export, use Shift or CTRL to highlight more than one.
- Click the GSelector® Export button .
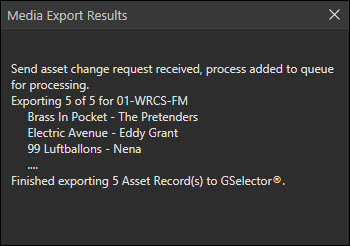
- Click the X close button in the upper right corner to close the results box.
Update Zetta activation's per GSelector
|
|
To Update Zetta activation's per GSelector, perform the following steps:
|
- Select Library from the Modules menu.
- Select the desired Asset Category
- Select the desired Assets use the SHIFT or CTRL keys to select multiple assets
- Click the Launch Audio Utility button
- Select the Update Zetta activations per GSelector option
- Click Go!
See also the Sync Assets with GSelector Tool.
Create Asset Types for the Library Module
|
|
To create a new tab in the Library modules, perform the following steps:
|
- From the Configuration Menu, click System
- Select the Asset Types tab.
- Select the Add New button
- Enter a Name for the new tab in the Name column.
- Optionally, double-click the Description column for the new tab and add a description.
- Click Save in the System Configuration window.
Changing the Library Module Layout
There are several ways to customize the look and layout of the Library Module window.
In the following sections can be used to change the Layout of the Library Module tabs and windows: show/hideshow/hide
Add Columns to the Library
|
|
To add columns to the Library Module in Zetta follow these steps:
|
- Right-click the column heading where the new column is to be added
- From the displayed menu click Insert and choose the item from the menu to be added.
Replace Columns in the Library
|
|
To replace a column in the Library Module in Zetta with a different column, follow these steps:
|
- Right-click the column heading to be replaced with the new column
- From the displayed menu, click Replace and choose the item from the menu to be added.
Remove Columns in the Library
|
|
To remove a column in the Library Module in Zetta follow these steps:
|
- Right-click the column heading to be removed
- Click Remove
Move Columns in the Library
|
|
To move a column in the Library Module in Zetta to a different location follow these steps:
|
- Click and Drag the column to be moved to the location desired.
- Drop the column in the desired location. While dragging the column, a ghost image of the column will be displayed that outlines the column’s position.
Save changes to Library Module Layout
|
|
To Save Changes to the Library Module layout, follow these steps.
|
- Select Layout from the Application Menu.
- Click Save Layout
Welcome < Modules Overview < Library Module
© 2007-2024 RCS All Rights Reserved.