Welcome < Configuration < System Configuration < Live Metadata
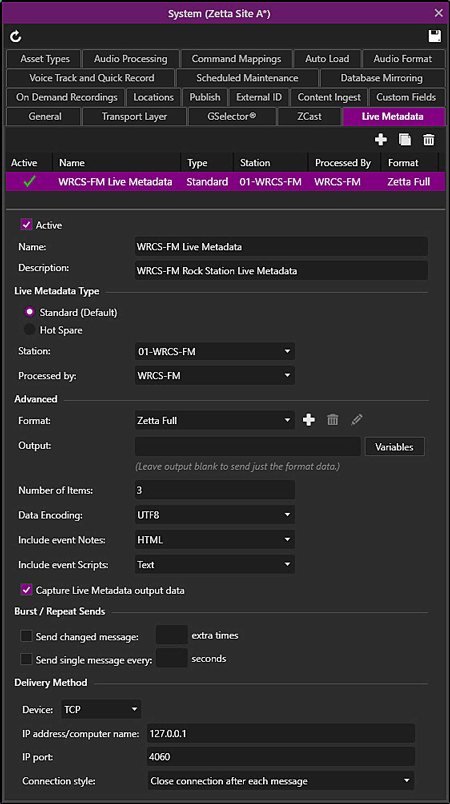
The Live Metadata tab is used to configure the exporting of Live Metadata information to a Radio Show RDS or Live Metadata server. This information is distributed as an ASCI file or as XML. Notes associated with assets can also be included in the data passed to a Live Metadata server. The Live Metadata instances configured in this window are used with the Sequencer Live Metadata Send messages, the Live Metadata Send Module messages and the LiveMetadata.Send Zetta Command messages.
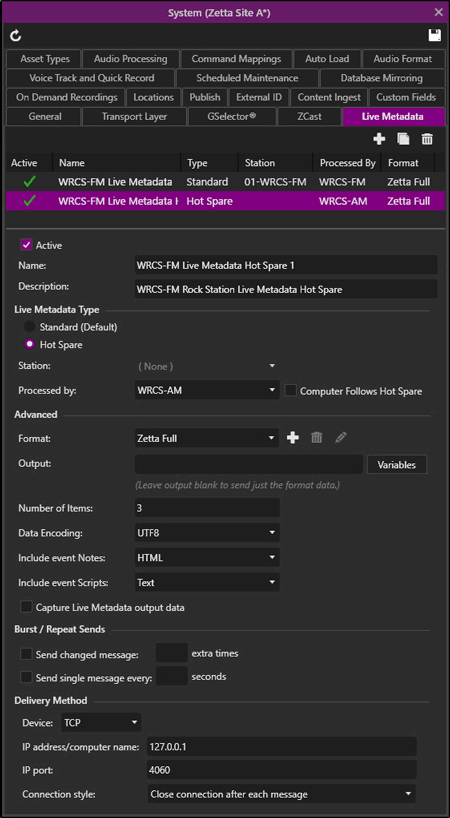
Click any area in this image for help

Click any area in this image for help
In this Topic: show/hideshow/hide
Capture Live Metadata output data
Live Metadata Tab Step-by-Step Topics
Adding a Standard Live Metadata Instance
The Live Metadata tab allows the user to view a list of all the configured servers as well the following configuration options:
 |
Add New Live Metadata – The 'Add New Live Metadata' button will create a new Live Metadata instance. Enter the details to export the Live Metadata, then click the Save |
 |
Copy Live Metadata - The 'Copy Live Metadata' button can be used to copy the currently selected Live Metadata instance to a new Live Metadata instance. This button is useful in creating a Hot Spare Live Metadata instance. |
 |
Delete Live Metadata – The 'Delete Live Metadata' button can be used to remove the selected Live Metadata instance. |
 |
Refresh - The Refresh button can be used to refresh the System Configuration window and return the setting to their previously saved state. |
Clicking the Add New Live Metadata  button will enable the following configuration fields:
Selecting the active option will enable the selected Live Metadata instance.
The Name field is used to identify the Live Metadata instance.
The Description field is used to provide additional information regarding the Live Metadata instance. (Optional)
The Live Metadata Instance can be a Standard instance or it can be a Hot Spare instance. The Hot Spare Live Metadata instance can be used with Studio Switching, recovery from system failure or any other hot spare situation. The Hot Spare Live Metadata is activated when the Configured Hot Spare is armed or activated. See the Hot Spare Configuration for additional details.
Standard - Standard Live Metadata Export is the default option for Live Metadata configurations. The Live Metadata will be for the selected station and processed only by the selected computer.
Hot Spare - When the Hot Spare option is enabled a station is not selected. This allows the Live Metadata to be used in a Hot Spare configuration for any Assigned Station. When a computer is selected, using the Processed By drop-down, the computer is the host of the Live Metadata when the associated Hot Spare is armed or activated.
Computer Follows Hot Spare - The 'Computer Follows Hot Spare' option is available when Hot Spare is selected as Live Metadata Type. This allows the Live Metadata to be used in a Hot Spare Configuration for any Assigned Station. The computer to process this Live Metadata Instance is derived from the associated Hot Spare's Sequencer Computer.
The Station drop-down option is used to select the station that will send the Live Metadata. Where multiple Live Metadata instances exist for a station, any Live Metadata message will be sent to all active Live Metadata instances for the station. The Station can be set to None when enabling the Hot Spare Live Metadata Type.
The Processed By drop-down is used to select the computer that will run the Live Metadata service and process the Live Metadata for the selected station or Hot Spare. A Processed By computer is not required when using the 'Computer Follows Hot Spare' option.
The Format drop-down allows the user to select a predefined XSLT to use to transform the output metadata. The user can select one of the predefined XSLT (Extensible Stylesheet Language Transformations) options or create a new Live Metadata format to use. There are five XSLT formats that ship with Zetta three of which can be edited to fit the needs of the Live Metadata Server. See the Live Metadata Format section of this topic. The existing formats are as follows:
Zetta Full - This format cannot be edited; it is a complex output XSLT format.
Zetta Lite - This format cannot be edited; it is a simpler XSLT format that does not include all the data that is in the Zetta Full format.
Sample 1 - This format can be edited and is the Zetta Full XSLT format without Notes that are associated with the asset to be exported with the Live Metadata.
Sample 2 - This format can be edited and is the Zetta Lite XSLT format with simple text output.
Sample 3 - This format can be edited and is the Zetta Lite XSLT format without Notes that are associated with the asset to be exported with the Live Metadata.
The Output field is used with the HTTP device option. The Output field shows the selected variables that will be output in the Live Metadata Send message to the HTTP site. When this field is blank the Live Metadata send will send the selected Format XSLT information using the HTTP device. Click the Variables button to open the Live Metadata Variables window and view the available variables that can be used. Enter the Variable(s) to use into the Output field or right-click the desired variable from the Live Metadata Variables window, select Copy Variable Name and then paste it into the Output field. The format of the content in the Output field is dependent on the Method selected in the HTTP device settings. When the Method is set to Get the content must start with a question mark and be in the format ?attribute=variable where attribute is any word or phrase such as ?title= or ?Now Playing= then the variable ?title=%TITLE%. Variable pairs can be separated by the ampersand (&) ?Title=%TITLE%&Artist=%ARTIST%. When the Method is set to Post the ?attribute= is not needed.
Examples: HTTP Method = Get
|
Output Field Entry |
Data displayed by web site |
|
?title=%TITLE% |
WHAT'S UP WITH THAT |
|
?Now Playing=%TITLE% %ARTIST% |
WHAT'S UP WITH THAT ZZ Top |
|
?Now Playing=Title - %TITLE% Artist - %ARTIST% |
Title - WHAT'S UP WITH THAT Artist - ZZ Top |
|
?Title=%TITLE% &Artist=%ARTIST% |
WHAT'S UP WITH THAT ZZ Top |
Examples: HTTP Method = Post
|
Output Field Entry |
Data displayed by web site |
|
%TITLE% |
WHAT'S UP WITH THAT |
|
%TITLE% %ARTIST% |
WHAT'S UP WITH THAT ZZ Top |
|
Title - %TITLE% Artist - %ARTIST% |
Title - WHAT'S UP WITH THAT Artist - ZZ Top |
If the web service provider provides a web address with a question mark (?) such as http://www.example.com?attribute=variable1&attribute=variable2 the data before the question mark (http://www.example.com) will be entered into the URL field and the information after and including the question mark (?attribute=variable1&attribute=variable2) will go into the Output field and the HTTP Method will be Get.
The Variables button next to the Output field opens the Live Metadata Export Variables window. The window opens showing the System Variables that can be used in the Output field of the Live Metadata instance. Right-click the desired variable from the Live Metadata Variables window, select Copy Variable Name and then paste it into the Output field.
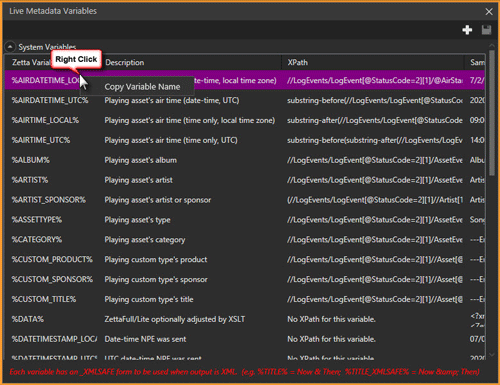
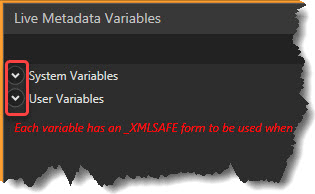
This window has two types of Variables, System Variables and User Variables. Scroll down to see the User Variables section or simply click the up arrow toggle  to the left of the System Variables name to close the System Variables section.
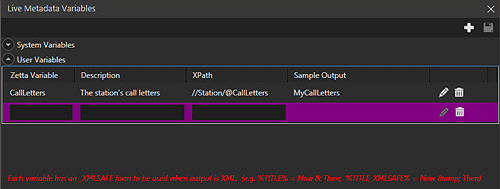
The Add new user defined variable  button in the toolbar will add a line in the User Variables section allowing the user to define new Variables. The Edit the user variable
  button can be used to edit an existing user variable. The Delete the user variable
  button can be used to delete an existing user variable. Use the Save
  button to save any changes.
|
Important Note! |
After a Variable has been added to the User Variables they can then be added to the Output field. The variable will need to start with % and end with % when added to the Output field for Zetta to recognize it as a Variable value. |
Number of Items is the number of items that will be loaded or queued at one time. The maximum number of items is 20.
The Data Encoding drop-down allows the user to select the encoding (ASCII, UTF8, UTF16) to be used for the data sent. The Data Encoding to use is typically provided by the web service provider. When ASCII is selected the user can select the 'Code page' to use. The (Zetta default) is code page 28591 (iso-8859-1). The (Windows code page) follows the Windows system locale setting in Language settings window. The (Accents stripped) takes any character that looks like a 7-bit ASCII character with accents and converts it to the 7-bit ASCII character.
For Example: Ó, ó, Ą, ą, Ę, ę, ś, Ł, ł, Ć, ć, Ż, ż, Ź, ź would convert to O, o, A, a, E, e, s, L, l, C, c, Z, z, Z, z
|
Important Note! |
The (Accents stripped) may fail for some characters, but for the majority of cases where a Unicode character looks like a pure ASCII character with accents the accents will be stripped. |
The Include event Notes option is used to include GSelector event Notes. Zetta must be integrated with GSelector.
No Notes - No notes will not output the note.
Text - The Text option will output plain text.
HTML - The HTML option will output HTML (starts with <P> and contains the HTML commands for the styling specified as well as the text).
RTF - The RTF option will output RTF (starts with {\rtf and contains the RTF commands for the styling specified as well as the text).
The Include event Scripts option is used to include Scripts from the Metadata card of the asset.
No Notes - No notes will not output the script.
Text - The Text option will output plain text.
HTML - The HTML option will output HTML (starts with <P> and contains the HTML commands for the styling specified as well as the text).
RTF - The RTF option will output RTF (starts with {\rtf and contains the RTF commands for the styling specified as well as the text).
The Capture Live Metadata output data option when selected will output a log file to C:\ProgramData\RCS\Zetta\!Logging\Debug on the computer that processes the Live Metadata instance with the name:
XX_<ComputerName>_Zetta.ExternalServicesLauncher.exe_ProcessID.xlog
The first two characters of the file name is the date the file was created. The date is followed by the Windows name for the computer. This option can be used to troubleshoot issues if needed.
Send Changed Message n extra times - The 'Send Changed Message n extra times' will send a Live Metadata message n number of times back to back. A maximum value of 100 extra times can be used for this field.
Send single message every x seconds - The 'Send single message every x seconds' will send a Live Metadata message every x number of seconds until a new message is sent, then the new message will be sent out every x seconds and so on. A maximum value of 1440 seconds or 24 hours can be used for this field.
Device - Use the Device drop-down to select the type of Device used from TCP, UDP, Serial or HTTP.
Selecting TCP will require the IP Address or Computer Name of the Live Metadata server that will receive the Live Metadata information and the IP port used to pass the Live Metadata data from Zetta to the server.
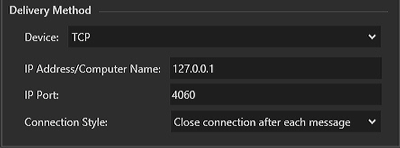
IP Address/Computer Name - The 'IP Address/Computer Name' field is the IP Address or Computer Name of the Live Metadata server that will receive the Live Metadata information.
IP Port - The 'IP Port' is the TCP communication port used to pass the Live Metadata from Zetta to the Live Metadata server.
Connection Style - Use the 'Connection Style' to select how Zetta will connect to the device. When Live Metadata has a message to send, the default connection type, will open a connection to the port, send the data, and then close the connection. However, some applications prefer to keep the connection open for as long as the two connected applications are running rather than connecting and disconnecting for each message. Zetta supports both, Close connection after each message and Keep connection open, connection styles.
Selecting UDP will require the IP Address or Computer Name of the Live Metadata server that will receive the Live Metadata information and the IP port used to pass the Live Metadata from Zetta to the server.
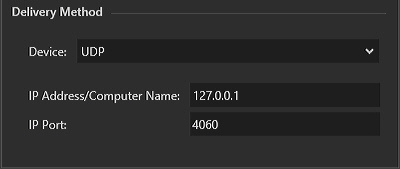
IP Address/Computer Name - The IP Address/Computer Name field is the IP Address or Computer Name of the Live Metadata server that will receive the Live Metadata information. UDP configurations, allow for multiple IPs/hosts:port to be specified in the IP Address field. For multiple destinations, use semicolon (;) as a separator. A Mix of IPs and host names can be specified. A port number can be specified in line of the IP Address. If the port is not specified, Zetta will use the port in the IP Port field.
For example: mark_laptop;216.3.128.12:3456;jeremy_laptop:5678
|
Important Note! |
If the hostname specified changes IP assignments, the sending device will need to be restarted. |
IP Port - The IP Port is the UDP communication port used to pass the Live Metadata from Zetta to the Live Metadata server.
Selecting Serial will require the Comport used and the communication parameters for the Comport connection. See the manufacturer's device documentation for more information on these settings.
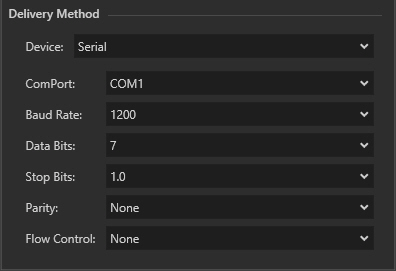
ComPort - Use the ComPort drop-down to select an installed Comport on the processing computer assigned.
Baud Rate - Use the Baud Rate drop-down to select the speed of the device attached to the Comport.
Data Bits - Use the Data Bits drop-down to select the Data Bits for the device attached to the Comport.
Stop Bits - Use the Stop Bits drop-down to select the Stop Bits for the device attached to the Comport.
Parity - Use the Parity drop-down to select the Parity for the device attached to the Comport.
Flow Control - Use the Flow Control drop-down to select the Flow Control used by the device attached to the Comport.
The HTTP devices can be used to send Live Metadata to a Web Service.
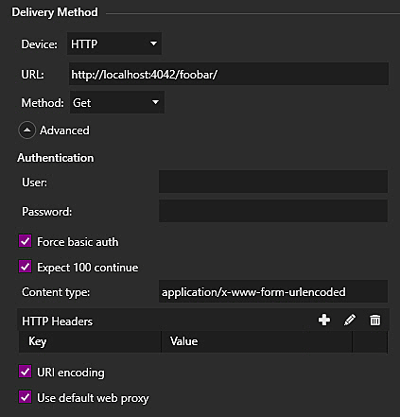
URL – The URL is the web address provided by the web service provider. The URL can have a protocol of HTTP or HTTPS for secure web sites. If the web service provider provides a web address with a question mark (?) such as http://www.example.com?attribute=variable1&attribute=variable2 the data before the question mark (http://www.example.com) will be entered into the URL field and the information after and including the question mark (?attribute=variable1&attribute=variable2) will go into the Output field and the Method will be Get.
Method - The two methods available are Get and Post.
Get - Requests data from a specified resource. The Get Method requires the data in the Output field start with a question mark and be in the format ?attribute=variable where attribute is any word or phrase such as ?Title= or ?Now Playing= then the variable ?Title=%TITLE%. Click the Variables button to open the Live Metadata Variables window and view the available variables that can be used.
Post - Submits data to be processed to a specified resource. The Post Method only needs the variable in the Output field. Click the Variables button to open the Live Metadata Variables window and view the available variables that can be used.
Advanced - Click the circled down arrow  to show the Advanced Authentication configuration for the HTTP device.
User - The User is the User ID provided by the Web Service Provider.
Password - The Password is the password for the User.
Force Basic Auth – The 'Force Basic Auth' when checked will force basic authentication mechanisms to control access to pages and other resources. Check with the web service provider to verify this setting.
Expect 100 Continue - When the 'Expect 100 Continue' option is selected, Zetta will expect a status response code from the web service indicating the User and Password were received. When the Expect 100 Continue option is deselected, this tells Zetta that it should not expect an acknowledgement when it sends User and Password.
Content-Type - The 'Content-Type' is an HTTP Header that is used to indicate the media type of the resource data. The default is application/x-www-form-urlencoded.
HTTP Headers - The 'HTTP Headers' section can be used to add additional HTTP Headers needed for the web service. If additional HTTP Headers are needed they will be provided by the web service provider. Use the Add New HTTP Header  button to add a Key and Value for the header. Use the Edit HTTP Header
  button to edit an existing Key or Value for an HTTP Header. Use the Delete HTTP Header
  button to remove an existing HTTP Header.
URI Encoding – URI Encoding reserves characters as delimiters for a Get request. The reserved characters include the following: :, /, ?, #, &, =. These characters are used in the Output syntax as delimiters. For example, the ‘?‘ indicates the beginning of the Output, and the ‘&‘ separates key/variable pairs in the Output.
Use Default Web Proxy – Selecting this option tells the HTTP service calls to use the system's default configured web proxy.
Live Metadata Export is driven by the "Sequencer Queue" which is a collection of data provided by the Sequencer containing information about the current and upcoming log events in the station's log, distributed by Sequencer to all subscribing services on any change in the log event queue. The Live Metadata Export service is one such subscriber, so is getting notified about queue changes. Some examples of a change that NPE gets notified about:
Log edits:
Manual edit to the log: Insert / delete / move / juggle / skip / segue edit / voice tracking operations in the station log. All of these operations are typically carried out by a user via the Logs module in the Zetta or Zetta2GO application.
System-based edit of the log: Zetta itself can perform changes to the log, if configured to do so.
For example: Fill (Sequencer fills gaps in the log with Fill elements to accommodate timing), Drop (Sequencer drops overscheduled elements to accommodate timing), Traffic Integration (Flat File Load service loads traffic into Spot Blocks when new traffic log is provided) etc.
Asset changes – applies when metadata on the asset present in the Sequencer queue are modified:
Manual edit of an asset: User modifies an asset (e.g. a Title or Artist on the upcoming song, or a Spot Product or Sponsor on the spot in the next Spot Block, or attaches new audio some asset in the queue)
System-based edit of an asset: New audio gets loaded into the system in the background (via Auto Load, ZCast, Site Replication; or, Background Recorder finishes recording into an asset).
When Live Metadata Export receives an updated Sequencer queue, it proceeds to generating a new Live Metadata Export message. This involves performing of an XSLT transformation of Top X Number of Events from the Sequencer queue and encoding it (e.g. UTF-8) to the final Live Metadata Export message, based on the Live Metadata Export Configuration.
Before the Live Metadata Export message is sent out, the XSLT-transformed message is compared to the previous one (if any).
This section will provide step-by-step instructions for common tasks in the Live Metadata tab of the System Configuration window.
In this section: show/hideshow/hide
|
|
To add a Standard Live Metadata Instance, perform the following steps: |
 button.
 button to save the Live Metadata configuration.
|
|
To add a Hot Spare Live Metadata Instance, perform the following steps: |
 button.
 button to save the Live Metadata configuration.
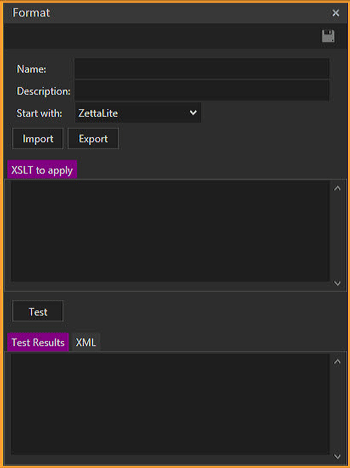
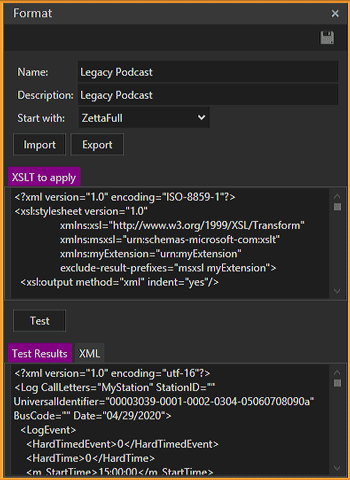
Live Metadata Formats allow the user to create their own XML format to be used in pushing Live Metadata to a server. The user can apply XSLT (Extensible Stylesheet Language Transformations) to transform the Zetta Full complex XML format or the Zetta Lite Simpler XML format to achieve their desired effect.
In this section: show/hideshow/hide
|
|
To add a Format, perform the following steps: |
 button
 button.
 button when finished.
|
|
To edit a Format, perform the following steps: |
 button
 button
 button when finished.
Welcome < Configuration < System Configuration < Live Metadata
© 2007-2024 RCS All Rights Reserved.