Welcome < Zetta Quick Setup < Zetta Quick Configuration
Zetta Quick Configuration
Using the Configuration menu, Zetta can be easily configured to run a station quickly. Zetta can be configured before it is licensed however, licensing warning alerts  will be shown throughout the system until the system is licensed.
|

Important Note!
|
The following configuration is shown in the Zetta Dark Window Theme. This theme is set in the Configuration | Preferences window.
|
In this Topic: show/hideshow/hide
Configure Database Features (System)
The database features enable additional components in Zetta. The following Database Features are available in Zetta.
GSelector® Integration – The GSelector Integration feature option will enable the GSelector® tab to allow the configuration of integrating GSelector with Zetta. Use the latest version of GSelector for all the latest GSelector integration features.
Database Watcher Service - The Database Watcher Service is automatically enabled when GSelector Integration or Site Replication is enabled. The Database Watcher Service is used to assign a machine to notify systems external to Zetta of database changes.
Time Sync Service – The Time Sync Service is for sites with more than one computer running Zetta, this option must be selected and the computer with the time sync device must be chosen to keep the time on all the computers synced to one source.
Status Feed Service - The Status Feed Service is a Service that will return information about each station and vital system information.
Zetta Splits® – Zetta can be setup as a Splits Master or Splits Client that will allow Zetta to send or receive audio, logs and queue commands from another Zetta Station. Splits in Zetta is a subscription based model, which means that any split client can subscribe and listen for split master control events.
ZCast Service – ZCast enables stations to share data and audio between interconnected sites, allowing small stations to be voice-tracked, programmed or updated from combined radio facilities, consultant's offices or remote broadcast locations.
Scheduled Maintenance – Scheduled Maintenance is enabled automatically and corresponds to the Scheduled Maintenance tab in the System Configuration window. The selected computer can be set up to run different maintenance tasks at a specified time to keep Zetta running normally and at best performance.
Zetta2GO® Service - The Zetta2GO Service is used to assign the machine that will be the service Host for Zetta2GO. The Service Host machine must have the required Windows Components and Zetta2GO installed.
Multisite Voice Tracker® - Zetta's Multisite Voice Tracker feature allows users to voice track in a single log for multiple Zetta sites using ZCast.
Site Replication Services - The Site Replication Services are used to sync two or more Zetta sites, to create redundant Zetta systems. These redundant systems can be local or remote allowing for synchronization across a wide area network.
Zetta Cloud Watcher Service - The Zetta Cloud Watcher Service watches for changes to Zetta Cloud such as Voice Tracks created in station logs that are integrated with Zetta. When the Zetta Cloud Watcher Service is enabled the Site Replication Services are also enabled automatically.
Zetta API Services - The Zetta API Services can be used by external applications to communicate with Zetta. Some application plugins may require the Zetta API Services.
|

|
To configure the database features, follow these steps:
|
- In the Configuration menu, select System.
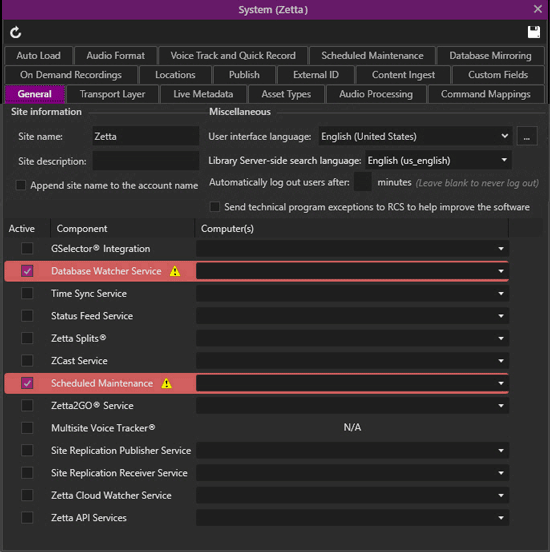
- Edit the Site Name to name the installation, leave the default or enter any name desired.
- Optionally, select the Append Site Name to the Account Name so the site name will display next to the logged in users name in the Menu title bar at the top right corner on the main Zetta window.
- Optionally, set a log out time in minutes using the Automatically Log Out Users After field.
- Use the User Interface Language field to select a site default language; this will translate Zetta to the selected language when Zetta is restarted. See the Translation section for more information on creating a custom translation.
- Select the Library Server-side search language. This will typically match the User interface language selected.
- Optionally, deselect Send technical exceptions to RCS to help improve the software.
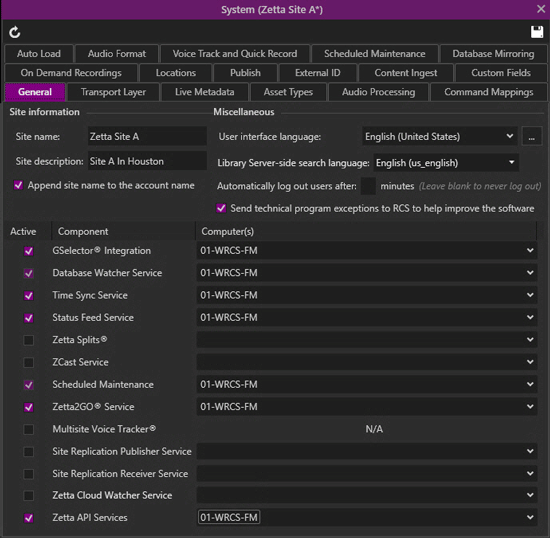
- Check the Active box next to the GSelector® Integration component to allow GSelector to schedule the logs in Zetta.
- Select the Computer responsible for GSelector Integration.
- Select the Computer responsible for the Database Watcher Service. This service must be assigned to a Computer when GSelector Integration or Site Replication is enabled.
- Select the Computer that will run the Database Notify Service and be responsible for notifying other network computers running Zetta, of all database changes.
- Select the Computer to run Scheduled Maintenance. This service must be assigned to a Computer to keep Zetta running normally and at best performance.
- Check the active box next to any other service that will be needed for the desired configuration and assign the computer to run the service.
- Click the Save
 icon to save the settings.
- At each computer assigned in the General tab verify the assigned services start in the Startup Manager. Access the Startup Manager window by double-clicking on the
 icon in the System Tray.
- If the services have not started, click the Stop All button for each service.
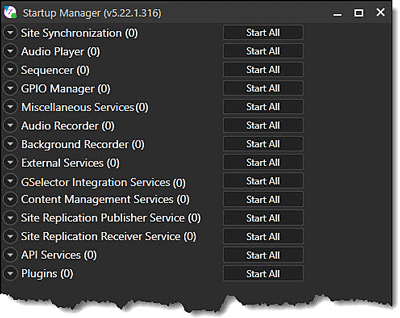
- Once all the services have stopped, click the Start All button for each service used by the computer the exception of the GSelector Service. GSelector will need to be configured in the GSelector tab of the System Configuration window before starting this service. If Start All is selected for a service that is not needed for the computer, Zetta will not start the service.
- Verify that all services selected start correctly. Close the Startup Manager to return it to the system tray.
Configure the Computer
When logging into Zetta for the first time the user is prompted to add the computer using the Computer Setup Wizard. With the addition of this initial computer, a play device and an Stream Group are created for the computer. The default configuration for the Audition Stream Group is the first three streams of the installed play device. For an On-Air computer additional streams will need to be added. For the following setup, an device will be used to setup the On-Air workstation.
|

|
To configure the Computer, perform the following steps:
|
- In the main application window, click the Configuration menu.
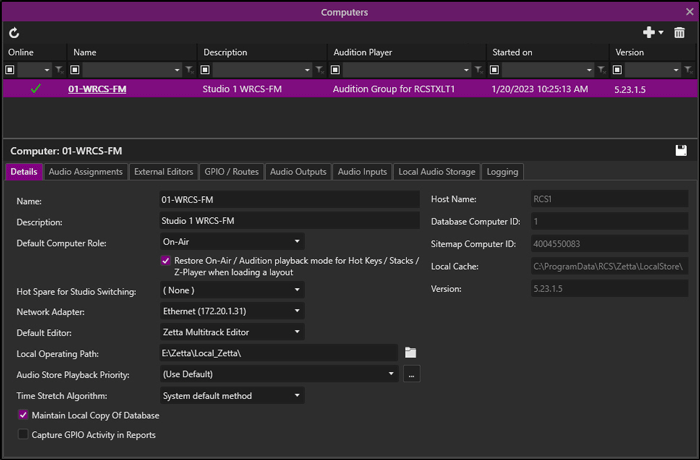
- Click Computers. The computer that was added when Zetta was logged in for the first time should be displayed.
- In the Details tab change the Name and Description if needed.
- Optionally, select a Default Computer Role. Audition is the default for all newly created computers.
- Optionally, select Restore On-Air / Audition playback mode for Hot Keys / Stacks / Z-Player when loading a layout
- Select the Network Adapter that the computer will use to communicate with the other Zetta Computers on the network. This allows Zetta computers and processes to communicate over the correct Network Interface Connection. If this is a laptop or other portable device that will switch from Ethernet cable to Wireless, it is recommended that Host Name be used for this setting.
- Optionally, select the Default Editor. Zetta Multitrack Editor is the default editor for all newly created computers.
- Set the Local Operating Path for Zetta to store local resources such as logging, recordings and temporary conversion files.
- The Audio Store Playback Priority is used to configure and select a priority profile. A priority profile is a collection of configured Content Stores, which are set in a desired order, to be used to select the play location of the asset by the stream group. This is typically setup after the Content Store setup.
- Optionally, select Maintain Local Copy of Database if the computer will be used as a Local Emergency Backup. See the Emergency On-Air Backup topic in the Features section.
- Click the Audio Outputs tab. The first play device is created with the computer setup at initial login.
- Optionally rename the device using the Device Name field.
- Optionally edit the Description of the Audio Output.
- The Technology Type, Zetta Audio Engine (WASAPI - Recommended) is the default and recommended Technology Type to use. Contact RCS Support for assistance or press F1 in the Play Devices tab for additional help.
- Use the Default audio output drop-down menu to select the default audio device for Zetta to use.
- To configure the additional streams needed for an On-Air computer, click the Add Play Stream
 button. For this example, we will use Fifteen streams. The following chart shows the recommended Stream Groups.
|
Stream Group
|
Description
|
Minimum Recommended Streams
|
|
On-Air
(Sequencer)
|
Used for On-Air station play.
|
3 Streams
|
|
Audition
|
Used for Local Playback.
|
3 Streams
|
|
Hot Keys®
|
Frequently used audio control room events saved to Hot Keys.
|
3 Stream
|
|
Stacks
|
Used to play a stacked selection of audio control room events.
|
3 Streams
|
|
Z-Player
|
Used to play audio in the Z-Player Module.
|
3 Streams
|
- Double-click the Short Name field to add a name. (Optional)
- The Stream Name can be changed by double-clicking the Name in the Stream Name column, and entering the desired name.
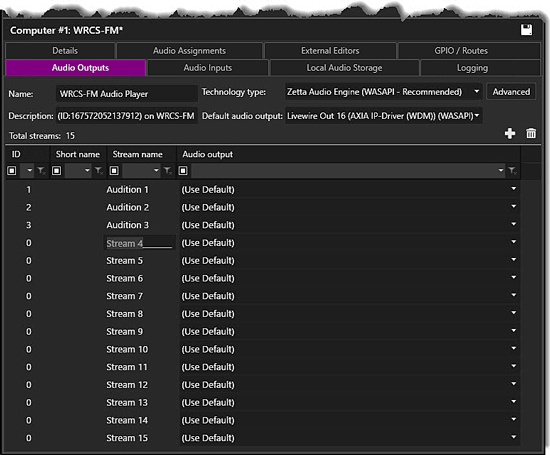
- The Stream can be given a Short Name by double-clicking the Short Name column for each stream.
- For each of the streams configured, select a Play Device.
|

Important Note!
|
Selecting the same Play device for multiple streams, will cause all audio to be played from the same Play device.
When configuring Axia drivers, be sure to select the Axia IP-Driver (WDM), selecting the Axia Wave driver will prevent the play of multiple items simultaneously.
|
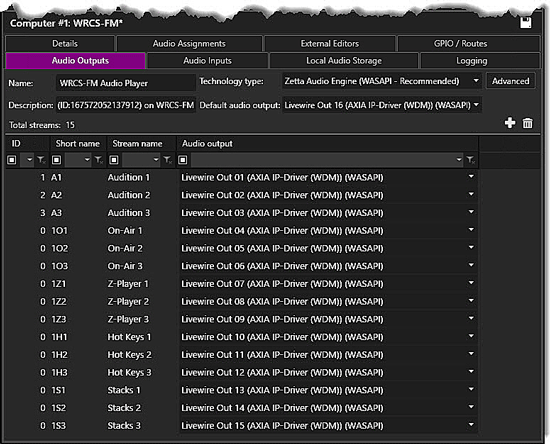
- Once the play streams have been configured, click the Save
 icon.
icon.
- Click OK to the warning that the play device must be restarted for the changes to take effect.
- Select the Audio Inputs tab.
- Click the Active check box to make the audio inputs active for the computer.
- Edit the Name if desired.
- Add a Description for the Audio Inputs for the computer. (optional)
- Click the Add Audio Input
 button.
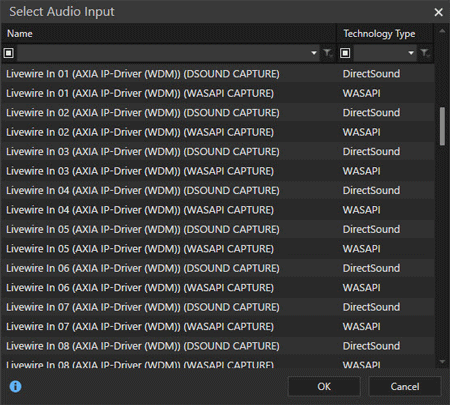
- Select the Audio Input to use from the Select Audio Input window.
- Click OK to except the selection.
- Double-click the Input Name field to change the name. (optional)
- Select the Audio Assignments tab, the Audition Stream Group has been set, but can be changed later using the drop-down menu. The Play Devices and Stream Groups must be defined before additional options are available.
- Use the Voice Tracker/Metadata Card audio input drop-down to select a configured audio input for Voice Tracker and the Metadata Card.
- Use the Zetta Editor default audio input drop-down to select an installed audio input to use as the default record audio input for the Zetta Editor. This is the audio output that will be used for Quick Record in the Zetta Single Track Editor.
- Use the Zetta Editor audio output drop-down to select an installed audio output to use for the Zetta Editor.
- Use the Zetta Editor (Legacy) audio input drop-down to select an installed audio input to use for the Quick Record Module when Zetta Editor (Legacy) is selected as the Quick Recorder Type in the Users Preferences.
- Use the Zetta Editor (Legacy) audio output drop-down to select an installed audio output to use for the Quick Record Module when Zetta Editor (Legacy) is selected as the Quick Recorder Type in the Users Preferences.
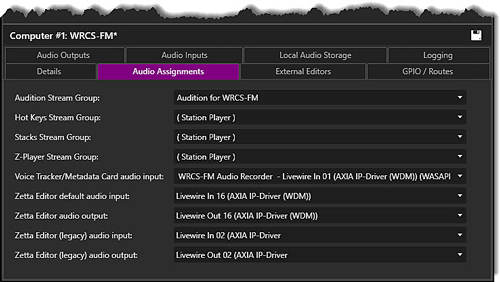
- Click the Save
 icon to save changes.
- For more information on configuring computers, see the Computer Configuration section.
|

Important Note!
|
Anytime a Play Device is changed the Play Device in the Startup Manager will need to be restarted.
|
Add Stream Groups
Stream Groups in Zetta give the ability to group play streams together. This is necessary, as there are times when station playback requires multiple events to be fired simultaneously. Each audio event playing at any given time must have its own play stream. The following are the recommended Stream Groups to be created:
On-Air Group – The On-Air Group (Sequencer) is used for On-Air playback. For the best On-Air sound and playability, use a minimum of three play streams for this group.
Audition Group – The Audition Group is used for Local playback for previewing audio from the Library Module. One play stream is needed for this group, three are recommended.
Hot Keys Group – The Hot Keys Group is used for playing audio back from the Hot Keys Module. Use at least one play stream for this group, three is recommended.
Stack Group – The Stacks Group is used for playing audio back from the Stacks Module. For best On-Air sound and playability, use at least two play streams for this group, three is recommended.
Z-Player Group – The Z-Player Group is used for playing audio from the Z-Player Module. Use at least one play stream for this group, three is recommended.
|

|
To add Stream Groups, follow these steps:
|
- Select Stream Groups from the Configuration menu. The Audition group is already created with the initial computer setup.
- The Name can be changed if desired.
- In the second line type in a description of the Audition Stream Group. (Optional)
- To add additional playback mappings for the Stream Group, click the Add New Stream Group
 button for the desired number of streams.
- For each stream, select the Player configured in the computers play device tab.
- Select the Stream Name to use.
- Use the Verify if Player is Online
 button to verify the players are functioning; the status column will display a green check mark
  . If the Player is not online or not functioning a red
  is visible in the Status column. If the playback stream is online but the device cannot be verified a yellow check mark
  is visible in the Status column. Hover the mouse over the icons in the status column to view the status of the players.
- Optionally, select the Asset Types that can be played for the selected play device (All) Asset Types is the default.
- Click the Save icon
 to add the Player.
- Click the Add New Stream Group
 button or the Copy Selected Stream Group button from the top left pane of the Stream Group window for additional Stream Groups. The Copy button will create a copy of the Stream Group with the exact same settings. The Add New Stream Group button will create an empty Stream Group. The following table shows a list of recommended Stream Groups and number of streams.
|
Stream Group
|
Description
|
Minimum Recommended Streams
|
|
On-Air
(Sequencer)
|
Used for On-Air station play
|
3 Streams
|
|
Audition
|
Used for Local Playback
|
3 Streams
|
|
Hot Keys®
|
Frequently used audio control room events saved to Hot Keys
|
3 Stream
|
|
Stacks
|
Used to play a stacked selection of audio control room events
|
3 Streams
|
|
Z-Player
|
Used to play audio in the Z-Player Module
|
3 Streams
|
- Enter a Name for the new or copied Stream Group.
- In the second line type in a Description of the Stream Group (optional)
- To add play streams for the Stream Group, click the Add Stream to Group
 button for the desired number of streams.
- For each stream, select the Player configured in the computers Audio Outputs tab.
- Select the Stream Name to use. The Audio output is shown.
- Use the Verify if Player is Online
 button to verify the players are functioning; the status column will display a green check mark
  . If the Player is not online or not functioning a red
  is visible in the Status column. If the playback stream is online but the device cannot be verified a yellow check mark
  is visible in the Status column. Hover the mouse over the icons in the status column to view the status of the players.
- Optionally, select the Asset Types that can be played for the selected play device (All) Asset Types is the default.
- Click the Save icon
 to add the Player.
- Repeat steps 10-18 for additional Stream Groups.
- When finished, the Stream Groups window should show all five Stream Groups. If Zetta Splits is enabled additional information and settings are shown in this window.
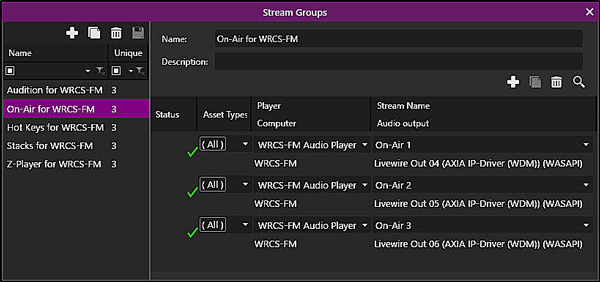
See the Stream Groups Configuration section for more detailed information on players.
Create a Station
This covers the basic setup for a station; for information on Splits, Shifts and Network Operation see the Station Configuration section.
|

|
To create and configure a station, follow these steps:
|
- Using the Configuration menu, select Stations
- Select Add new station
 .
.
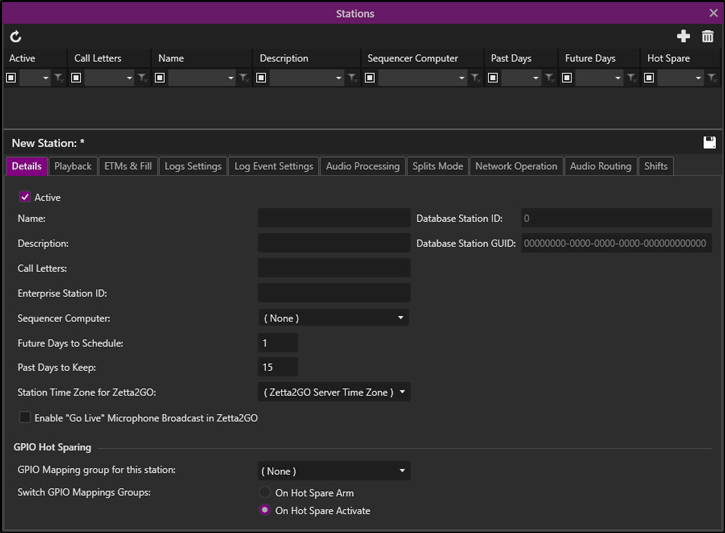
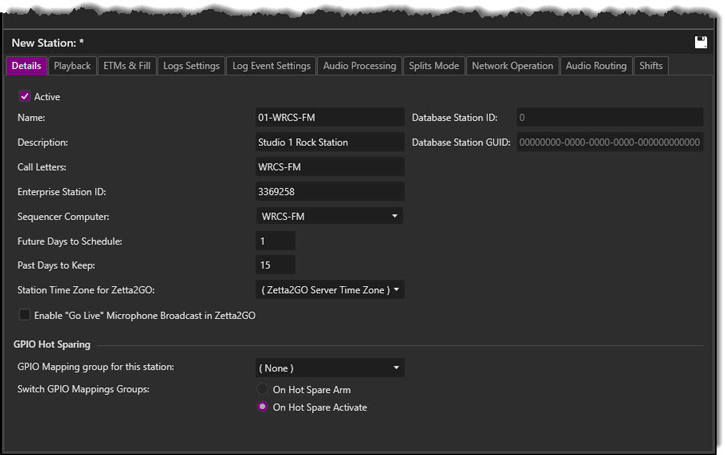
- Select Active to activate the station. This setting will activate the station so that logs can be generated. The station will not be available in the On-Air Module or Log Module unless the Active option is selected.
- Enter a Name to identify the Station in the first space provided
- Enter a Description of the station. (optional)
- Enter the Call Letters of the station.
- Enter an Enterprise Station ID. This is used with external Traffic applications and may not be required for the station. This field can also be exported using Live Metadata feature.
- Select the Sequencer Computer to run the station.
- Optionally, change the number of Future Days to Schedule logs for the station. Schedule Days must be selected in the Scheduled Maintenance tab of the System Configuration window.
- Optionally, change the number of Past Days to Keep logs for the station. Purge Old Logs must be selected in the Scheduled Maintenance tab of the System Configuration window.
- Optionally, change the Station Time Zone for Zetta2GO using the drop-down. This is the time zone used in Zetta2GO for the station.
- Select the Enable "Go Live" Microphone Broadcast in Zetta2GO option.
- Optionally, select the GPIO Hot Sparing options.
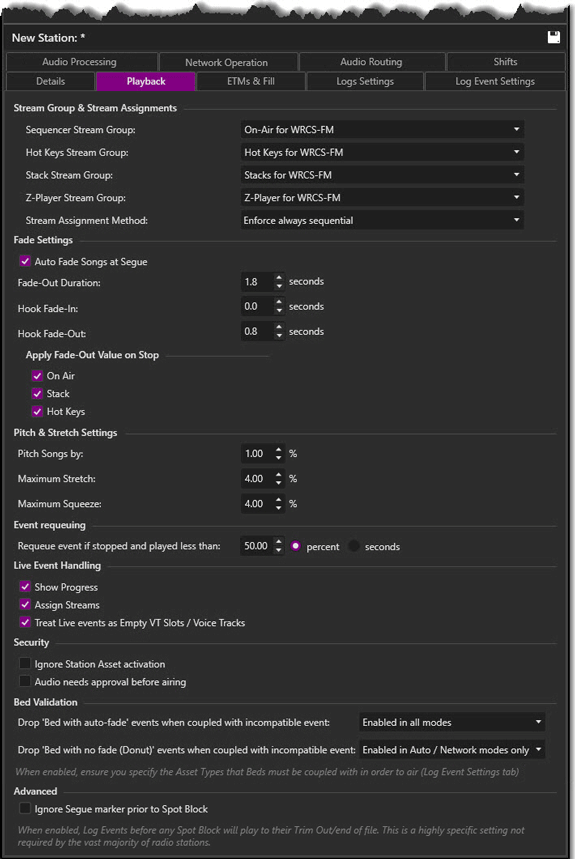
- Select the Playback tab. See the Playback section for more details.
- Select the Sequencer Stream Group created in the Add Stream Groups section of this guide.
- Select the Hot Keys Stream Group created in the Add Stream Groups section of this guide.
- Select the Stacks Stream Group created in the Add Stream Groups section of this guide.
- Select the Z-Player Stream Group in the Add Stream Groups section of this guide.
- Select the Stream Assignment Method.
- Optionally, select Ignore Station Asset Activation.
- Select Audio needs approval before airing if desired. (optional)
- Enabling the Auto Fade Songs at Segue feature will automatically fade songs for the station at the marked segue point for the Fade-Out Duration configured above.
- Optionally, adjust the Fade-Out Duration in Seconds
- Optionally, adjust the Hook Fade-In time in Seconds
- Optionally, adjust the Hook Fade-Out time in Seconds
- Select the check box next to the desired player to Apply the Fade-Out value on Stop
- Optionally, set the percentage that Zetta should Pitch Songs By for the station.
- Optionally, adjust the percentage of Maximum for Stretch and Squeeze to use in the log. The Maximum Stretch and Maximum Squeeze set the amount of pitch that can be applied to the contents of a Spot Block to get the length to the specified time value.
- Set the Requeue event if stopped and has played less than time in percent or seconds of audio played.
- Set how to handle Live Events for the station using the Live Event Handling options.
- Set the Bed Validation to have Zetta validate the bed for play. See also Bed Validation in the Playback tab of the Station Configuration.
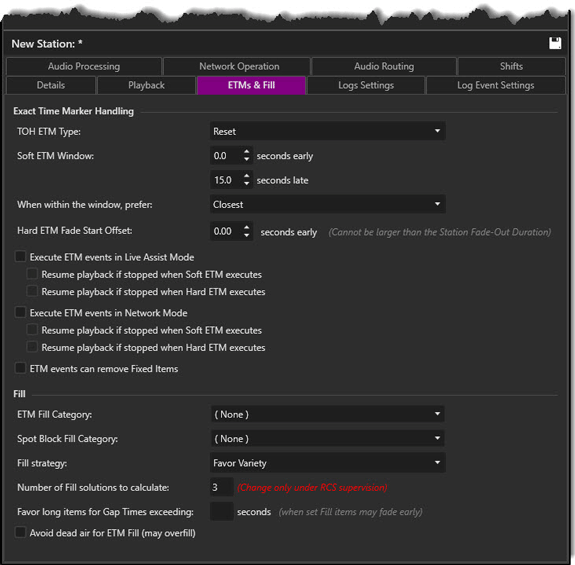
- Click the ETMs & Fill tab. See the ETMs & Fill section for more details.
- Select the TOH ETM Type. The Top of Hour marker in the Log will be treated as a comment unless this option is used. This option is useful if a Spot Block is to be scheduled at the Top of every hour. The default setting is Reset.
- Soft ETM Window, Early: X Late: Y (seconds) - The Soft ETM Window option is used when a Soft ETM is scheduled in the log for the station. If the log is under filled by less than the ETM window stated here, then the event after the Soft ETM will be started and hour fill will not occur. If an event is to start within the Soft ETM window and has more audio after the end of the ETM than before then this event will be skipped and the event after the Soft ETM will be started. For instance, if the Soft ETM window is one minute and the event that is to start is three minutes, there will be two minutes of audio left after the ETM. Therefore, Zetta will skip this event and play the next event after the Soft ETM.
- When within the window, prefer Closest/Over/Under - The option, When within the window, prefer Closet/Over/Under works with the Soft ETM Window setting above to select how the Sequencer will hit the Soft ETM marker. If no Soft ETM window is defined (0/0), then this setting does NOT apply and Zetta will use the legacy default Soft ETM behavior which means the log will stay overscheduled but not by more than one event. If Soft ETM window is defined and the log is overscheduled and starts dropping events:
- If there are NO over/under combinations within the ETM window, Zetta will fall back to the above legacy default Soft ETM behavior.
- If there ARE one or more over/under combinations within the ETM window, the 'When within the window, prefer' setting is applied:
- Over - If Over is selected, Zetta will keep the extra events to stay over but while within the ETM window, Zetta will NOT try to eliminate extra events that may exist while still staying over.
- Under - If Under is selected, Zetta will keep on eliminating events until the window is no longer overfilled but still within the ETM window.
- Closest - If Closest is selected, if multiple over/under options exist, Zetta picks the one closest to the Soft ETM time, while still within the ETM window.
- Execute ETM events in Live Assist Mode - The Execute ETM events in Live Assist Mode option is typically used with Backtiming. When this option is selected the user is presented with two options for playback when the ETM executes:
- Resume playback if stopped when Soft ETM executes - When this option is selected and the Sequencer is in Live Assist mode all fixed events will play before the next Soft ETM. If this option is enabled when the sequencer is in Live Assist mode the Soft ETM events will execute the same as if the sequencer were in Auto mode.
- Resume playback if stopped when Hard ETM executes - When this option is selected and the Sequencer is in Live Assist mode all fixed events will play before the next Hard ETM. If this option is enabled when the sequencer is in Live Assist mode the Hard ETM events will execute the same as if the sequencer were in Auto mode.
- Execute ETM events in Network Mode - When the Execute ETM events in Network Mode option is selected, the user is presented with two options for playback when the ETM executes:
- Resume playback if stopped when Soft ETM executes – When this option is enabled and the station is in Network mode and idle (not playing a Log Event), executing a Soft ETM will drop anything prior to the ETM and start playing the Log Event immediately after it. The event that needs to fire should be immediately adjacent to the Soft ETM; if it is not (say there is a Comment), the playable event (e.g. a Spot Block) will not be fired. Only the next event will play when in Network mode. When the event is finished, all playback will stop as all events are treated as having a stop chain in Network Mode.
- Resume playback if stopped when Hard ETM executes - When this option is enabled and the station is in Network mode and idle (not playing a Log Event), executing a Hard ETM will drop anything prior to the ETM and start playing the Log Event immediately after it. The event that needs to fire should be immediately adjacent to the Hard ETM; if it is not (say there is a Comment), the playable event (e.g. a Spot Block) will not be fired. Only the next event will play when in Network mode. When the event is finished, all playback will stop as all events are treated as having a stop chain in Network Mode.
- ETM events can remove Fixed Items - Enabling the ETM events can remove Fixed Items option, will allow Zetta to remove any fixed events from the Log in the situation where there are more fixed events scheduled than there is time remaining before ETM.
- The ETM Fill Category field is used to specify the category used to fill audio to meet exact time markers (ETMs). Categories are created in the Station Specific tab of the Library asset. The Category can be a Song, Link or custom Asset Type Category. This can be set after GSelector is configured and synced to Zetta or after Categories are created in Zetta.
- The Spot Block Fill Category field is used to specify the category used to fill audio to meet a specified Spot Block length. Categories are created in the Station Specific tab of the Library asset. The Category can be a Song, Link or custom Asset Type Category. This can be set after GSelector is configured and synced to Zetta or after Categories are created in Zetta.
- Select the Fill Strategy to use.
- Optionally, set the seconds for Favor Long Items for Gap Times Exceeding x seconds (when set Fill items may fade early)
- Optionally, check the Avoid dead air for ETM Fill option.
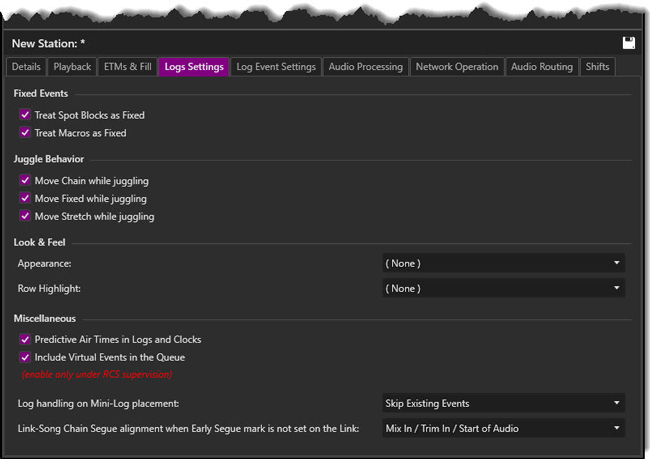
- Select the Logs Settings tab. See the Logs Settings section for more details.
- Optionally, set the Treat Spot Blocks as Fixed option. This option is used with Backtiming. This option will set all Spot Blocks in the Log as Fixed. If a Spot Block is set as Fixed the events in the spot block are also fixed.
- Optionally, set the Treat Macros as Fixed option. This option is used to set all Macros scheduled in a log as Fixed. When a macro is set as fixed all events within the Macro are set as fixed.
- Select the Juggle Behavior for Chain, Fixed and Stretched events that are juggled.
- See Themes & Appearances section for information on the Appearance and Row Highlight options.
- Select Predictive air times in Logs and Clocks if desired. This will cause log and clocks to process future hard/soft ETM events showing pre drops around the ETM events. (optional)
- Optionally, select to Include Virtual Event in the Queue.
- If using GSelector select the Update the Spot Blocks in GSelector when the Fill Length changes. This is only shown when this station is integrated with a GSelector station. (optional)
- Optionally, change the Log handling on Mini-Log placement using the drop-down. See the Mini-Logs section for more details on Mini-Logs.
- Optionally, set the Link-Song Chain Segue Alignment option. The Link-Song Chain Type will set the start of the next event at the early segue point of the previous event. This 'Link-Song Chain Segue Alignment when Early Segue Mark is not set on the Link' option is used for lining up the previous and the next event when an Early Segue Mark is not set.
- Select the Log Event Settings tab. From this tab the user can configure whether to reconcile assets played from Hot Keys, Stacks and Z-Player and at what point of play the asset will be treated as played when On-Air for reconciliation. See the Log Event Settings section for more details.
- Select the Asset/Event type in the top pane of the Log Event Settings tab.
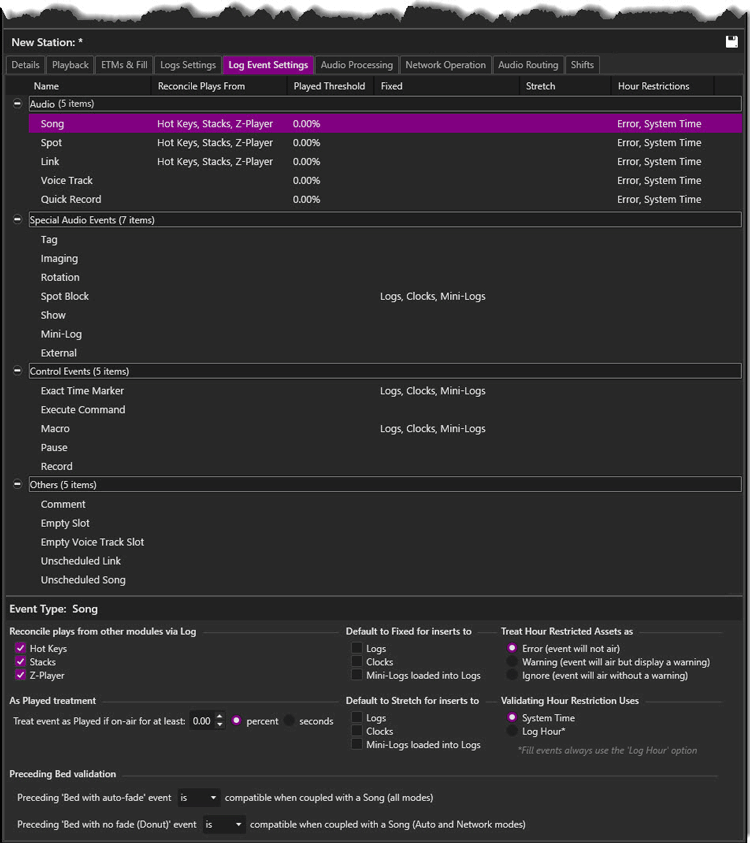
- In the bottom pane select the module(s) to reconcile asset in the Reconcile plays from other modules via Log section.
- Optionally, select the options to set the Default to Fixed for inserts to of the selected event into Logs, Clocks and Mini-Logs loaded into Logs.
- Optionally, change the Treat Hour Restricted Asset as option. The Treat Hour Restricted Assets setting is used to set how Zetta will treat assets, which are assigned an hour restriction grid, that are place in the log or played during the restricted hour. When Error is selected, Zetta will not allow the asset to be played. When Warning is selected, Zetta will allow the asset to be played but will show a warning to the user. When Ignore is selected, Zetta will ignore the hour restriction and play without warning the user.
- Enter a percent or seconds value for the Treat event as Played if on-air for at least option.
- Optionally, select the options to set the Default to Stretch for inserts to of the selected event into Logs, Clocks and Mini-Logs loaded into Logs.
- Optionally, change the Validating hour Restriction Uses option. Zetta can restrict based on the System Time hour or the Log Hour. When System Time is set, Zetta will use the ‘clock on the wall time’ to verify if an asset is outside of its Hour Restriction. When Log Hour is set, Zetta will look at the currently playing hour in the Log and verify against that.
- Set the Preceding Bed Validation for each asset type. See also Bed Validation in the Playback tab of the Station Configuration.
- Select the Audio Processing tab. Normalization is the process of increasing (or decreasing) the amplitude of an entire audio signal so that the resulting peak amplitude matches a desired target. Normalization can be set for each type of asset.
- Optionally, select Limit Peak. When Limit Peak is checked the Absolute Peak will be at 0dB
- Select the check box next to the desired audio to be normalized.
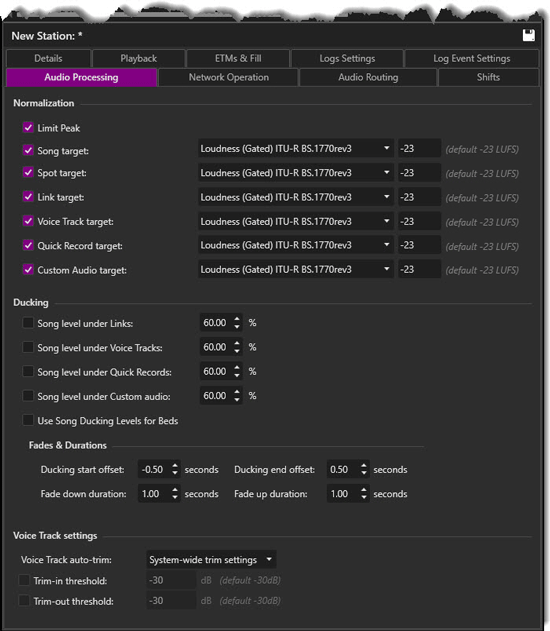
- Select the Normalization algorithm to be used by Zetta:
- Absolute Peak – (As used in AFC 4.0) Absolute peak normalization checks every sample in the audio file and calculates the largest audio peak value.
- Root Mean Square – (As used in Selector/MC 15) Uses the square root mean algorithm to calculate peak values, which is the square root of the mean or middle of the squares of the values.
- Filtered Peak – (As used in AFC 3.0) Filtered peak normalization analyzes all the samples within an audio file and calculates the peak level by ignoring 5% of highest samples.
- Average Peak – Average peak normalization which is new with Zetta, analyzes all the samples within an audio file and calculates the median or middle value of the top 5% of the peaks.
- Loudness (EBU R128) ITU-R BS.1770rev0 - Loudness normalization is concerned with balancing audio according to their actual perceived loudness. The EBU R128 is the recommended level of loudness at -23LUFS. The ITU-R BS.1770 standards provide an algorithm for quantifying the loudness and loudness level of a given audio asset in loudness units (LU or LUFS).
- Loudness (Gated) ITU-R BS.1770rev3 - Loudness (Gated) ITU-R BS.1770rev3 is an algorithm to measure audio loudness of a Gated block of audio. This is the default setting and is recommended for Broadcast audio.
- Set the Ducking levels to use for songs when played in the log with other asset types. See the Audio Processing section for more details.
- Set the Voice Track settings for the station. It nothing is set for Voice Track settings for the station then the Configuration | System | Audio Processing | Voice Track settings will be used.
- Click the Save
 icon.
icon.
- To create additional stations, click the Add New Station
 icon and repeat steps 2-12.
- Verify that all Station Sequencers start correctly. Access the Startup Manager window by double-clicking on the
 icon in the System Tray. If the Sequencer does not start verify the Configuration and the Licensing for the station.
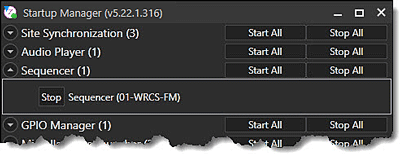
- Close the Startup Manager to return it to the system tray.
For more information on Stations, Shifts and Network Operation see the Station Configuration section.
Content Store Setup
Content Stores in Zetta® allows the user to store and manage media assets and backups in a specified network location. This section will detail the steps needed for configuring and using Content Stores for Media and Backup storage in Zetta. A Store can be configured to store just the media files and a separate store for the backup files or the stores can be configured to hold both the audio files and backup files.
Note: Content Store setup is not required in a stand-alone environment, but is highly recommended when using Zetta.
Audio Store
|

|
To configure Content Stores for Audio in Zetta, perform the following steps:
|
- Go to Configuration menu and click Content Stores
- Click the Add Store
 button.
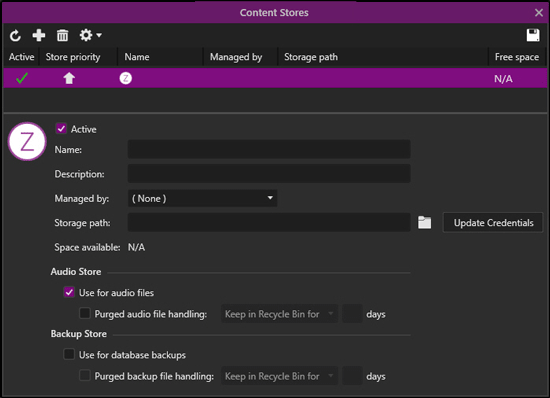
- Enter in a Name for the Content Store.
- Optionally, enter a Description for the Content Store.
- Select the computer that will manage the store from the Managed By drop-down list.
- Specify the Storage Path location or browse to the shared directory for the Content Store.
- Click the Update Credentials button to enter a valid user name and password to access the Storage Path.
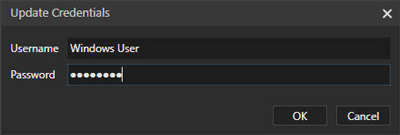
- Select Use for audio files in the Audio Store section drop-down
- Optionally, select the Purge audio file handling option. Then select the setting on when Zetta should purge the audio in the Recycle Bin.
- Don't use Recycle Bin (purge immediately)
- Keep in Recycle Bin for x days
- Keep in Recycle Bin until total size exceeds x GB
- Click Save
 .
.
- Repeat for each Media Store.
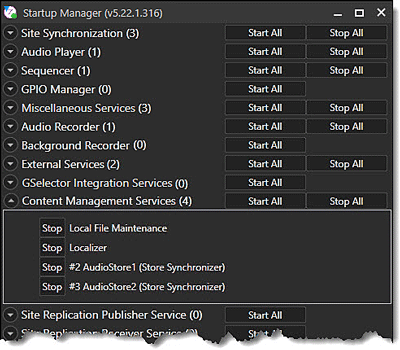
- Access the Startup Manager window by double-clicking on the
 icon in the System Tray to verify all the Content Management Services created start. If the services do not start automatically, click the Stop All button for the Content Management Services group.
- Once all the services have stopped, click the Start All button.
Backup Store
|

|
To configure Content Stores Backup Store for Zetta, perform the following steps:
|
- Go to Configuration menu and click Content Stores
- Click the Add Store
 button.
- Enter in a Name for the Content Store.
- Optionally, enter a Description for the Content Store.
- Select the computer that will manage the store from the Managed By drop-down list.
- Specify the Storage Path location or browse to the shared directory for the Content Store.
- Click the Update Credentials button to enter a valid user name and password to access the Storage Path.

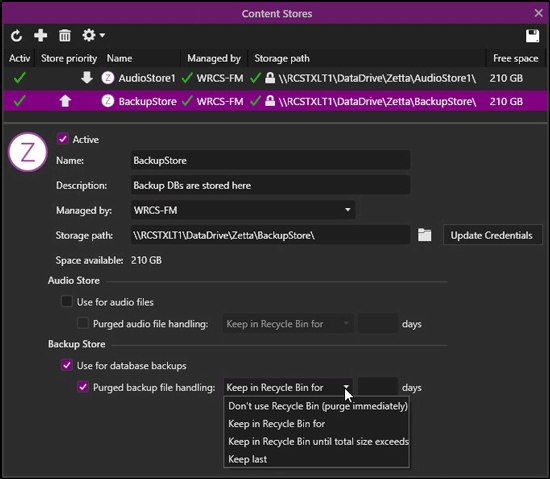
- Select Use for database backups in the Backup Store section drop-down
- Optionally, select the Purge backup file handling option. Then select the setting on when Zetta should purge the audio in the Recycle Bin.
- Don't use Recycle Bin (purge immediately)
- Keep in Recycle Bin for x days
- Keep in Recycle Bin until total size exceeds x GB
- Keep Last x backups
- Click Save
 .
.
- Repeat for each Backup Store.
- Access the Startup Manager window by double-clicking on the
 icon in the System Tray to verify all the Content Management Services created start. If the services do not start automatically, click the Stop All button for the Content Management Services group.
- Once all the services have stopped, click the Start All button.
- Ensure all the Content Management Services start.
See the Content Stores topic, for more detailed information on Content Stores.
Create a Flat File Assignment to Load Traffic
If GSelector Integration is not used, then a Flat File Assignment can be created to assist in the loading of Music and Traffic into the Logs.
|

|
To create a Flat File Assignment in Zetta, perform the following steps:
|
- From the Configuration menu, select Flat File Assignments
- Click the Add Flat File Assignment
 button
- Enter a Name for the Flat File Assignment.
- Optionally, enter a Description for the Flat File Assignment.
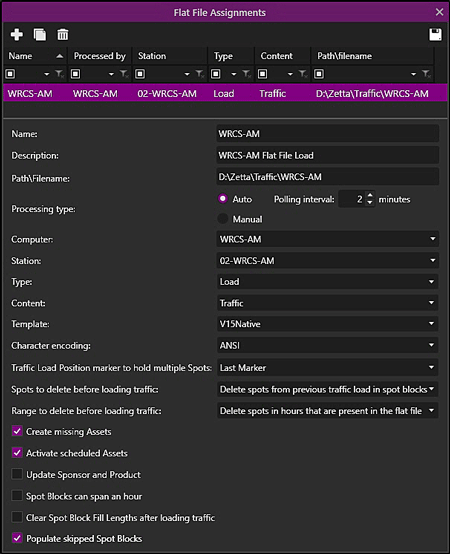
- Enter the Path/Filename where the Flat File can be located. To use Filename variables as seen in the illustration below, see the Zetta Variables section.
- Select the Processing Type desired, if Manual is selected there is a Load Traffic/Music from Flat File
 button in the Logs Module. See the Clocks and Logs section for more details.
- Select the Computer that will look for the flat file when using Auto as the Processing Type
- Select the Station to load the flat file.
- Optionally, select the Traffic Load Position marker to hold multiple Spots option. This option is used when the Traffic Load Position Control Event is placed in a Spot Block. This option is only available when Load is selected as the Type and Traffic is selected as the Content. See the Flat File Assignments section for more details.
- Select the Type of Flat File.
- Select the Content.
- Select the Template for Zetta to use. Additional Templates can be created contact RCS Support for details.
- Select the Character Encoding.
- Optionally, select the Spots to delete before loading traffic option. This option is only available when Load is selected as the Type and Traffic is selected as the Content. See the Flat File Assignments section for more details.
- Optionally, select the Range to delete before loading traffic.
- Optionally, select the Create missing assets option to create any assets that are found in the traffic load file but not in Zetta.
- Optionally, select the Activate scheduled assets option.
- Optionally, select the Update Sponsor and Product option. This option is only available when Load is selected as the Type and Traffic is selected as the Content. See the Flat File Assignments section for more details.
- Optionally, select the Spot blocks can span an hour option. This option is only available when Load is selected as the Type and Traffic is selected as the Content. See the Flat File Assignments section for more details.
- Optionally, select the Clear spot block fill lengths after loading traffic option. This option is only available when Load is selected as the Type and Traffic is selected as the Content. See the Flat File Assignments section for more details.
- Optionally, change the Populate skipped Spot Blocks setting.
- Click the Save
 button to save the assignment.
- Repeat for Flat File Type Reconcile.
- Verify the Flat File Load & Reconciliation service in the Miscellaneous Services section of the Startup Manager has started.
- Repeat for each Station and Day as necessary.
Configure GSelector Integration
The System Window in Zetta is used to configure GSelector® Integration, for Log programming and to specify the machine responsible for notifying the network of database changes.
|

Important Note!
|
Prior to attempting to enable GSelector Integration, it is recommended that all tasks in the Getting Connected to GSelector section have been completed.
Always use the latest version of GSelector to take full advantage of the functionality and integration between Zetta and GSelector.
|
Getting Connected to GSelector
Verifying GS Web Services
Verifying Connectivity
Assigning GS Hold Categories
Configuring Zetta System Options
Configure Custom Fields in Zetta
Add a New Custom Field
Enabling GSelector Integration
Zetta System GSelector® Settings
GSelector Interfaces Settings
Getting Connected to GSelector
Before configuring GSelector Integration in the System Options, it is critical that the following steps are completed:
- Ensure GSelector is properly installed and runs without errors: In order to configure integration, GSelector must be present and running. Ensure GSelector launches without errors and has one On-Air Station configured. Consult the GSelector Help Guide or contact RCS Support for assistance with GSelector questions.
- Ensure GSelector web services use IIS in Windows for Network configuration: Verify GSelector web services are installed before configuring integration; see the Verifying GS Web Services information in this section.
- Verify Zetta Workstation can successfully connect to GS web services: To ensure communication can occur without issues, test the connectivity prior to configuring integration; see the Verifying Connectivity information in this section.
- Assign Hold Categories in GSelector: In order for a station to be eligible to participate in integration, hold categories must be assigned to the station. For more information on assigning these Hold Categories, see the Assigning GS Hold Categories in this section.
Verifying GS Web Services
|

|
To verify web services are properly installed with IIS, follow these steps:
|
- Go to Start | Run and type in inetmgr
- Press ENTER or click OK.
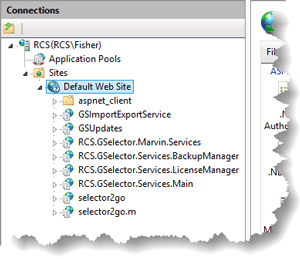
- In the left frame, expand <System Name>\Web Sites\Default Web Site, verify the GSImportExportService and the RCS.GSelector.Marvin.Services is installed.
- Open the GSelector Editor to verify the RCS.GSelector.Marvin.Services services are running,
- Once verification of the services is completed, close the IIS Manager window.
- Now, attempt to connect to the GSImportExportService from the Zetta® machine as outlined in the Verifying Connectivity section of this topic.
|

Important Note!
|
If these services are not present, contact RCS Support.
|
Verifying Connectivity
|

|
To verify the Zetta Computer can connect to the GS Web Services, follow these steps:
|
- Open the default web browser from the Computer that will be assigned to run the GSelector Service.
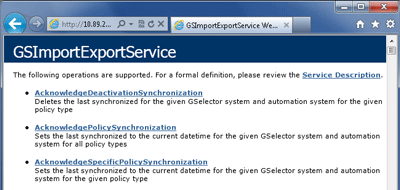
- Access the address for the GSImportExportService from the Zetta Computer. The format of this address is:
IIS = [http://<GS IP Address>/gsimportexportservice/gsimportexportservice.asmx]
|

Important Note!
|
If the above web page is not displayed contact RCS Support for assistance troubleshooting connectivity issues.
|
Assigning GS Hold Categories
|

Important Note!
|
In GSelector, a station will not be eligible to participate in any implementation of integration until the Song and Link Hold Categories have been designated.
If these have not been specified for a channel, the channel will show as ineligible in the Interfaces window of GSelector:

|
|

|
To configure Hold categories used for deleted Songs and Links, perform the following steps:
|
- Open GSelector, and choose the station to configure.
- Click Goals |Categories
- Verify there are a Song Hold Category and Group. GSelector will create two categories by default when a station is created; A1 which is used by the Clock and a default Z - Hold category. If a Hold category does not exist for the station one will need to be created, see the GSelector help guide for information on creating a Category and Category Group.
- Click the LINKER | Link Goals | Categories
- Verify there are a Link Hold Category and Group. GSelector will create two categories by default when a station is created; al1 which is used by the Clock and a default ZLink - Hold category. If a Hold category does not exist for the station one will need to be created, see the GSelector help guide for information on creating a Category and Category Group.
- Once the required categories have been created, go to Setup | Hold Categories.
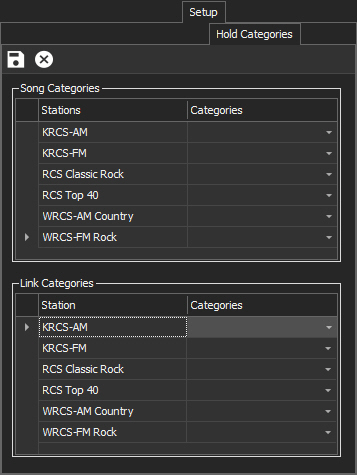
- In the Song Categories section, select the Category for Songs. This must be done for each station that will participate in the integration.
- In the Link Categories section, select the Category for Links. Select a Category for each Station that will participate in integration.
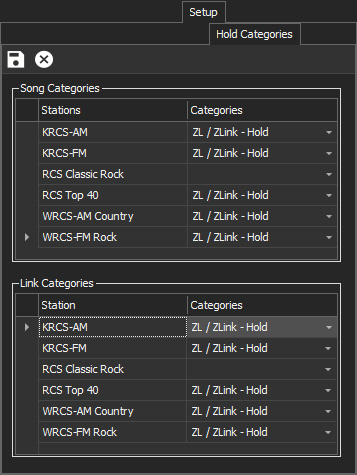
- Click the Save
 button to save changes.
- Follow steps 2 – 13 for additional stations being integrated with Zetta®; use the Stations menu to change stations.
Configuring Zetta System Options
|

|
To configure System Options for GSelector Integration, perform the following steps:
|
- In the Configuration menu, select System.
- In the Features section of the General tab, click the Active box next to GSelector® Integration if it is not already active.
- If GSelector Integration is already active, skip to Zetta System GSelector Settings.
- Select the Computer from the computer drop-down. When GSelector Integration is enabled, the GSelector configuration tab is made visible in the System Configuration window:

- Select the Computer responsible for the Database Watcher Service. This service must be assigned to a Computer when GSelector Integration is enabled.
- Click the Save
 icon to save settings.
Configure Custom Fields in Zetta
The Custom Fields can be used to configure attribute and text fields in Zetta. When Zetta is integrated with GSelector, most of the attributes in GSelector can be mapped to Zetta Custom Fields. The following tables and examples show how to match the supported fields. When Custom Fields are created to match GSelector fields, Zetta and the GSelector Integration Services must be restarted.
NOTE: Ensure you select Allow New Values for all of these Custom Fields so GSelector can create any non-existing attribute values.
The Additional attributes found in the Additional tab of the Song or Link card in GSelector will have a Scope of Global, a Value Type of Attribute and allow for single or multiple values. Some of the Attributes from the Additional tab of GSelector are already in Zetta. The Publisher and Label attributes are already fields in the Extra tab of the Song metadata card and are not currently supported for Links. The ISRC attribute is already in the Extra tab of the Song and Link metadata card. The Promoter and License fields are already read-only fields in the GSelector tab of the Metadata Card for Songs but can be added for Songs if desired. The User Defined attributes in the bottom portion of the Additional tab will need to be defined in the Tools | Global Setting | User Defined tab of GSelector before they are matched up to Zetta Custom Fields. Fields that are set to Allow Multiple Values in Zetta will be shown in GSelector with a semicolon separating the values and if the values are added in GSelector with a semicolon they will be treated as separate values when passed to Zetta.
Tip: If these fields are not used in GSelector they do not need to be added to Zetta.
|
Name
|
Asset Type
|
Scope
|
Value Type
|
Value Pool
|
Notes
|
|
Attributes in the GSelector Song or Link Additional tab
|
|
|
|
|
|
|
Promoter
|
Link
|
Global
|
Attribute
|
NA
|
Exists for Songs in the GSelector tab of MetaData card.
|
|
License
|
Link
|
Global
|
Attribute
|
NA
|
Exists for Songs in the GSelector tab of MetaData card.
|
|
Prefix
|
Song and Link
|
Global
|
Attribute
|
NA
|
|
|
Record Number
|
Song and Link
|
Global
|
Attribute
|
NA
|
|
|
Country
|
Song and Link
|
Global
|
Attribute
|
NA
|
|
|
Association
|
Song and Link
|
Global
|
Attribute
|
NA
|
|
|
Suffix
|
Song and Link
|
Global
|
Attribute
|
NA
|
|
|
User Defined 1 - 10 (see notes)
|
Song and Link
|
Global
|
Attribute
|
NA
|
The Name must match the name defined in the User Defined tab of the Global Setting window in GSelector.
|
|
Other Global Attributes in GSelector
|
|
|
|
|
|
|
Complete Work
|
Song
|
Global
|
Attribute
|
NA
|
Complete Work Values (Values 'Yes' and 'No' must match exactly)
|
|
Complete Work Name
|
Song
|
Global
|
Text
|
NA
|
Complete Work and Complete Work Name are available in the song information pane in GSelector. The Value must match exactly.
|
|
Film Name
|
Song
|
Global
|
Attribute
|
NA
|
|
|
Version
|
Link
|
Global
|
Attribute
|
NA
|
Exists for Songs in the GSelector tab of MetaData card.
|
|
BPM In
|
Song and Link
|
Global
|
Text
|
NA
|
These fields are integers in GSelector, therefore if alpha characters are entered into these fields, Zetta will send over blank data to GSelector.
|
|
BPM Overall
|
Song and Link
|
Global
|
Text
|
NA
|
|
BPM Out
|
Song and Link
|
Global
|
Text
|
NA
|
|
Global/Station Attribute Mapping in GSelector
|
|
|
|
|
|
|
Artist Group
|
Song and Link
|
Global
|
Attribute
|
NA
|
Select Allow New Values and Allow Multiple Values for all these Attributes.
|
|
Content
|
Song and Link
|
Global
|
Attribute
|
NA
|
|
Era
|
Song and Link
|
Global
|
Attribute
|
NA
|
|
Genre
|
Song and Link
|
Global
|
Attribute
|
NA
|
|
Instrument
|
Song and Link
|
Global
|
Attribute
|
NA
|
|
Theme
|
Song and Link
|
Global
|
Attribute
|
NA
|
|
Vocal
|
Song and Link
|
Global
|
Attribute
|
NA
|
|
|
|
|
|
|
|
|
Station Artist Group
|
Song and Link
|
Station
|
Attribute
|
Global
|
Select Allow New Values and Allow Multiple Values for all these Attributes.
|
|
Station Content
|
Song and Link
|
Station
|
Attribute
|
Global
|
|
Station Era
|
Song and Link
|
Station
|
Attribute
|
Global
|
|
Station Genre
|
Song and Link
|
Station
|
Attribute
|
Global
|
|
Station Instrument
|
Song and Link
|
Station
|
Attribute
|
Global
|
|
Station Theme
|
Song and Link
|
Station
|
Attribute
|
Global
|
|
Station Vocal
|
Song and Link
|
Station
|
Attribute
|
Global
|
See the Custom Fields topic for more details.
Add a New Custom Field
|

|
To add a new Custom Field, perform the following steps:
|
- Go to the Custom Fields tab in the System Configuration window.
- Click the Add Custom Field
 button.
- Enter a Name for the Field.
- Select the Asset Type
- Select the Scope
- Select the Value Type
- Select the Pool if the Scope of the attribute is Station or Cut and the Value Type selected is Attribute.
- Optionally, select Allow New Values if the Value Type is Attribute.
- Optionally, select Allow Multiple Values if the Value Type is Attribute.
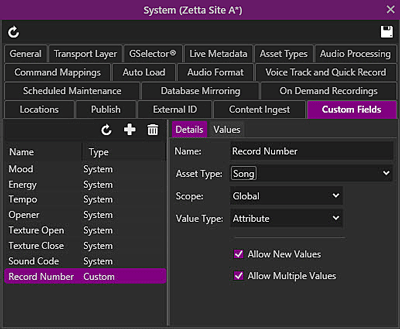
- Optionally, set a Maximum Length if the Value Type is Text.
- Click the Values tab to add field values if the Value Type is Attribute.
- Click Save
 in the System Configuration toolbar.
Enabling GSelector® Integration
This section will outline the steps required to enable GSelector Integration in both the Zetta and GSelector software.
Zetta System GSelector Settings
GSelector Interfaces Settings
Zetta System GSelector Settings
|

|
To configure GSelector Integration, follow these steps:
|
- In the Configuration menu, select System.
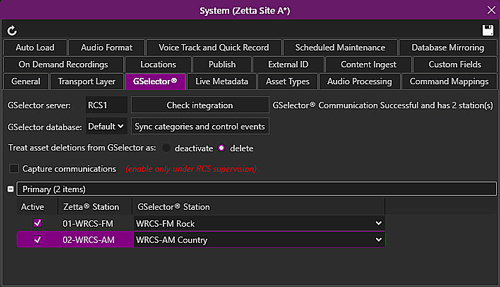
- Select the GSelector® tab that added during the Configuring Zetta System Options steps.
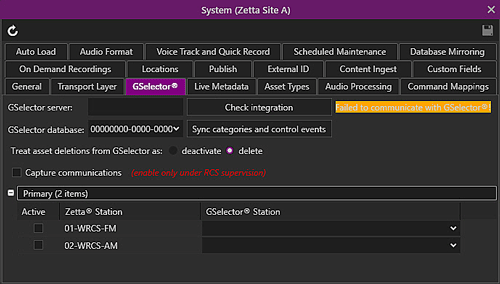
- Enter the IP address or Name of the GSelector Server.
- Click the Check Integration button.
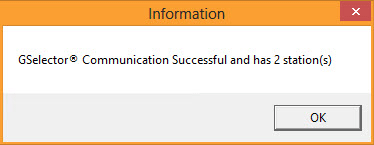
- When the connection is made a GSelector® Communication Successful message should be displayed, click OK to close the message.
- If using a database other than the default, use the GSelector Database drop-down to select the database for Zetta to connect with. Click the Check Integration button again to connect to the selected database.
- Set how Deletions should be handled when an asset is deleted in GSelector using the Treat asset deletions from GSelector as: Deactivate or Delete option.
- Select the GSelector Station to integrate with from the drop-down; this creates mappings between the GSelector and Zetta stations. This mapping is used to send Log data to the correct station.
- Select the Active to enable integration for each station.
- Click the Save
 icon to save changes.
- Close the Zetta main application.
- Access the Startup Manager window by double-clicking on the
 icon in the System Tray.
- The GSelector Integration Services start automatically when the connection is made. If the Services are not started, click the Start All button for the GSelector Integration Services group.
GSelector® Interfaces Settings
|

|
To configure GSelector Integration, follow these steps:
|
- Using GSelector, go to the Tools menu and click Interfaces.
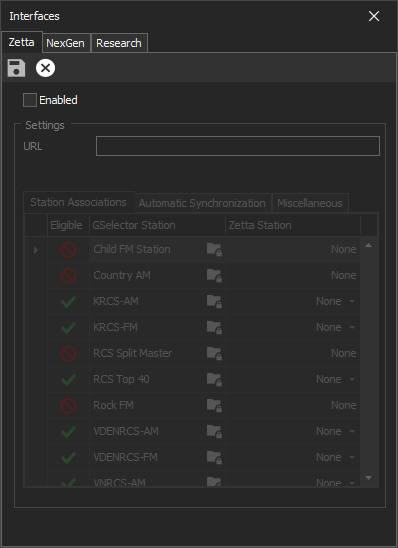
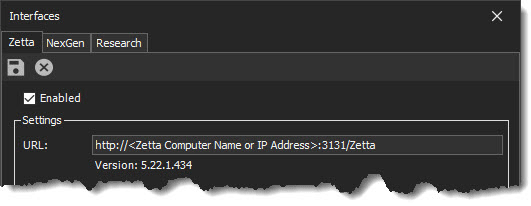
- Using the Zetta tab, click Enable to enable GSelector Integration.
- The URL field is used to configure where GSelector will send changes. For Zetta integration, the path should read as follows:
http://<Zetta® Computer Name or IP address>:3131/Zetta
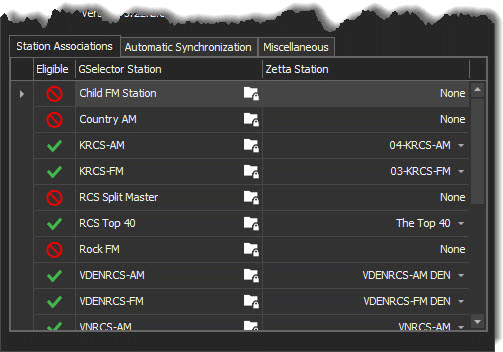
- Use the Station Associations tab to set the Zetta Station(s) to be integrated with the GSelector Station(s).
-
- There will be a green check mark
 next to the GS Station indicating it is Eligible for integration. See Getting Connected to GSelector section if no stations are eligible.
- To allow GSelector® to synchronize station logs, select the Zetta Station name from the Zetta station drop-down menu.
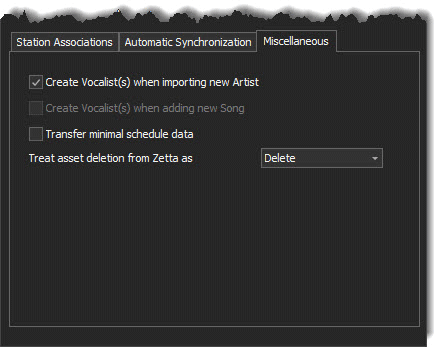
- Select the Miscellaneous tab to Create Vocalist(s) when importing new Artist or Create Vocalist(s) when adding new Song from Zetta. Transfer minimal schedule data is not used for Zetta version 2.9 or higher.
- Optionally, change how assets are treated when deleted in Zetta. The default is to deactivate the asset from all stations.
- Click the Save
 icon to Save the settings.
- Click the Setup Zetta button to transfer existing GSelector data (Categories, assets etc.) to Zetta. This button should only be used once. See the GSelector Assets section of the Adding Library Media topic for more information. The Use of this button requires the GSelector Administrator password.
Once integration and automatic synchronization have been enabled in both applications, any asset or log changes made in either application will be synchronized with the other.
Working with Security
Security is not required when getting started with Zetta, however, it is highly recommended that user Accounts are created. Creating Station Groups and Roles before creating accounts in Zetta will make applying security quick and easy when dealing with multiple users with the same level of security. Creating Station Groups allows the administrator to limit access to specific stations, while the Roles determine what areas of Zetta a group of users can access. Station Groups are used when assigning users to a Role when creating an Account and for grouping stations for Multisite Voice Tracking and Site Replication. Station Groups are also used for assigning groups of stations to asset Cuts. To limit user's access further, see the Talent Grids section.
|

Important Note!
|
It is important to change the password of the supervisor to prevent unwanted changes to the system.
|
Create Station Groups
Create a Role
Create an Account
Create Station Groups
|

|
To create Station Groups in Zetta, perform the following steps:
|
- Select Station Groups from the Configuration Menu
- Click the Add Station Group
 button
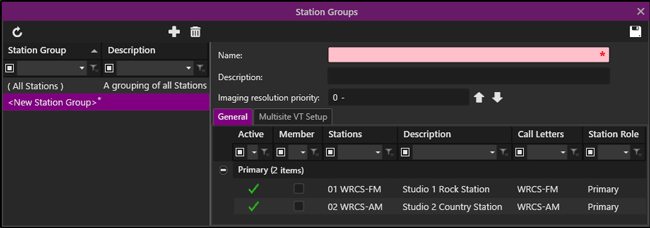
- Type in a Name
- Type in a Description of the Station Group.
- Optionally, set an Imaging resolution priority. This can be done at a later time as needed. See the Station Groups Configuration topic for more details.
- Select the Stations for the Station Group.
- Click Save
 to save the Station Group.
- Repeat for each Station Group.
Create Roles
|

|
To create Groups of Users, perform the following steps:
|
- Select Roles from the Configuration Menu
- Click the Add Role
 button
- Enter a Role Name
- Enter a Description (optional)
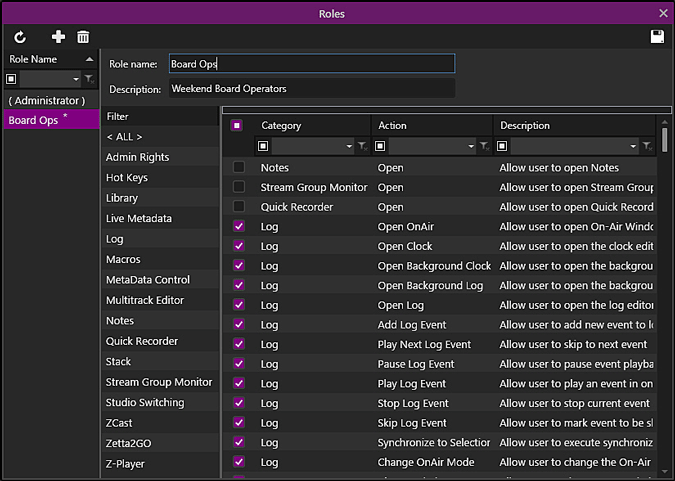
- Click the check box next to each security option to allow access.
- Click Save
 .
.
- Repeat for each Role.
Create User Accounts
|

|
To create user accounts, perform the following steps:
|
- Select Accounts from the Configuration menu
- Click the Add Account
 button
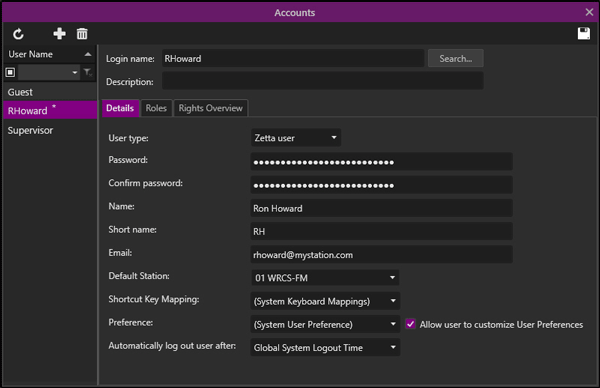
- Select the User type to add a 'Windows user' to use a Windows domain account or leave as 'Zetta user' for login authentication, see the Accounts section for more information on using Windows domain User accounts
- Enter the Login Name if creating a Zetta user or Search for a Windows user.
- Enter an Account Description (optional)
- Enter the Password for the Zetta user, leave blank if no password is desired.
- Enter the Password again to Confirm Password
- Enter the Users Name
- Enter a Short Name, the Short Name is just a shortened version of the user's name, such as the user's initials. (optional)
- Enter an Email address (optional)
- Select the Default Station from the drop-down or simply type in the station name.
- Select the Shortcut Key Mappings from the drop-down; see the Command Mapping section for more information.
- Select the User Preference from the drop-down; see the Preferences section for more information.
- Optionally, select the Allow the User to Customize User Preferences option; see the User Preferences section for more information.
- Optionally, select the Automatically Log Out User After option.
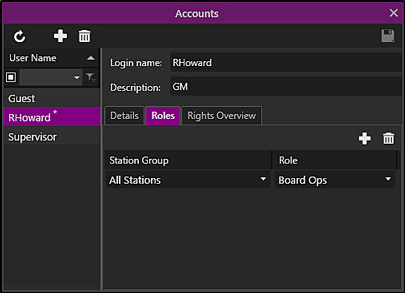
- Click the Roles tab
- Click the Add Role
 button to select the role to add to the account.
- Select the Station Group
- Select the Role of the user.
- Click the Rights Overview tab
- Select the Station from the station select drop-down.
- Select the check box next to the desired privileges to give the user.
- Click the Save
 button to save the new User Account.
- Repeat steps 2-19 to create additional accounts.
For more information on User Accounts and individual privileges, see the Accounts section.
Next see the section Adding Library Media to import assets into the Library.
© 2007-2024 RCS. All Rights Reserved.
 will be shown throughout the system until the system is licensed.
 will be shown throughout the system until the system is licensed.

 icon to save the settings.
 icon in the System Tray.

 button. For this example, we will use Fifteen streams. The following chart shows the recommended Stream Groups.

 icon.
icon. button.

 icon to save changes.
 button for the desired number of streams.
 button to verify the players are functioning; the status column will display a green check mark
  . If the Player is not online or not functioning a red
  is visible in the Status column. If the playback stream is online but the device cannot be verified a yellow check mark
  is visible in the Status column. Hover the mouse over the icons in the status column to view the status of the players.
 to add the Player.
 button or the Copy Selected Stream Group button from the top left pane of the Stream Group window for additional Stream Groups. The Copy button will create a copy of the Stream Group with the exact same settings. The Add New Stream Group button will create an empty Stream Group. The following table shows a list of recommended Stream Groups and number of streams.
 button for the desired number of streams.
 . If the Player is not online or not functioning a red
  is visible in the Status column. If the playback stream is online but the device cannot be verified a yellow check mark
  is visible in the Status column. Hover the mouse over the icons in the status column to view the status of the players.
 to add the Player.
 .
.


 icon.
icon.  icon and repeat steps 2-12.
 icon in the System Tray. If the Sequencer does not start verify the Configuration and the Licensing for the station.
 button.

 .
. icon in the System Tray to verify all the Content Management Services created start. If the services do not start automatically, click the Stop All button for the Content Management Services group.
 button.

 .
. icon in the System Tray to verify all the Content Management Services created start. If the services do not start automatically, click the Stop All button for the Content Management Services group.
 button
 button in the Logs Module. See the Clocks and Logs section for more details.
 button to save the assignment.


 button to save changes.
 icon to save settings.
 button.
 in the System Configuration toolbar.


 icon to save changes.
 icon in the System Tray.

 next to the GS Station indicating it is Eligible for integration. See Getting Connected to GSelector section if no stations are eligible.

 icon to Save the settings.
 button
 to save the Station Group.
 button
 .
. button
 button to select the role to add to the account.
 button to save the new User Account.