Welcome < Configuration < Virtual Station Configuration
The Virtual Station configuration in Zetta® is used to add a Virtual station for use with ZCast between stations.
Click any area in this image for help
Click any area in this image for help
In this Topic: show/hideshow/hide
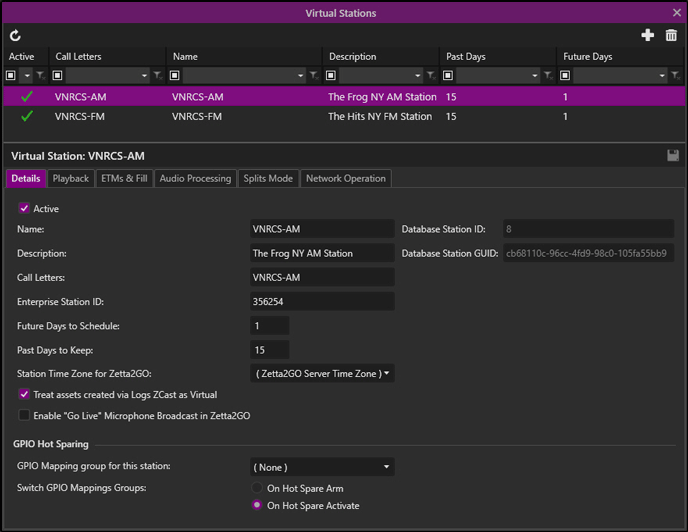
The top frame of the Stations configuration window shows a list of stations added. The columns can be reorganized to fit the user’s needs and Custom Filtering can be used to filter the contents of the pane. Optionally, use the column to search for a Virtual Station.
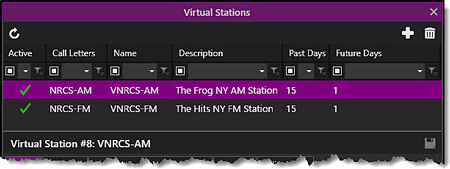
The following functions are available for adding and deleting a station:
 |
Refresh Stations - The Refresh Stations button will refresh the window to the last saved state, discarding any unsaved changes. |
 |
Add New Virtual Station – The Add New Virtual Station option is used to create new virtual stations. Alternatively, right clicking in the Station list and selecting Add Station from the menu will add a station. |
 |
Delete Selected Virtual Station – The Delete Selected Virtual Station icon will remove the selected virtual station from Zetta. Alternatively, right clicking on the station and selecting Delete Selected Station from the menu will remove the station from Zetta. |
The bottom frame of the window is for customizing the Station.
The Virtual Station Details has the following configurable values:
Active - The station is Active when it is first created. Select this option to make the Virtual Station inactive. When the virtual station is active it can be selected in the modules. If it is inactive the virtual station will not be shown in the modules or metadata card of the assets.
Name – The Name is used to identify the Virtual Station.
Database Station ID - The 'Database Station ID' is the number of the station in the database. This ID may be used by an external application, such as NexGen, when communicating with a specific station in the database. This field is read only but the contents can be copied.
Description – The Description is used to describe the station. (optional)
Database Station GUID - The 'Database Station GUID' is a globally unique identifier for the station in the database. This identifier may be used by an external application when communicating with a specific station in the database. This field is read only but the contents can be copied.
Call Letters - Use the Call Letters field to enter the Call Letters for the station the Call Letters here are used with the Publish and Live Metadata features. This field is optional and typically not used for Virtual Stations.
Enterprise Station Id - The Enterprise Station Id is typically used with external Traffic applications and may not be required for the station. This field can also be exported using Live Metadata feature.
Future Days to Schedule - The Future days to Schedule is used to set the number of days to schedule future logs for the virtual station. The Schedule Days option must be selected in the Scheduled Maintenance tab of the System Configuration window.
Past Days to Keep - The Past Days to Keep is used to set the number of days to keep past logs for the virtual station in the database. The Purge Old Logs option must be selected in the Scheduled Maintenance tab of the System Configuration window.
Station Time Zone for Zetta2GO - The Station Time Zone for Zetta2GO option is used to set the time zone the station will display as in Zetta2GO. This is useful if the remote user is using Zetta2GO for a station that is in a time zone other to the one they are in. The default setting is (Zetta2GO Server Time Zone). This means the time zone used for the station in Zetta2GO will be the time zone set in Windows for the computer assigned as the Zetta2GO® Services computer in the General tab of the System Configuration window. Use the drop-down to select a different time zone for the station.
Treat assets created via Logs ZCast as Virtual - When this option is selected, any assets sent to the virtual station via a ZCast Log will be created, if they do not already exist, but will not have an External ID assigned.
Enable "Go Live" Microphone Broadcast in Zetta2GO - This option is typically not used for Virtual Stations. See the Station Details topic for more information on this setting.
GPIO Hot Sparing - The GPIO Hot Sparing section is used for sequencer stations. See the Station Details topic for more information on this setting.
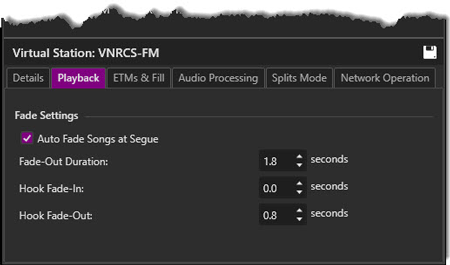
Auto Fade Songs at Segue – Auto Fade Songs at Segue will automatically fade the current song when the segue is hit.
Fade-Out Duration – The Fade-Out Duration is used to define the number of seconds to fade-out the first event when segueing into the next event.
Hook Fade-In – The Hook Fade-In is used to define the number of seconds to fade in when a hook is played.
Hook Fade-Out – The Hook Fade-Out is used to define the number of seconds to fade out when a hook is played.
The ETMs & Fill tab is used to configure the following specific station options:
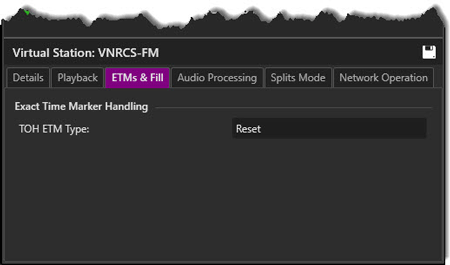
TOH ETM Type: The Top of Hour marker is treated as a Comment unless this option is set to Soft, Hard, Reset or Hit. For more information on ETM Types see the Exact Time Marker section of this guide.
|
Important Note! |
This ETM setting will not act as a traffic marker for loading traffic from a third party system. It is recommended this setting be set to none and an ETM Control Event be placed in the log for a traffic marker. |
The Audio Processing tab is used to set the Normalization, Ducking and Voice Track settings for each station.
Normalization is the process of increasing (or decreasing) the amplitude of an entire audio signal so that the resulting peak amplitude matches a desired target. Zetta now has the ability to use a RCS Direct Show Peak form filter to calculate Peak form value, Trim in/out, Segue and run normalization analysis. Normalization can be set for each station and each type of asset.
Limit Peak – When the Limit Peak option is check the Absolute Peak will default at -20dB
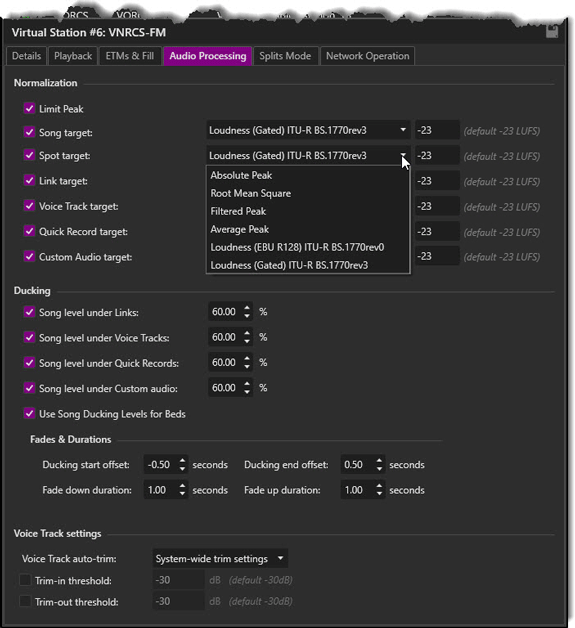
Normalization algorithms used by Zetta:
Absolute Peak – (As used in AFC 4.0) Absolute peak normalization checks every sample in the audio file and calculates the largest audio peak value.
Root Mean Square – (As used in Selector/MC 15) Uses the square root mean algorithm to calculate peak values, which is the square root of the mean or middle of the squares of the values.
Filtered Peak – (As used in AFC 3.0) Filtered peak normalization analyzes all the samples within an audio file and calculates the peak level by ignoring 5% of highest samples.
Average Peak – Average peak normalization is new with Zetta; it analyzes all the samples within an audio file and calculates the median or middle value of the top 5% of the peaks.
Loudness (EBU R128) ITU-R BS.1770rev0 - Loudness normalization is concerned with balancing audio according to their actually perceived loudness. The EBU R128 is the recommended level of loudness at -23LUFS. The ITU-R BS.1770 standards provide an algorithm for quantifying the loudness and loudness level of a given audio asset in loudness units (LU or LUFS).
Loudness (Gated) ITU-R BS.1770rev3 - Loudness (Gated) ITU-R BS.1770rev3 is an algorithm to measure audio loudness of a Gated block of audio. This option is recommended default setting for Broadcast audio.
The Ducking section allows the user to setup ducking percentages, duration and Fade time for ducking Songs under Links and Voice Tracks. Ducking allows the playout device to temporarily reduce the volume of a currently playing element (typically a song) when another element plays on top of it (so that they don't "fight" for on-air presence). Good examples could be a jingle auto posted over song's Intro, or Voice Tracks overlapping the ending of the previous song and the opening of the next song.
Song Level Under Links – The Song Level Under Links is the percentage amount to reduce the audio level of the song when played at the same time as a Link the lower the value the more Zetta will reduce the volume. (Default is 60%) When a Link is set as a Bed the audio level of the song will not be reduced.
Song Level Under Voice Tracks – The Song Level Under Voice Tracks is the percentage amount to reduce the audio level of the song when played at the same time as a Voice Track the lower the value the more Zetta will reduce the volume. (Default is 60%) When a Voice Track is set as a Bed the audio level of the song will not be reduced.
Song Level Under Quick Recording - The Song Level Under Quick Recording is the percentage amount to reduce the audio level of the song when played at the same time as a Quick Recording the lower the value the more Zetta will reduce the volume. (Default is 60%) When a Quick Recording is set as a Bed the audio level of the song will not be reduced.
Song Level Under Other Audio - The Song Level Under Other Audio events is the percentage amount to reduce the audio level of the song when played at the same time as a custom asset type, the lower the value the more Zetta will reduce the volume. (Default is 60%). For additional information on custom asset types see the Asset Types in the System Configuration and the Custom Asset Types section in the Library topic of this guide. When a custom asset is set as a Bed the audio level of the song will not be reduced.
Use Song Ducking Levels for Beds - When an asset such as a Link is marked as a Bed, Zetta will use the Song Ducking Level for the bed. When the above options are used for Song Level and this option is also used, the bed will be ducked under the asset. For example: If the option Song Level Under Links is selected, the bed is ducked whenever a link overlaps the bed.
Settings
The Voice Track settings in the Station Audio Processing tab are used to override the system Voice Track settings that are set in the Configuration | System | Audio Processing tab. When Multisite Voice Tracking is used, if only one station is selected to be Voice Tracked, MVT will use that station's settings, otherwise, the system settings are used for all selected stations.
Voice Track auto-trim - The Voice Track auto-trim drop-down is used to select on of the following three options:
Trim-in threshold – Trim-in is an open marker to define where “silence” ends and actual audio begins. (Default -30dB)
Trim-out threshold – Trim-out is a closing marker where audio becomes “silence”. (Default -30dB)
|
Important Note! |
If the Station-specific trim settings is selected from the Voice Track auto-trim drop-down but the Trim-in and Trim-out threshold are unchecked, this is in essence like choosing Disabled. |
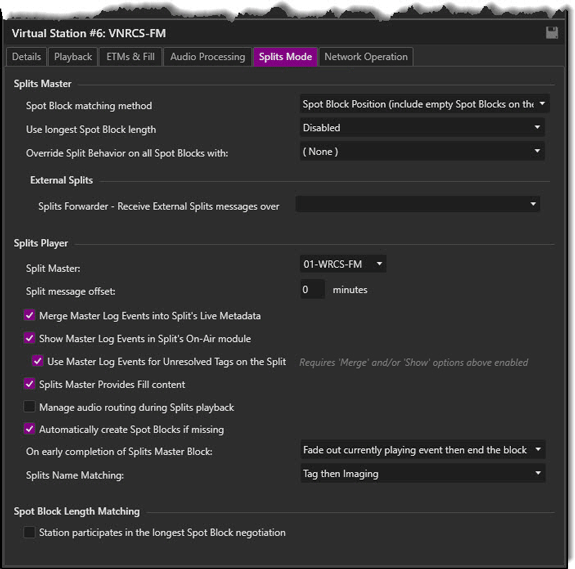
The Splits Mode tab is used to configure settings for Splits processing. Zetta Splits must be enabled in the Configuration System General tab for the Splits tab to be visible in the Stations window.
**See also the Zetta Splits® topic in the Features section.
Spot Block Matching Method - The 'Spot Block Matching Method' tells Zetta how to match the Spot Blocks in the Master stations log with the Spot Blocks in the Splits Clients log.
Use Longest Spot Block Length - The master station 'Use the longest Spot Block length' setting has three options that can be used for the Longest Spot Block Length negotiation with the splits stations:
Disabled - This is the default value for a new station.
Include ALL subscribing Split Player stations - When this option is set, the Master Station check both split stations and this master station and locate the Spot Block with the longest fill length. Zetta will set that length as the fill length for the Spot Block for all the split stations and master station. Changes to the Spot Block such as, adding/removing non fill items from blocks and stations attaching/detaching themselves as split client stations will affect which station’s block length is used as the "longest" block length. As these changes are made Zetta will adjust Spot Blocks with the new fill length, even if the block is currently playing.
Include only subscribing Split Player stations that also participate in longest Spot Block negotiation - When this option is set, only those splits stations with the Stations participates in the longest station spot block negotiation option enabled will participate in the calculation of the spot block length. Splits station included in the 'Splits Family' that do not have the Stations participates in the longest station spot block negotiation will not participate in the calculation but will still have its Spot Block Length adjusted to the longest block length.
|
Important Note! |
The Use Longest Spot Block Length feature currently only works with Master and Split stations on the same database. |
The Split Behavior of the Spot Block, the Fill Length of the Spot Block, the existence of Child Events in the block and the Use longest Spot Block length will have an impact on the Spot Block Driver Logic. If GSelector is integrated with Zetta, enable the Update the Spot Blocks in GSelector when the Fill Length changes option in the Logs Settings tab to send these changes to GSelector.
Override Split Behavior on all Spot Blocks with - The 'Override Split Behavior on all Spot Blocks with' drop-down option, will assign all spot blocks the selected split behavior for the selected station. This is useful when switching a station to splits that is already scheduled. When this option is set, the Spot Block properties in the Log Module properties pane will show the override split behavior selected here and the control to change this setting in the properties window will be disabled.
Splits Forwarder - Receive External Splits Messages Over - The 'Split Forwarder - Receive Serial Splits Messages Over' drop-down is used to select the RS232, TCP or UDP Splits GPIO device that has been configured to receive splits messages by the Split Forwarder station. The Splits Master: Sends Serial Splits Message Over device will need to be configured and set in the Splits tab of the Master Station at the sending site.
Splits Master - The 'Splits Master' drop-down is used to select the Splits Master station for the selected Split Player station.
Split Message Offset (Minutes): - The 'Split Message Offset' setting is used to set the time between the actual splits playback and the time the split message feed is aired on the remote split system, this is used if splits playing back is not done real-time and the RS232 feed is being delayed. The Split Message Offset setting is used with serial communications to Split Master stations using the RS232 Splits GPIO setup.
Example: If it is 2:00 now, and Zetta is capturing a LIVE RS232 split feed and the split player is to play it back at 3:00, then the Split Message Offset is to be set at 60.
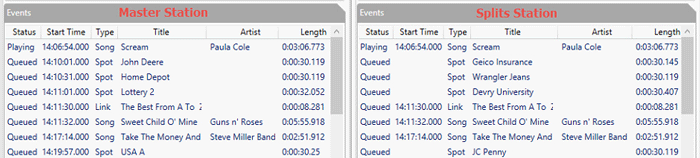
Merge Master Log Events into Split's Live Metadata - When the 'Merge Master Log Events into Split's Live Metadata' option is enabled, Live Metadata when configured, will subscribe to both the split and master sequencer queue changes. This allows Live Metadata to display the content from the master on the Splits Live Metadata. In the following illustration the Master Live Metadata is on the right and the Splits Live Metadata is on the left. Notice the master song event, Scream is displayed for both stations but the spots following the master event are different for each station. This option is not used with ZCast Splits.
|
Important Note! |
Content from the master will not include events such as breaks that will be covered by the split station. This option currently only works within Zetta site Splits not through ZCast or Serial. |
Show Master Log Events in Split's On-Air Module - When the 'Show Master Log Events in Split's On-Air Module' option is checked the events playing on the master station will be shown in the On-Air module of the splits station. This allows users to see events playing from the master station and the splits player events in the On-Air module of the splits station. This option is enabled by default. When the Sequencer is in Splits Player mode the Master Log Events will be shown with a Master  icon and the title header of the On-Air module will show a filter
  icon. This filter can be used to switch the view between showing and not showing the master log events. When this option is not enabled only the splits events will be shown in the On-Air Module of the splits station. This option is not used with ZCast Splits.
Use Master Log Events for Unresolved Tags on the Split - When the 'Use Master Log Events for Unresolved Tags on the Split' option is checked, Zetta will use the event playing on the master station in the Live Metadata for the Split station and in the On-Air module (if Show Master Log Events in Split's On-Air Module is enabled) when the Tag playing doesn’t contain a valid asset for the Split. When this option is not checked the event will show as Unresolved Tag in the split stations log, Live Metadata and On-Air module. This option is enabled by default. This option is not used with ZCast Splits.
Splits Master Provides Fill content - When the 'Splits Master Provides Fill content' is selected the splits client will first attempt to fill using the material which is in the Splits Master’s spot block, then use fill material from the station’s Block Fill Category. Any asset that is not active for the split client station will automatically be set as active by the sequencer once it is used as fill material. When this option is deselected the splits station will use the fill material from the station’s Block Fill Category. This option is not used with External Splits or ZCast Splits.
Manage Audio Routing During Splits Playback - The 'Manage Audio Routing During Splits Playback' is used with the selected Split Master Route and Local Route in the Audio Routing tab to route the Master splits Audio source during Splits playback. This option is not used with External Splits.
Auto Create Spot Blocks if Missing - When the 'Auto Create Spot Blocks if Missing' is enabled, Zetta will create any Spot Blocks that are missing on the Splits Stations so the number of spot blocks match the Master Station. The selected Fill logic will then be used to fill the newly created spot block.
On Early Completion of Splits Master Block - The 'On Early Completion of Splits Master Block' option is used to tell Zetta what to do on this Splits Station when the Master Station stops or ends their Spot Block early, such as pressing the Play Next button in the On-Air module. This option is not used with External Splits.
Fade out currently playing event then end block - The Split Player will fade the currently playing event and stop the spot blocks immediately.
Complete currently playing event and drop any remaining events - The audio for the log event currently playing in the spot block of the Splits Players should play to completion and any log events beyond the block’s playing event will be skipped.
Complete all events in the block - The event currently playing in the Spot Block on the Splits Player will continue to play, the remaining log events in the Splits Player Spot Block will remain untouched and the spot block will play to the Spot Block end.
Splits Name Matching - The Splits Name Matching tells Zetta how to match an asset (Tag/Imaging) for the splits player station when a splits master station plays an asset with a splits behavior. The default setting is Tags then Imaging which means Zetta will first check for an asset in a Tag that matches the master if no match is found it will check Imaging. The Tag and the Imaging must have the same name.
For example: You have a Tag and an Imaging called “Split Liner”, the ‘Splits Name Matching’ setting dictates what it looks for when playing that “Split Liner” on the Split Player. With this set to Tag then Imaging, Zetta will first look for a Tag called “Split Liner” if one doesn’t exist it will look for an Imaging called “Split Liner”.
If Splits Name Matching was set to Imaging then Tag it would look at the Imaging first and then the Tag. It will only check for Tags when set to Tags only or only Imaging when set to Imaging only.
Station participates in longest Spot Block negotiation - With this option enabled, the Station is considered part of the ‘Splits Family’. When a Full or Traffic Schedule is imported, a negotiation request to synchronize the Fill Lengths for all Spot Blocks in the day for this and any other ‘Splits Family’ stations is triggered. When this option is enabled a 'Longest Split Break Negotiation Computer' must be set in Configuration | System | General | Splits. This option is not used with External Splits or ZCast Splits.
The Network Operation tab in the Virtual Station Configuration is used to assign GPOs and GPIs to a virtual station for use when the virtual station set to capture GPO and GPI tiggers during recordings. This tab works similar to the Network Operation tab in Stations Configuration.
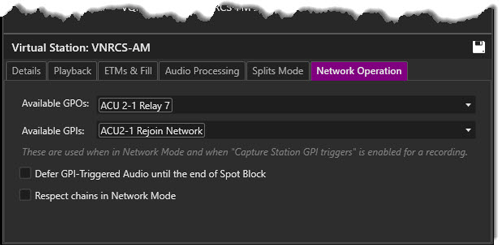
See the Network Operation tab in Stations Configuration for more details on these settings.
|
|
To create a new virtual station, perform the following steps: |
icon. The Virtual Station is set to Active automatically. button to save the virtual station settings.
Welcome < Configuration < Virtual Station Configuration
© 2007-2024 RCS All Rights Reserved.

