Welcome < Configuration < Content Stores
Content Stores in Zetta® allows the user to specify a location to store media and backup files. Using the content stores, redundant locations can be setup. For every store created the media and backup files are synchronized to each store, allowing for an off-site duplicate or backup of the files. If a file is accidentally or maliciously deleted from one store the synchronization will automatically recover the file from the other stores.
When a Zetta sequencer player queue's an asset, it first looks to the Local Audio Store for the audio, if not found it then looks to the first priority media store, if not found it looks to the next priority media store (redundant) and so on. Finally, if configured, it will look to the Zetta Cloud Store. If the audio is not located in any store the sequencer will skip the audio asset.
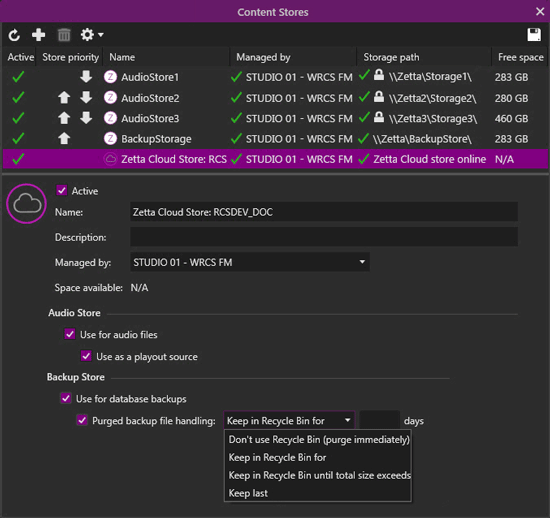
When Zetta is integrated with Zetta Cloud through Site Replication a Zetta Cloud Store is shown in the Content Stores.
Click any area in this image for help
Click any area in this image for help
In this Topic: show/hideshow/hide
Content Stores Directory Structure in Windows
Content Stores Step-by-Step Topics
Configuring a Store for Media Files
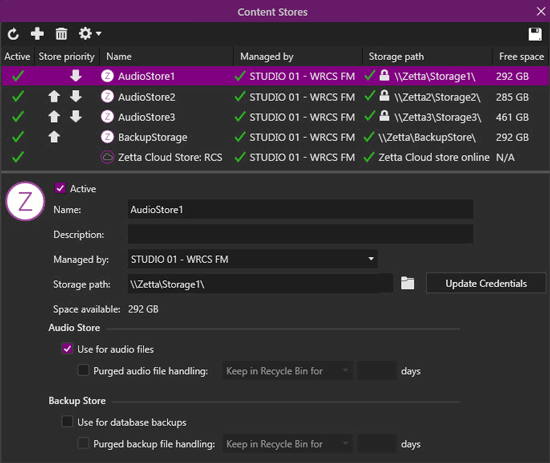
The toolbar across the top of the Content Stores window can be used to add, delete or save a content store.
 |
Refresh - The Refresh button will refresh the Content Stores window. This will remove any unsaved changes. |
 |
Add Store - The Add Store button is used to add a content store. |
 |
Remove Store - The Remove Store button is used to delete a selected store. |
 |
Advanced - The Advanced button has a drop-down allowing the user to Generate file for the selected store. The files generated can have absolute paths or relative paths. These files can be opened in a text editor application. Many third party tools (e.g. Total Commander) can be used to verify file consistency of all audio files in the content store. Example paths: Absolute Path = \\ZettaServer\Storage1\0\98~1-01 Call Me.mp3 Relative Path = 0\98~1-01 Call Me.mp3 When selected, the user will be prompted to save the file to a folder. Additionally, the user can select Force Full Synchronization to force a synchronization of the selected store. |
 |
Save All - The Save All button is used to save a new or changed store. |
The Content Stores window is divided into two sections. The top pane displays the configured stores with the priority and path. The bottom pane contains the configuration information for the selected store. See the Local Audio Storage tab in the Computer Configuration to setup the Local Audio Store. See the Detail tab to setup the Audio Store Playback Priority for each computer.
For every Media Store created the audio is synchronized to each store. Therefore, if the drives of a store fail, Zetta can still play audio from the secondary store or cloud store. Once the drive is restored any missing media and backup files will be synchronized to the new drives by the computer that is selected as the Managed by computer. If all the stores are accidentally deleted contact RCS Support for assistance.
The Store Priority can be change using the arrow  buttons in the Store Priority column to the left of the Name of the store in the top pane.
The Store can be set to Active or Inactive.
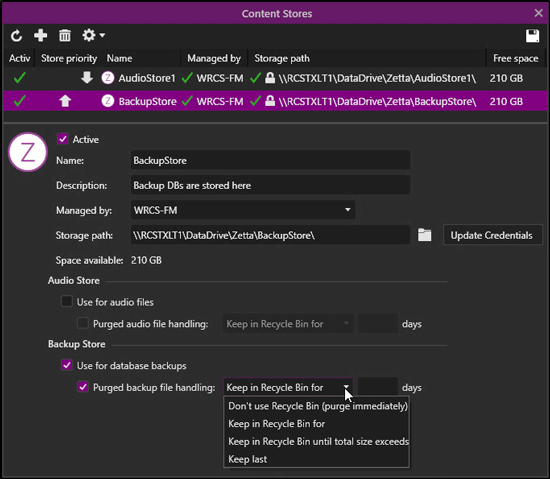
Each Store can be named with a unique name to identify its purpose.
The Description is used to expand on the name of the store to give it more meaning.
The Managed By selection is used to select the computer responsible for handling the content store synchronization process in Startup Manager. When there are two or more stores, this computer is responsible for synchronizing the files in the stores. This computer must have access to the Storage Path(s) specified. When there is a green check next to the 'Managed by' computer that means the computer in online and a tooltip will show "Computer online" when the mouse is hovered over the green check. When there is a red x  next to the 'Managed by' computer that means the computer in offline and a tooltip will show "Computer offline" when the mouse is hovered over the red x
![]() . To quickly locate the computer needed, simply start typing the name in the Managed by field to filter down the list of computers.
. To quickly locate the computer needed, simply start typing the name in the Managed by field to filter down the list of computers.
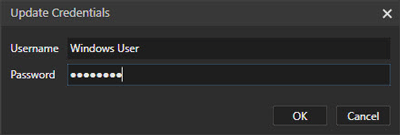
The Storage Path is the UNC path to the location of the shared folder to store the media files or database backups. Use the Update Credentials button to open the Updated credentials window to enter a valid Windows Username and Password. This allows the site to secure the assets in a location where only Zetta and the site administrator have access. Simply create the Storage path folder share and give the account, only used by Zetta, Full Control to the share location. Then add that account to the Update Credentials window.
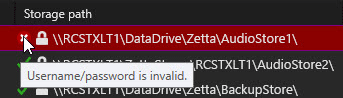
When windows Credentials are added a lock  appears next to the Storage path in the list. If the credentials saved in Zetta are incorrect (password was changed on the Domain/Windows account being used) the row shows an alert with a red background.
To remove the credentials, open the 'Update Credentials' window and clear both the username and password fields.
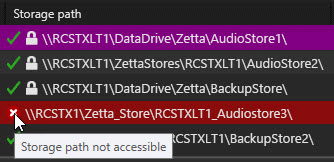
When there is a green check next to the 'Storage path' that means the storage path is accessible and online and a tooltip will show "Storage path validated" when the mouse is hovered over the green check. When there is a red next to the 'Storage path' that can mean the Storage path is not accessible and offline or the username/password is invalid. A tooltip will show "Username/password is invalid", "Storage path not accessible" or "The location does not exist: (with location)" when the mouse is hovered over the red .
The Space Available shows the amount of free space available in the specified path.
The Audio Store settings are used to configure the store to be used for audio files. This includes the audio files and xmarks files.
Use for Audio Files - This option tells Zetta to use the selected store for Audio and metadata files associated with the Assets. When this is selected for the Zetta Cloud Store audio files will be synced to the Zetta Cloud. This allows for missing or corrupt audio files to be automatically recovered from the Zetta Cloud Store.
Use as Playout Source - This option is available for the Zetta Cloud store only and is only visible when Zetta is integrated with Zetta Cloud. This option tells Zetta to use this store as a source for the audio files associated with the asset events scheduled in the Logs, Hot Keys, Stacks etc. When this is selected for the Zetta Cloud Store, if audio for an Asset is missing from the local Content Stores, Zetta can stream the audio directly from the Zetta Cloud Store.
Purge audio file handling - The 'Purge audio file handling' will delete any audio files older than the parameter set for the store or the (RecycleBin) folder of the store. The 'Purge audio file handling' is not shown for the Zetta Cloud Store. Audio files are not purged from the Zetta Cloud as part of the Disaster Recovery feature. This setting has three options.
The Backup Store settings are used to configure the store to be used for Zetta database backups.
Use for database backups - This option tells Zetta to use the selected store for backups of the Zetta database.
Purge backup file handling - The 'Purge backup file handling' will delete any backups older than the parameter set for the store or the (RecycleBin) folder of the store. This parameter can be set to one of the following options:
Note: Backups in the Zetta Cloud Store are shown in the Restore Database window but are only used in Disaster Recovery situations.
The directory structure in windows divides the amount of files into additional directories for increased speed when accessing windows. Zetta also maintains the deleted or unneeded files in a (RecycleBin) folder, thus allowing the user to retrieve files that may have been deleted by mistake. This structure is similar to the structure used for the Local Audio Storage.
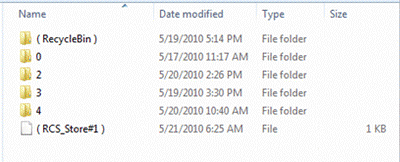
The File Path column can be inserted into the Library module to show the location of the file.
Example:
If the File Path for the asset in Zetta is \\RCS1\Zetta\Storage1\6\6210~dynamite.mp3
The Storage Path of the primary media store is used as the path: \\RCS1\Zetta\Storage1\
Zetta creates a separate numeric folder for each 1,000 files. This is to speed up network access to the files. The numeric folder represents the value of the resource ID divided by 1000: 6
The Media Filename is built using the resource ID from the database (6210 in our case), tilde (~) and then original file name (dynamite.mp3): 6210~dynamite.mp3
The files in the RecycleBin are stored based on the selected purge handling. (i.e., Keep in Recycle Bin for x days will look similar to this "\\audioserver\contentstore\(RecycleBin)\2022-12-21\1\660\1660616~1973 - James Blunt.wav").
This section will detail the steps needed for configuring and using Content Stores in Zetta. A Store can be configured to store just the media files and a separate store for the backup files or the stores can be configured to hold both the media files and backup files.
In this section: show/hideshow/hide
|
|
To configure a Audio Store in the Content Stores of Zetta, perform the following steps: |
button.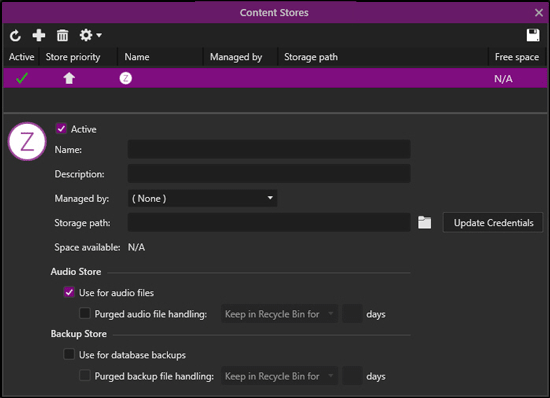 to save changes.
 icon in the System Tray:
|
|
To configure Backup Store in the Content Stores of Zetta, perform the following steps: |
button.
 . icon in the System Tray:
For every Store created the files selected, Audio/Backup, are duplicated to each store, allowing for an offsite duplicate of the files.
|
|
To configure a Redundant Store in the Content Stores of Zetta, perform the following steps: |
button. buttons to set the order of priority for the stores. See the Local Audio Storage tab in the Computer Configuration to setup the Local Audio Store. See the Detail tab to setup the Audio Store Playback Priority for each computer. to save changes. icon in the System Tray:
When Zetta is configured for Zetta Cloud Site Replication a Zetta Cloud Store is created. Backups sent to the Zetta Cloud Store can be used for Disaster Recovery.
|
|
To configure a Zetta Cloud Store in the Content Stores of Zetta, perform the following steps: |
 to save changes. icon in the System Tray:
© 2007-2024 RCS All Rights Reserved.
