Welcome < Features < Background Recording
Background Recording
The Background Recording feature is a Background Task Sequencer. A Background Recorder can be configured to record a Radio Show or Network Feed for playback on an On-Air station. These background recordings can be played back On-Air after they are recorded or with a delayed start while they are recording. Background Recorder stations can also be used for other background tasks needed by On-Air stations such as, changing the fill category, changing the sequencer mode, or running a macro, thus removing the clutter from the normal stations log, and preventing the accidental deletion of critical control events. The background recorder uses a background sequencer to execute the tasks scheduled in the Recorder Clocks and Recorder Logs. The Background Recorder runs as a Service process in the Startup Manager and does not require an On-Air module. After a Background Recorder is created, configured and the service is started, the Recorder Logs and Recorder Clocks are then available in the Tools menu.
In this Topic: show/hideshow/hide
Recording Shows with Background Recorder
The following step-by-step instructions will assist in the setup of the Background Recording feature to record a Radio Show or Network Feed. This does not cover the wiring of the audio and logic to the Computer(s). For a Network Feed, the show's program clock will need to be obtained from the Network provider.
Preparing for a Background Recording
In this section: show/hideshow/hide
Step 1: Computer Audio Inputs Configuration
|

|
To Configure a Computers Audio Inputs, perform the following steps:
|
- Click Computers from the Configuration menu
- Select the computer to configure
- Select the Audio Inputs tab for the computer
- Ensure the Active is checked to make the audio input active for the computer.
- Edit the Name if desired.
- Add a Description for the Audio Input for the computer. (optional)
- Click the Add audio input
 button.
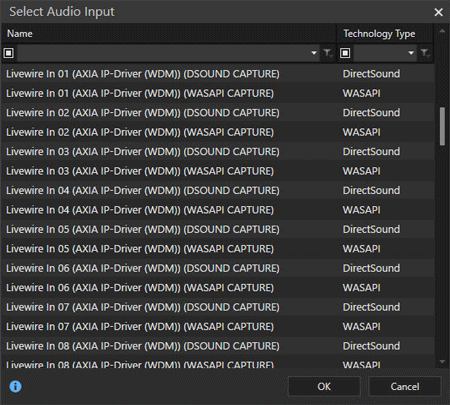
- Select the audio input to use from the list in Select Audio Input window.
- Click OK to except the selection.
- Double-click the Input Name field to change the name. (optional)
- Add any additional Audio Inputs as needed.
- Click Save
 button to save the changes.
Step 2: Computer GPIO Devices Configuration
|

|
To Configure a Computers GPIO Devices, perform the following steps:
|
- Click the GPIO /Routes tab in Configuration | Computers
- Click the Add New GPIO Device
 button.
- Ensure the Enabled is checked.
- Select the Device Type. The GPIO devices are listed in alphabetic order and will default to the first device in the list.
- If required select the number of devices connected from the Quantity drop-down menu.
- Enter the Name of the GPIO Device.
Tip: The Name will be carried over to the GPI (Inputs), GPO(Outputs) and Routes when they are created, so it is helpful to give the device a meaningful Name before creating the Inputs, Outputs and Routes.
- Enter a Description for the GPIO device. (optional)
- Optionally, enter a Description for the GPIO device.
- Optionally, enter a GPI Hold Time in seconds for Zetta to wait before receiving an additional Input from each GPI of the device. The GPI Hold Time is per GPI. This means if there are two GPI for the same device, GPI 1 and GPI 2, and a command is received twice from GPI 1 during the specified hold time, Zetta will ignore the second command. However, if a command is received from GPI 1 and GPI 2 within the specified hold time Zetta will respond to both.
- Optionally, enter the number of seconds to ignore a GPI event following a GPO event using the Ignore GPI after GPO for X seconds field. If an input is received with X seconds of an output event, then the input will be ignored.
- Optionally, enter the number of seconds to not generate a GPO event following a GPI event using the Do not send GPO after GPI for X seconds field. If an output is received with X seconds of an input event, then output event will not be sent.
- See the Device setting and the device manufacturers' manual for other specific device setting configuration.
- Select the GPIs (Inputs) tab to configure the Inputs; Inputs will display with the Name, GPI and Trigger Event On or Name and Event Text data. These fields can be edited and configured as needed.
- Select the GPOs (Outputs) tab to configure the Outputs; Outputs will display with the Name, Bit Position and Event Duration or Name and Event Text. These fields can be edited and configured as needed. See the GPO Variables section of the Zetta Variables topic for Event Text variables that can be used.
- Select the Routes tab to configure the Routes (sources) for the device. Not all GPIO devices listed support Routes so this tab may not be available.
- Click Save
 button to save the GPIO device settings.
See the GPIO/Routes and GPIO/Route Devices topics for additional details.
Step 3: Background Recorder Configuration
|

|
To create a new Background Recorder, perform the following steps:
|
- In the Configuration Menu, click Background Recorders.
- Select an existing Background Recorder of click the Add new station
 to add a new.
- Ensure the Active (Required) is checked.
- Enter a Name to identify the Background Recorder.
- Enter a Description to describe the Background Recorder. (optional)
- Select the Sequencer Computer from the drop-down to be the Background Recorder Sequencer that processes the Recorder Log.
- Select the number of Future Days to Schedule of Logs.
- Select the number of Past Days to Keep of Logs.
- Click the Save
 button to save the settings.
Step 4: Create Assets for Recording
A show can be recorded in segments, recording each segment as a separate asset. Optionally, the show can be recorded as one asset, capturing GPO, GPI, and Virtual Events. Typically, these assets will be created as Links so they can be scheduled using GSelector or Loaded using a Flat File Load.
At times there may be the need to record the audio to a File. This can be done by selecting File in the Record To field on the Record Control Event and entering a File Path using the variables in Zetta.
For these record examples we will set up Link assets.
|

|
To Create Assets for recording, perform the following steps:
|
- In the Library Module select the Link tab
- Click the Add New Media
 button
- Give each Asset a Title.
- If the asset is to be played while recording, select the Playback Method of Play Incoming File from the Extra tab. If not skip to step 6.
- Set the Target Duration.
- Click the Station Specific tab and make the Asset active for the playback stations.
- Select a Category for the asset.
- Save
 the Asset.
- Repeat if recording the show in segments. An asset will be needed for each segment of the show.
See the Links topic for more details on the Links Metadata card.
Note: When a Play Incoming File asset is rerecorded, all cue points and virtual events, which are not locked, are cleared from the asset when recording starts.
Recording a Show in Segments for Playback
In this section: show/hideshow/hide
Step 1: Configure GPIO Event Command Mappings to Start and Stop a Background Recording
Configure the individual opto closures for Start recording and Stop recording. This Step can be skipped if using Timed recordings.
|

|
To Configure a System GPIO Command Mapping to Start and Stop a Background Recording, perform the following steps:
|
- From the Configuration Menu, click System.
- Click the Command Mappings tab
- Click Add GPIO Event Mapping option from the Add new mapping
 drop-down button.
- Enter a Name for the GPIO Mapping (default is New Mapping GPIO).
- Input a Description for the GPIO Mapping (optional)
- Set the GPIO Mapping Type to Standard (Default)
- Using the Processed By drop-down select the computer that has the device installed and configured above.
- In the Input Trigger Mapping (GPIs), click the Add new mapping
 button
- Uncheck the Capture option.
- Give the GPI a Name
- Set the Context to Global.
- Select the GPI Trigger name added to the GPIs (Inputs) created above when the GPIO device was added.
- Add a Rejoin event using the Execute Command, Background.Record.Start
- Select the Background Station created above.
- Select the Audio Input created above.
- Click the Add New Mapping
 button
- Uncheck the Capture option.
- Give the GPI a Name
- Set the Context to Global.
- Select the GPI Trigger name added to the GPIs (Inputs) created above when the GPIO device was added.
- Add a Local Break event with the Execute Command, Background.Record.Stop
- Select the Background Station created above.
- Select the Audio Input created above to stop recording.

- For more information on Execute Commands that can be used for Background Recorders in Zetta, see the Zetta Commands topic.
Step 2.1: Add a GPIO Record Control Event to a Recorder Clock
|

|
To Add a GPIO Record Control Event to a Recorder Clock, perform the following steps:
|
- Open the Recorder Clocks Module from the Tools menu
- Select the Background Recorder created above from the Station Select drop-down.
- Select the Day of the week the Show is to be recorded.
- If using the show's program clock, determine when the first segment will send a start opto. Select Hard Time.
- Enter a time that is a minute and a half ahead of when the opto is to fire, such as 58:30 (provided there is no show in the previous hour that would end after that point).
- Select the Audio Input created above.
- Select the route to enable when the recording starts from the Enable Route on recording start drop-down.
- Select the action to take when the recording stops from the Route state on recording stop drop-down.
- Enter a Recording Length greater than the longest time that the first segment is expected to run. If the Record Length specified here is different than the Target Duration specified for the asset created, once the recording starts the Target Duration will be adjusted to match the Record Length specified.
- Select the Start Type of GPIO since a start opto is expected from the source.
- Select the Audio format to use. See the Audio Format section for additional information.
- Select Asset as the Record To option.
- Drag and Drop the Asset created above to the Asset field where it states Drop asset to assign.
- Optionally, uncheck the Perform Marks Analysis option. This will be specific to this recording. This would typically be cleared for recordings where a silent spot/spot block is scheduled at the beginning or end of a show that is being recorded.
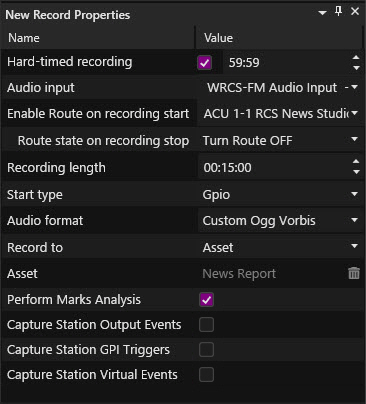
- Drag and drop the Record Control Event into the clock position.
- Repeat for each Segment of the show. Each successive segment should be a hard-timed GPIO recording. The start time should be at the midpoint of the previous spot block. For example, if segment 1 ends at :15:00 and is followed by a 4-minute spot block, segment 2 should be hard-timed at :17:00. This allows segment 1 to end up to 2 minutes late or segment 2 to start up to 2 minutes early without causing problems. This buffer time is dependent on the length of the local break. The length of these recordings should be greater than the longest time that each segment is expected to run. Some shows may require a 40-minute length, for the second segment out of three, but most shows have segments less than 30 minutes long.
- Generate a Recorder Log if event was added to the Recorder Clock.
|

Important Note!
|
Hard-timed GPIO recording will start listening for an opto at the start time. It will listen for the length of the recording. If a stop opto is received first, the recording ends and creates a 0-length audio file. Once a start opto is received, it will record until it receives a stop opto or for the length of the recording. For example, a 10-minute GPIO recording scheduled at :30:00 will wait until :40:00 for a start command. If it receives a start command at :38:00, it will record until :48:00 or until a stop opto is received. If a stop opto is received instead at :30:01, the recording immediately ends. (This stop before start behavior may change in a future version of Zetta)
|
Step 2.2: Add a Timed Record Control Event to a Recorder Clock
|

|
To Add a Timed Record Control Event to a Recorder Clock, perform the following steps:
|
- Open the Recorder Clocks Module from the Tools menu
- Select the Background Recorder created above from the Station Select drop-down.
- Select the Day of the week the Show is to be recorded.
- Using the show's program clock, determine when the first segment will send a start opto. Select Hard Time.
- Enter the time the show is to start, such as 00:00.
- Select the Audio Input created above.
- Select the route to enable when the recording starts from the Enable Route on recording start drop-down.
- Select the action to take when the recording stops from the Route state on recording stop drop-down.
- Enter a Recording Length greater than the longest time that the first segment is expected to run. If the Record Length specified here is different than the Target Duration specified for the asset created, once the recording starts the Target Duration will be adjusted to match the Record Length specified.
- Select the Start Type of Time.
- Select the Audio format to use. See the Audio Format section for additional information.
- Select Asset as the Record To option.
- Drag and Drop the Asset created above to the Asset field where it states Drop asset to assign.
- Optionally, uncheck the Perform Marks Analysis option. This will be specific to this recording. This would typically be cleared for recordings where a silent spot/spot block is scheduled at the end of a show that is being recorded.
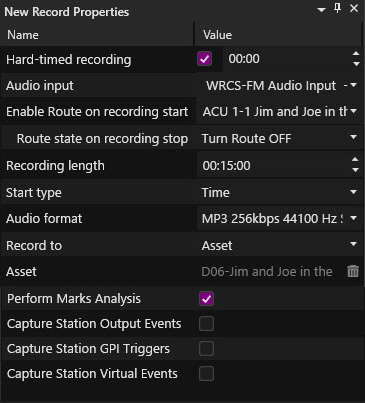
- Drag and drop the Record Control Event into the clock position.
- Repeat for each Segment of the show. Each successive segment should be a hard-timed GPIO recording. The start time should be at the midpoint of the previous spot block. For example, if segment 1 ends at :15:00 and is followed by a 4-minute spot block, segment 2 should be hard-timed at :17:00. This allows segment 1 to end up to 2 minutes late or segment 2 to start up to 2 minutes early without causing problems. This buffer time is dependent on the length of the local break. The length of these recordings should be greater than the longest time that each segment is expected to run. Some shows may require a 40-minute length, for the second segment out of three, but most shows have segments less than 30 minutes long.
- Generate a Recorder Log if event was added to the Recorder Clock.
Step 3: Playback of Show Recorded in Segments
Playing back these recordings is simple. If recording the show in segments, schedule the segments in the proper order with spot blocks in between. Add any missing elements like legal ID's and imaging, and load traffic. Set the Station to run in Auto mode for the length of the show. These shows can also be scheduled as Links when using GSelector Integration. If the Play Incoming File Playback Method was selected for the asset created, the asset can be played from any configured computer in a station Log, Hot Keys, Stacks or Metadata Card while it is recording.
Record Show, Capture Spot Blocks as Cue Points for Playback on another Station
In this section: show/hideshow/hide
Step 1: Configure Output Event Mapping so SpotBlockPlay is captured by the Recorder
|

|
To Configure Output Event Mappings, perform the following steps:
|
- From the Configuration Menu, click System.
- Click the Command Mappings tab
- Select the desired GPIO Command Mapping or create a new GPIO Mapping.
- Select the Output Event Mappings tab
- Add an Execute Command.
- Give the command a Name.
- Select the Output Event field for the command.
- In the Properties for the Output Event select the Task Type Sequencer.SpotBlockPlay
- Select the Station (01 WRCS-FM) that the Cue Point will be captured.
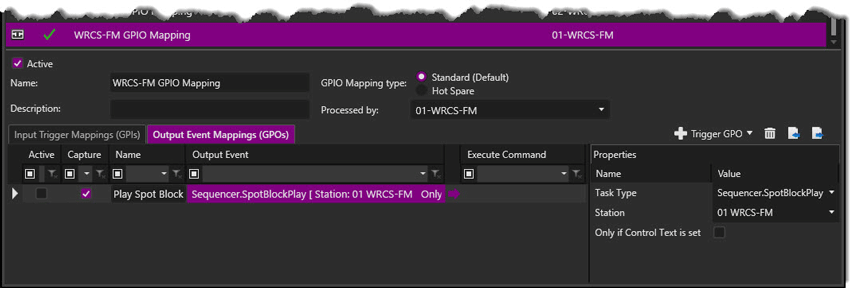
- Save
 the Command Mapping
Step 2: Add a Timed Record Control Event to Recorder Log/Clock to Capture SpotBlockPlay Output Event
|

|
To Add a Timed Record Control Event to a Recorder Log/Clock to Capture SpotBlockPlay Output Event, perform the following steps:
|
- Open the Recorder Clocks or Recorder Logs from the Tools menu
- Select the Background Recorder created above from the Station Select drop-down.
- Select the Day of the week or Date the Show is to be recorded.
- Right-click the Hour of the Clock/Log.
- From the resulting menu select Insert, then Control Event.
- Select Record from the Insert Context Event consideration window.
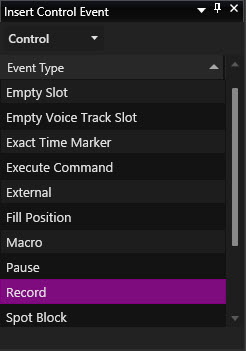
- In the New Record Properties window, enable the Hard-timed recording checkbox.
- Enter the time the show/recording is to start, such as 59:59.
- Select the Audio Input created above.
- Enter a Recording Length. If the Record Length specified here is different than the Target Duration (Play Incoming File) specified for the asset created, once the recording starts the Target Duration will be adjusted to match the Record Length specified.
- Select the Start Type of Time.
- Select the Audio format to use. See the Audio Format section for additional information.
- Select Asset as the Record To option.
- Drag and Drop the Asset created above to the Asset field where it states Drop asset to assign.
- Optionally, uncheck the Perform Marks Analysis option. This will be specific to this recording. This would typically be cleared for recordings where a silent spot/spot block is scheduled at the beginning or end of a show that is being recorded.
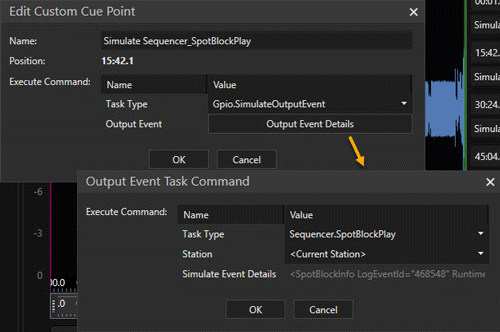
- Check the Capture Station Output Events option. This will Capture the start of a Spot Block and create a Simulate Sequencer_SpotBlockPlay Cue Point with a Task Type of GPIO.SimulateOutputEvent with an Output Event details task type of Sequencer.SpotBlockPlay
- Select the Capture Station (01 WRCS-FM).
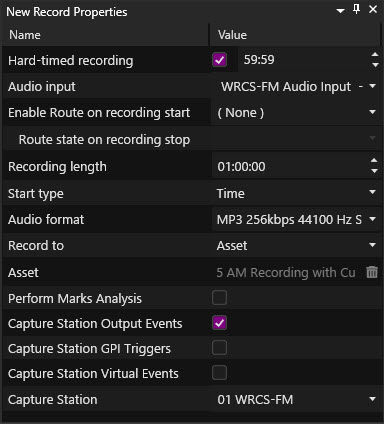
- Drag and drop the Record Control Event into the clock position.
- Generate a Recorder Log if event was added to the Recorder Clock.
- After the recording completes, confirm the spot block start events were captured by the recorder.
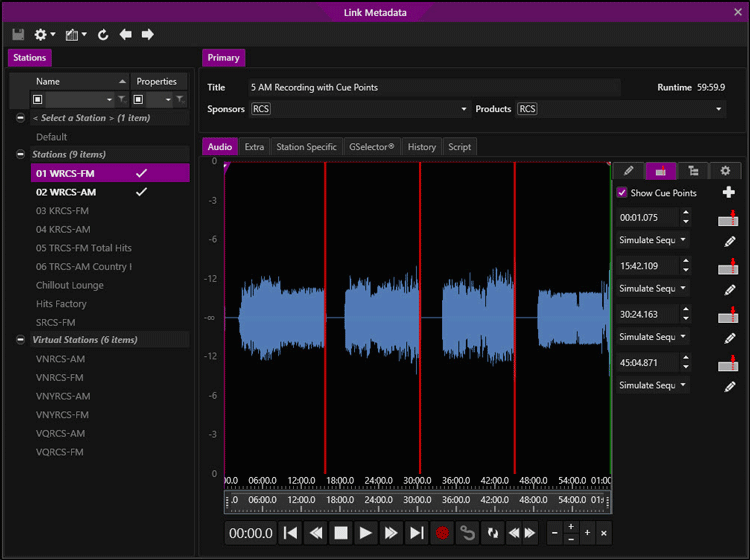
- Note the Captured Cue points in the Audio graph of the Metadata Card. This is where the Spot Blocks played on the station that was recorded/captured. The Spot Blocks that played on the station had a Split Behavior of Master Silent, hence the regions of silence. Click the Edit
 button to view the details of the captured cue point.
Step 3: Configure Output Event Mapping so SpotBlockPlay cue points trigger MoveUpAndPlayNextSpotBlock on Playback
|

|
To Configure Output Event Mapping so SpotBlockPlay cue points trigger MoveUpAndPlayNextSpotBlock on Playback, perform the following steps:
|
- From the Configuration Menu, click System.
- Click the Command Mappings tab
- Select the desired GPIO Command Mapping or create a new GPIO Mapping.
- Select the Output Event Mappings tab
- Add an Execute Command.
- Give the command a Name.
- Select the Output Event field for the command.
- In the Properties for the Output Event select the Task Type Sequencer.SpotBlockPlay
- Select the Station (02 WRCS-AM) that will play the Recording with Cue Points.
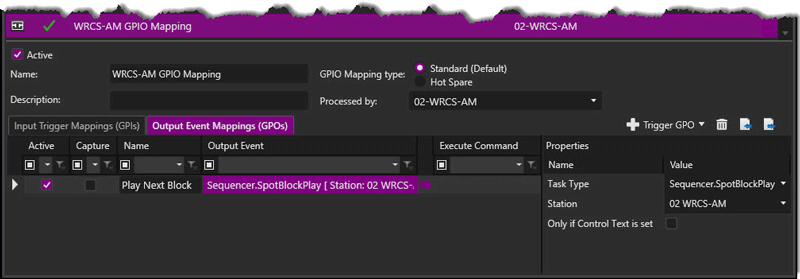
- Select the Execute Command field.
- In the Properties for the Execute Command select the Task Type Sequencer.MoveUpAndPlayNextSpotBlock
- Select the Station (02 WRCS-AM) that will play the Recording with cue points

- Save
 the Command Mapping.
Step 4: Schedule the Record Event with Captured Output Events and Corresponding Spot Blocks
The Recorded Event can be scheduled using GSelector or loaded using a Flat File Load. Any ETMs placed before the Spot Block for traffic load should be Reset ETMs. For this example, we will simply add the required events into the station Log. If the Play Incoming File Playback Method was selected for the asset created, the asset can be played from any configured computer in a station Log, Hot Keys, Stacks or Metadata Card while it is recording.
|

|
To Schedule a Recording with SpotBlockPlay Cue Points, perform the following steps:
|
- Open the Logs Module
- Select the playback Station (02 WRCS-AM).
- Select the Hour that the recorded asset will play.
- Open the Library Module and select the Links tab
- Locate the Asset created.
- Drag and drop the asset into the desired hour of the log.
- Right-click the hour. From the resulting menu select Insert, then Control Event.
- Drag and Drop a Spot Block for each cue point, into the Log below the Recorded asset.
- Optionally, drag and drop an ETM before each Spot Block. Set the ETM to Reset for the approximate time of the Spot Block.
- Load Traffic or Drag and Drop the Spots into the Spot Blocks from the Library Module.
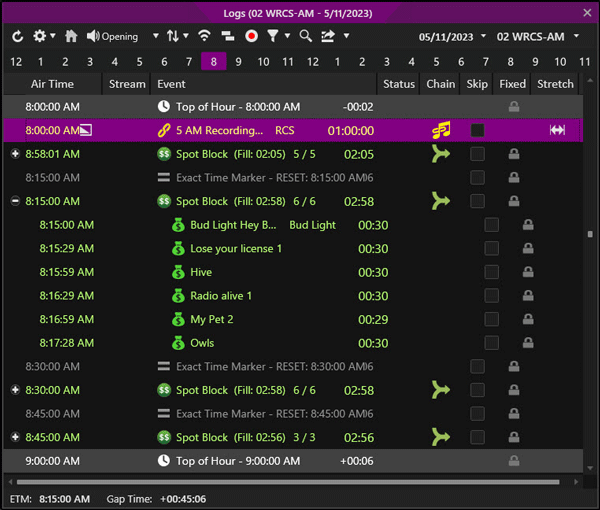
- When the recorded event plays, the recorded audio will pause when the SpotBlockPlay is played, and the Next Spot Block will be fired.

|

Important Note!
|
At least one additional stream/output will be needed if the Station is to play back an Asset which will pause and execute future Spot Blocks during the paused state.
|
- The recorded audio is also advanced to the point where the end of the original Spot Block was when recorded. The recorded audio will resume playing when the fired Spot Block is completed. If there is an event beyond the audio, it will transition to this event as it would any other event (based on the mode and chain type).
Record an External Source and Capture GPI Triggers for Playback with Spot Blocks
In this section: show/hideshow/hide
Step 1: Configure Network Operation for the Capture Station
|

|
To add GPIs to a Network Operation tab on a configured Station, perform the following steps:
|
-
In the Configuration Menu, click Stations.
- Select the Station (01 WRCS-FM) to edit.
- Click the Network Operation tab.
- In the Available GPIs, select the available Spot Block Start and Spot Block End GPIs (Inputs) the station will use that were configured for the computer.
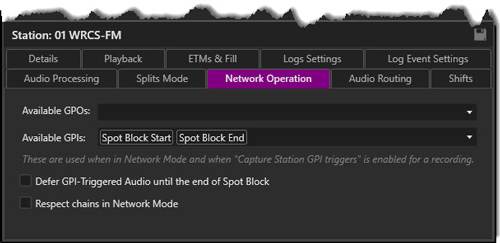
- Click Save
 to save the settings. See the Network Operation topic for more details on the settings in this window.
Step 2: Configure Command Mappings to Capture GPI Triggers
|

|
To Configure Command Mappings to Capture GPI Triggers, perform the following steps:
|
- From the Configuration Menu, click System.
- Click the Command Mappings tab
- Click Add GPIO Event Mapping option from the Add new mapping
 drop-down button.
- Enter a Name for the GPIO Mapping (default is New Mapping GPIO).
- Input a Description for the GPIO Mapping (optional)
- Set the GPIO Mapping Type to Standard (Default)
- Using the Processed By drop-down select the computer.
- Click the Add New Mapping
 button.
- In the Input Trigger Mappings tab, deselect the Active checkbox as we will be just capturing the GPI at this time.
- Ensure Capture is checked.
- Add a Name for the GPI
- Set the Context to Global
- Select the GPI trigger created when Configuring Computer GPIO Devices and added to the Network Operation tab for the Station being captured.

- Click Save
 to save the settings.
Step 3: Add a Timed Record Control Event to a Recorder Log/Clock to Capture GPI Triggers
|

|
To Add a Timed Record Control Event to a Recorder Log/Clock to Capture GPI Triggers, perform the following steps:
|
- Open the Recorder Clocks or Recorder Logs from the Tools menu
- Select the Background Recorder created above from the Station Select drop-down.
- Select the Day of the week or Date the Show is to be recorded.
- Right-click the Hour of the Clock/Log.
- From the resulting menu select Insert, then Control Event.
- Select Record from the Insert Context Event consideration window.

- In the New Record Properties window, enable the Hard-timed recording checkbox.
- Enter the time the show/recording is to start, such as 59:59.
- Select the Audio Input created above.
- Enter a Recording Length. If the Record Length specified here is different than the Target Duration (Play Incoming File) specified for the asset created, once the recording starts the Target Duration will be adjusted to match the Record Length specified.
- Select the Start Type of Time.
- Select the Audio format to use. See the Audio Format section for additional information.
- Select Asset as the Record To option.
- Drag and Drop the Asset created above to the Asset field where it states Drop asset to assign.
- Optionally, uncheck the Perform Marks Analysis option. This will be specific to this recording. This would typically be cleared for recordings where a silent spot/spot block is scheduled at the beginning or end of a show that is being recorded.
- Check the Capture Station GPI Triggers option.
- Select the Capture Station (01 WRCS-FM).
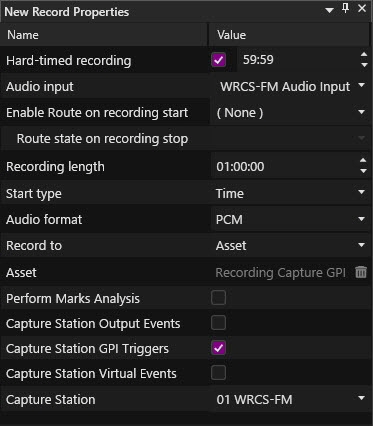
- Drag and drop the Record Control Event into the clock position.
- Generate a Recorder Log if event was added to the Recorder Clock.
- After the recording completes, confirm the GPI Triggers were captured by the recorder.
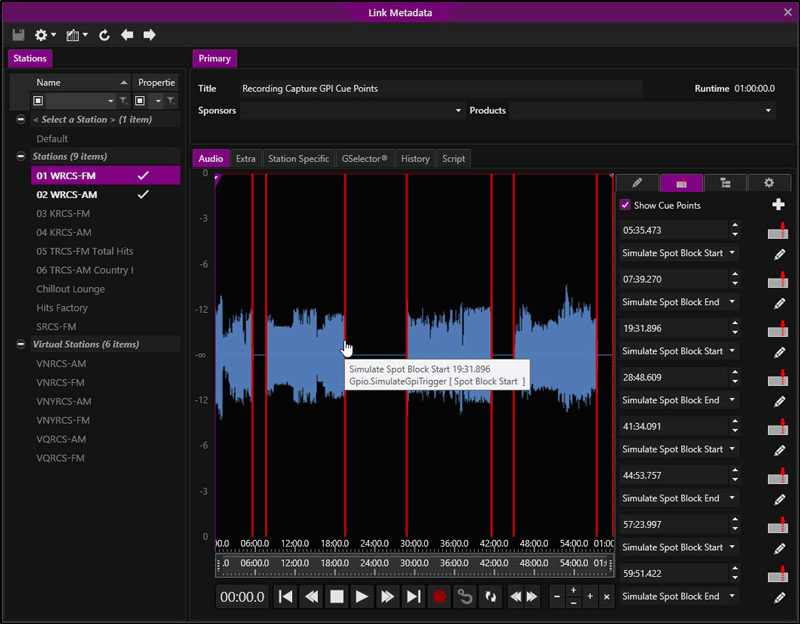
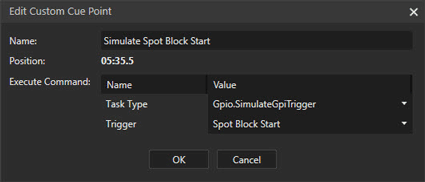
- Note the captured Cue Points in the Audio graph of the Metadata Card. This is where the GPI Triggers were received on the station that was recorded/captured. The Spot Blocks that played on the station had a Split Behavior of Master Silent, hence the regions of silence. Click the Edit
 button to view the details of the captured cue point.
Step 4: Configure Command Mappings so GPI triggers execute SyncToAndPlayNextSpotBlock.RemoveQueued and StopSpotBlock
|

|
To Configure Command Mappings so GPI triggers execute SyncToAndPlayNextSpotBlock.RemoveQueued and StopSpotBlock, perform the following steps:
|
- From the Configuration Menu, click System.
- Click the Command Mappings tab
- Select the desired GPIO Command Mapping or create a new GPIO Mapping.
- Select the Input Triggers Mappings tab
- Click Add new Mapping
 .
.
- Ensure Active is checked for this input.
- Clear the Capture checkbox as we will not be capturing this input.
- Give the command a Name.
- Set the Context to Global if not set.
- Select the GPI Trigger to execute Sequencer.SyncToAndPlayNextSpotBlock.RemoveQueued command.
- Select the Execute Command field.
- In the Properties window for the Execute Command select the Task Type, Sequencer.SyncToAndPlayNextSpotBlock.RemoveQueued
- Select the Station (02 WRCS-AM) that is playing the Recording with the Cue Points.
- Select Played as the Prior Event Status

- Click Add new Mapping
 .
.
- Ensure Active is checked for this input.
- Clear the Capture checkbox as we will not be capturing this input.
- Give the command a Name.
- Set the Context to Global if not set.
- Select the GPI Trigger to execute Sequencer.StopSpotBlock command.
- Select the Execute Command field.
- In the Properties window for the Execute Command select the Task Type, Sequencer.StopSpotBlock
- Select the Station (02 WRCS-AM) that will play the Recording with the Cue Points.

- Save
 the Command Mapping.
Step 5: Schedule Record Event with Captured GPI Triggers and Corresponding Spot Blocks
The Recorded Event can be scheduled using GSelector or loaded using a Flat File Load. Any ETMs placed before the Spot Block for traffic load should be Reset ETMs. For this example, we will simply add the required events into the station Log. With the GPI Trigger method of capturing the start and end of a spot block the user is not limited to the Spot Block Length of the original show, meaning the user can add more or less spots to the spot block as needed. If there is not a captured GPI Trigger to stop the Spot Block, Zetta will use the length of the Spot Block from the recording as the duration of the spot block when the recording is played. If the Play Incoming File Playback Method was selected for the asset created, the asset can be played from any configured computer in a station Log, Hot Keys, Stacks or Metadata Card while it is recording.
|

|
To Schedule a Recording with GPI Trigger Cue Points, perform the following steps:
|
- Open the Logs Module
- Select the playback Station (02 WRCS-AM).
- Select the Hour that the recorded asset will play.
- Open the Library Module and select the Links tab
- Locate the Asset created.
- Drag and drop the asset into the desired hour of the log.
- Right-click the hour. From the resulting menu select Insert, then Control Event.
- Drag and Drop a Spot Block for each cue point, into the Log below the Recorded asset.
- Optionally, drag and drop an ETM before each Spot Block. Set the ETM to Reset for the approximate time of the Spot Block.
- Load Traffic or drag and drop the Spots into the Spot Blocks from the Library Module.
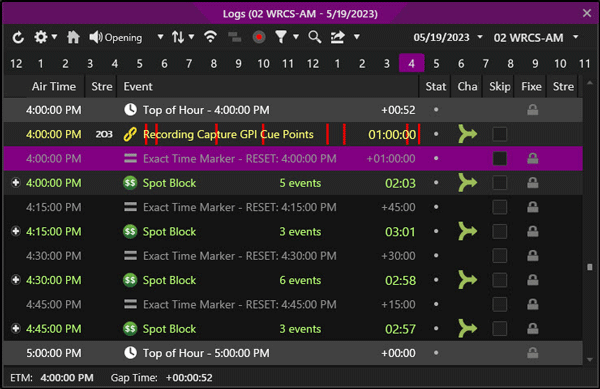
- When the recorded event plays, the recorded audio will pause when the Sequencer.SyncToAndPlayNextSpotBlock.RemoveQueued GPI Trigger is played, and the Next Spot Block will be fired.

|

Important Note!
|
At least one additional stream/output will be needed if the Station is to play back an Asset which will pause and execute future Spot Blocks during the paused state.
|
- The recorded audio is advanced to the next cue point where the Sequencer.StopSpotBlock GPI Trigger is located. The recorded audio will resume playing when the Spot Block is completed. If there is an event beyond the recorded audio, it will transition to this event as it would any other event (based on the mode and chain type).
Record a Radio Show Capturing Virtual Events for Playback
In this section: show/hideshow/hide
Step 1: Configure Log Event Settings for the Recorded Station
|

|
To configure Log Event Settings for a Station to Capture Virtual Events during a recording, perform the following steps:
|
- Click the Log Events Settings tab in Configuration | Stations
- Select the Event Type to configure.
- In the bottom setting pane for the event Type check the 'Capture asset type as virtual events in background recording' option.
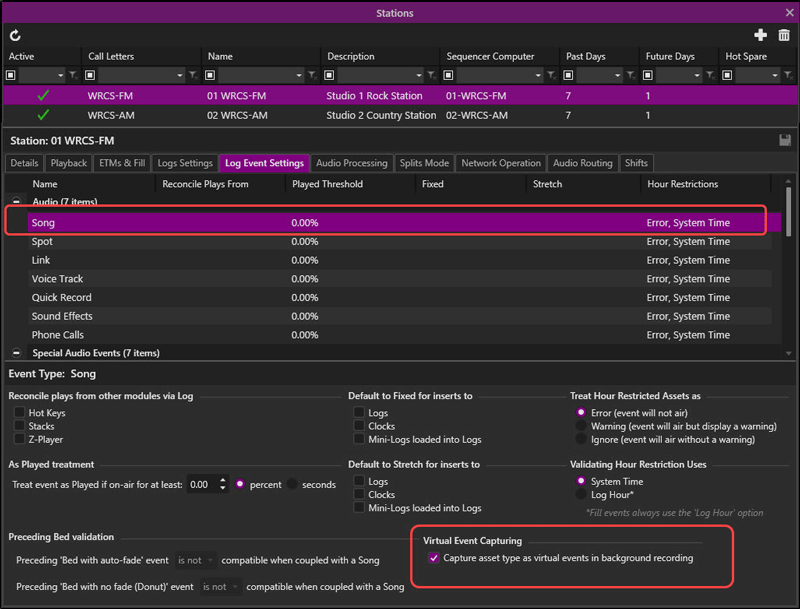
- Select the next Event Type to configure.
- In the bottom setting pane for the event Type check the 'Capture asset type as virtual events in background recording' option.
- Continue until all Event Types are configured.
- For any event types to exclude clear the check for the 'Capture asset type as virtual events in background recording' option.
- Click Save
 button to save the changes.
Step 2: Add a Timed Record Control Event to a Recorder Log/Clock to Capture Virtual Events
|

|
To Add a Timed Record Control Event to a Recorder Log/Clock to Capture Virtual Events, perform the following steps:
|
- Open the Recorder Clocks or Recorder Logs from the Tools menu
- Select the Background Recorder created above from the Station Select drop-down.
- Select the Day of the week or Date the Show is to be recorded.
- Right-click the Hour of the Clock/Log.
- From the resulting menu select Insert, then Control Event.
- Select Record from the Insert Context Event consideration window.

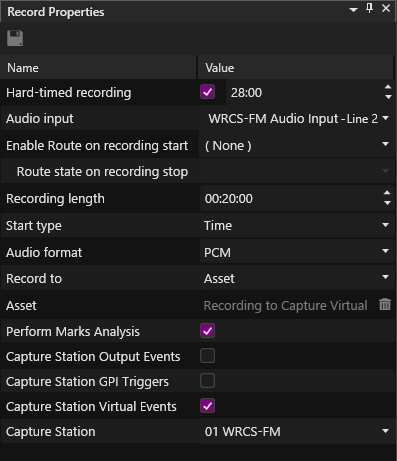
- In the New Record Properties window, enable the Hard-timed recording checkbox.
- Enter the time the show/recording is to start, such as 59:59.
- Select the Audio Input created above.
- Enter a Recording Length. If the Record Length specified here is different than the Target Duration (Play Incoming File) specified for the asset created, once the recording starts the Target Duration will be adjusted to match the Record Length specified.
- Select the Start Type of Time.
- Select the Audio format to use. See the Audio Format section for additional information.
- Select Asset as the Record To option.
- Drag and Drop the Asset created above to the Asset field where it states Drop asset to assign.
- Optionally, uncheck the Perform Marks Analysis option. This will be specific to this recording. This would typically be cleared for recordings where a silent spot/spot block is scheduled at the beginning or end of a show that is being recorded.
- Check the Capture Station Virtual Events option.
- Select the Capture Station (01 WRCS-FM).
- Drag and drop the Record Control Event into the clock position.
- Generate a Recorder Log if event was added to the Recorder Clock.
- After the recording completes, confirm the Virtual Events were captured by the recorder.
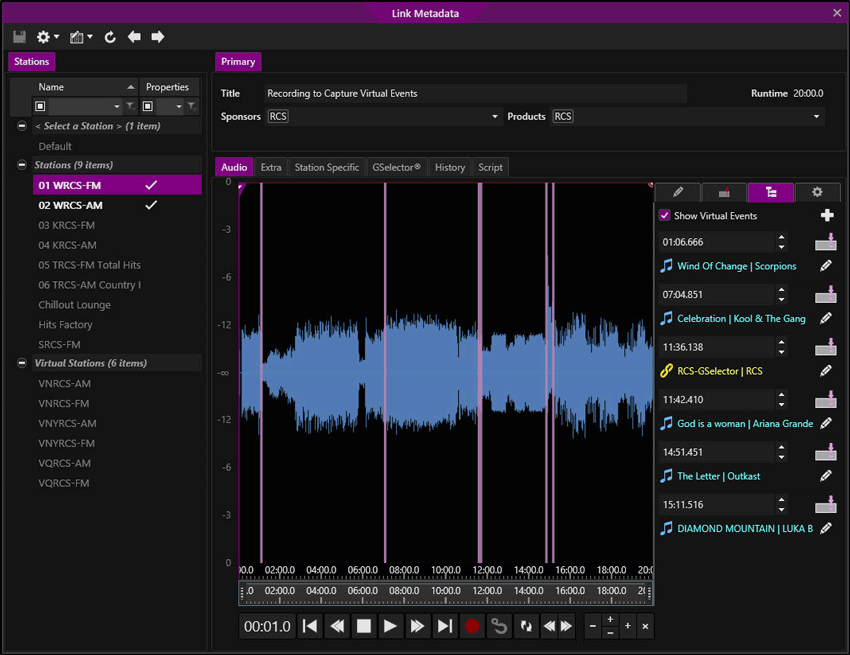
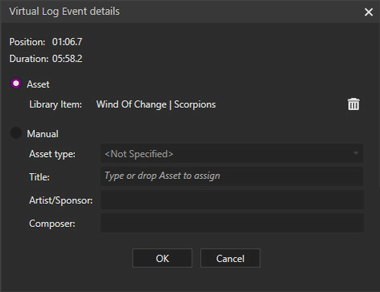
- Note the captured Virtual Event marks in the Audio graph of the Metadata Card. This is where the Virtual Events were captured on the station that was recorded/captured. Click the Edit
 button to view the details of the captured Virtual Event.
Step 3: Playback Recording with Captured Virtual Events
The Recorded Event can be scheduled using GSelector or loaded using a Flat File Load. If the Play Incoming File Playback Method was selected for the asset created, the asset can be played from any configured computer in a station Log, Hot Keys, Stacks or Metadata Card while it is recording.
|

|
To Schedule a Recording with Virtual Events, perform the following steps:
|
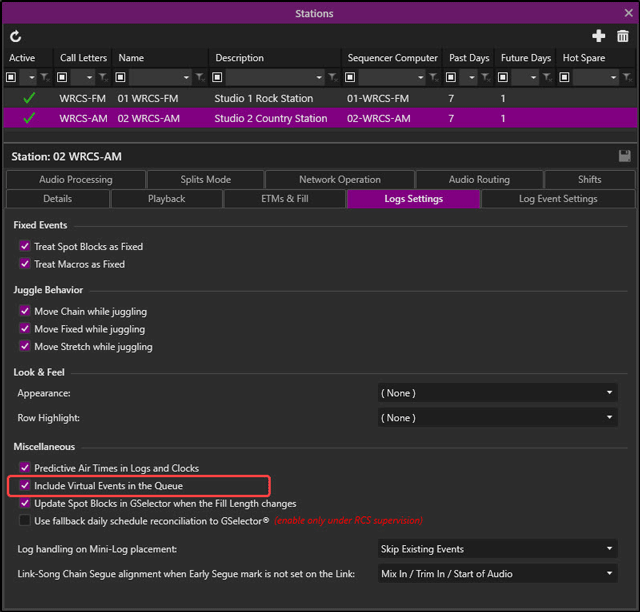
- Go to the Logs Settings tab in Station Configuration for the Station (02-WRCS-AM) that will be playing the Recording.
- In the Logs Settings ensure Include Virtual Events in the Queue is checked.
- Save
 the any changes to the Station Configuration
- Open the Logs Module
- Select the playback Station (02 WRCS-AM).
- Select the Hour that the recorded asset will play.
- Open the Library Module and select the Links tab
- Locate the Asset created.
- Drag and drop the asset into the desired hour of the log.
- Open the on-air window for the station (02 WRCS-AM) and make sure the virtual events option is turned on
 . You should see the virtual events following the recorded event with the virtual events markers.
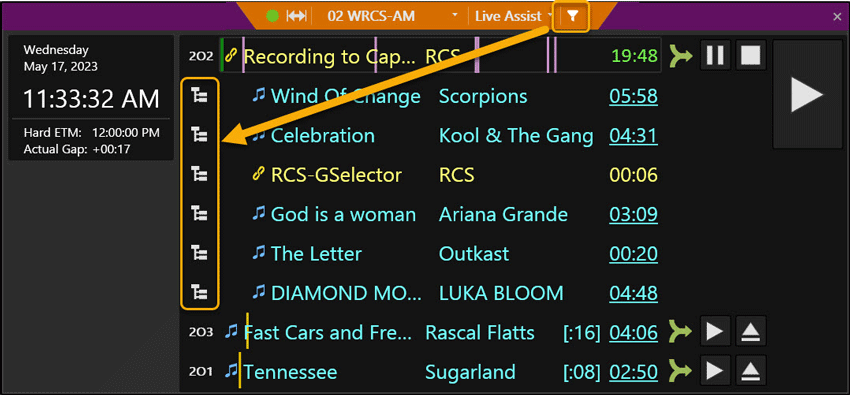
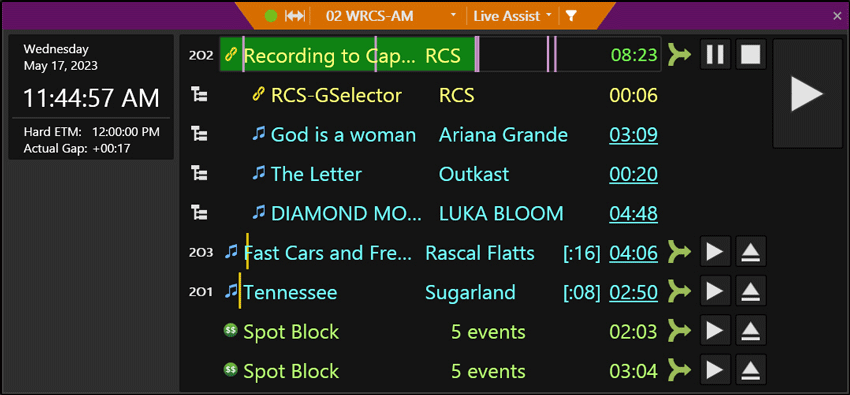
- As each virtual event is played, it will be removed from the display.
Background On Demand Recording using Cue Points
On Demand recordings can be set up to record to File, Asset or FTP site to automatically record a News Bulletin to send to a Website as a Podcast. For this option, a Cue Point can be inserted at the start of the opening News Jingle to initiate the recording and then another Cue Point at the end of the closing News Jingle to complete the recording.
In this section: show/hideshow/hide
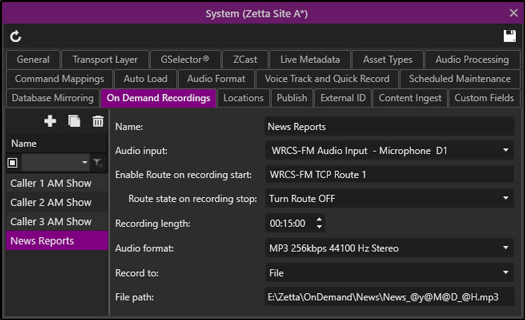
Step 1: Setup On Demand Recordings to a File
On Demand recordings can be set up to record to File, Asset or FTP site. In this example we will record to a File.
|

|
To configure a On Demand Recording, perform the following steps:
|
- From the Configuration Menu, click System.
- Click the On Demand Recording tab
- Click the Add Recording button
- Enter a unique Name for the recording
- Select an Audio Input from the drop-down. The audio input selected should be an input that will be available at the required time. If the input is being shared with Voice Tracking or Quick Record, it is evident that no VT or QR can occur during an On Demand Background recording.
- Select the route to enable when the recording starts from the Enable Route on recording start drop-down.
- Select the action to take when the recording stops from the Route state on recording stop drop-down.
- Insert a maximum Recording Length for the recording. Record Length must reflect the maximum expected length of the target event.
- Choose an Audio Format from the drop-down of configured Audio Formats.
- Select File from the Record To field.
- Enter a Path to the location for Zetta to save the file when finished recording. The File path will need to be shared if it is to be accessible to all machines which will be accessing this directory. File Path must include the target file name and extension. The extension should match the Format defined.
- Click Save
 to save the settings.
Step 2: Create a Background Insert/Auto Start Cue Point in the Intro
Cue Points can be used to add embedded cue markers at various points in an audio file to perform commands. Use the Marking Tool to insert a Cue Point into the Intro audio for the News.
|

|
To create a Cue Point in the Intro audio to start an On Demand recording, follow these steps:
|
- Open the Library from the Modules Menu
- Double-click the desired asset to edit
- Select the Station or Cut in the left tab.
- Click on the audio graph to set the Play marker at the point where the Recording should start.
- Select the Cue Points tab
- Select the Add new Cue Point
 button.
- Select <Custom> from the drop-down.
- Name the Cue Point
- In the Execute Command column select the Task Type of Background.OnDemandRecording.Insert
- In the Select the Background Recorder from the drop-down.
- Select the On Demand Recording created.
- Select Auto Start. The command invokes the background recorder to INSERT a blank audio file in the File Path specified (in the On Demand Configuration) and START (Auto Start enabled) recording the event.
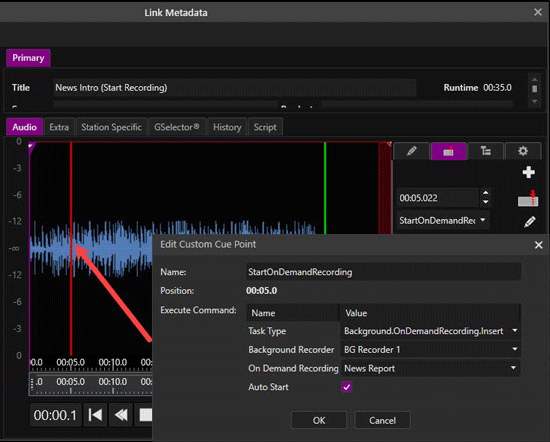
- Click OK to close the Edit Custom Cue Point window.
- When finished editing the Metadata card click the Save
 button.
Step 3: Create a Background Stop Cue Point in the Outro
Use the Marking Tool to insert a Cue Point into the Outro audio for the News.
|

|
To create a Cue Point in the Outro audio to stop an On Demand recording, follow these steps:
|
- Open the Library from the Modules Menu
- Double-click the desired asset to edit
- Select the Station or Cut in the left tab.
- Click on the waveform graph to set the Play marker at the point where the Recording should stop.
- Select the Cue Points tab
- Select the Add new Cue Point
 button.
- Select Custom from the drop-down.
- Name the Cue Point
- In the Execute Command column select the Task Type of Background.OnDemandRecording.Stop
- Select the Background Recorder from the drop-down.
- Select the On Demand Recording created. The command stops the background recorder and saves the audio file to the specified File Path. The STOP cue point must occur before the Segue marker.
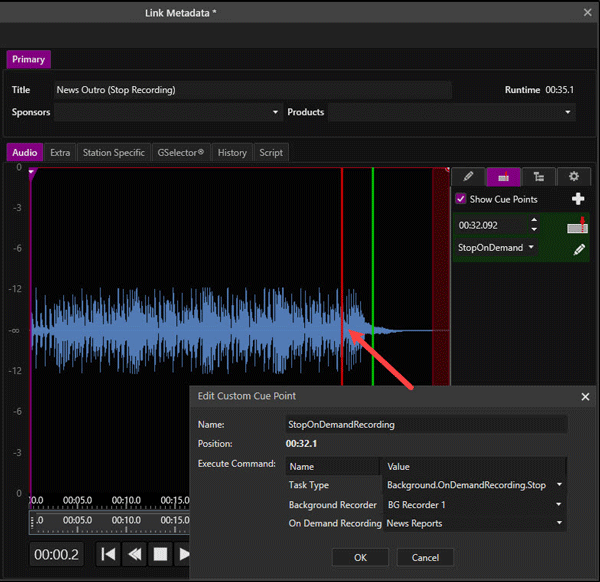
- Click OK to close the Edit Custom Cue Point window.
- When finished editing the Metadata card click the Save
 button.
Step 4: Setup Station log to play the Intro, Live Event and Outro
|

|
To Setup Station log to play the Intro, Live Event and Outro, follow these steps:
|
- Open Logs from the Modules Menu
- Open the Library from the Modules menu
- Locate the Assets to add to the Log.
- Drag and drop the Intro, News Live Event, and the Outro to the Station Log.
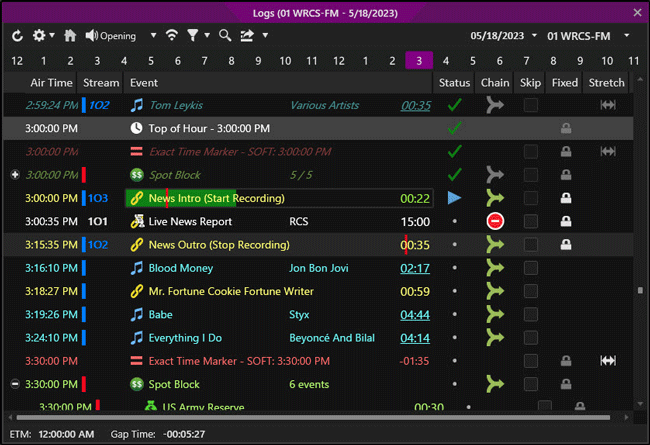
The Background record events will appear in the log as above, with a RED marker warning the user of the upcoming Cue Point to insert/auto start and stop the background recording.
Monitoring Background Record Events
Using the Background Recorder log from the Tools | Recorder Logs option the scheduled and on demand recordings can be monitored.
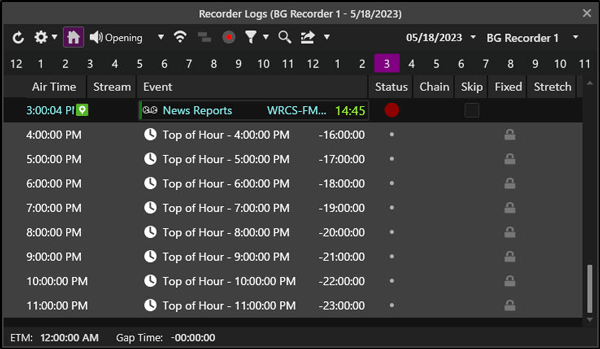
Editing the Marks of a Play Incoming Asset Recording
If the asset is configured up with the Play Incoming File Playback Method, then the audio of the asset can be viewed, played and marks added/changed while it is recording.
|

|
To edit Play Incoming Assets for a recording Show, perform the following steps:
|
- In the Library Module locate the asset being recorded.
- Double-click the asset that is recording to open the Metadata card for the asset.
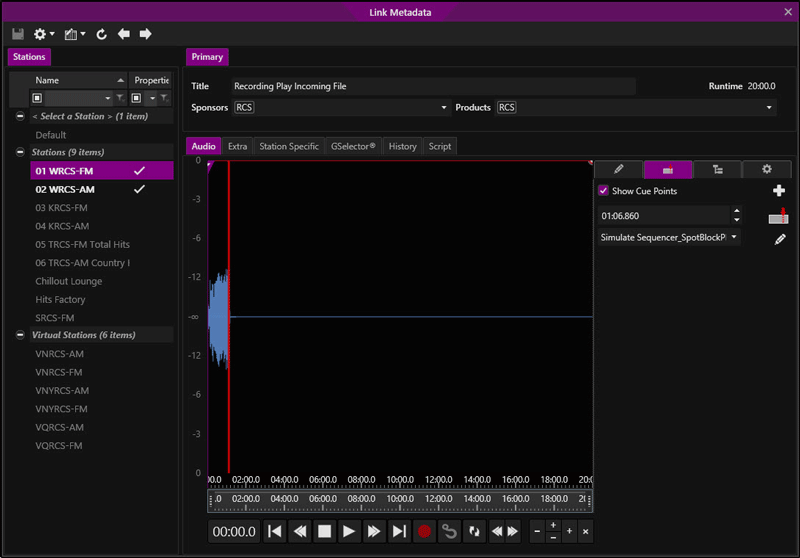
- As the Audio is recording the audio can be played using the play
 button in the Marks Editor. Use the refresh
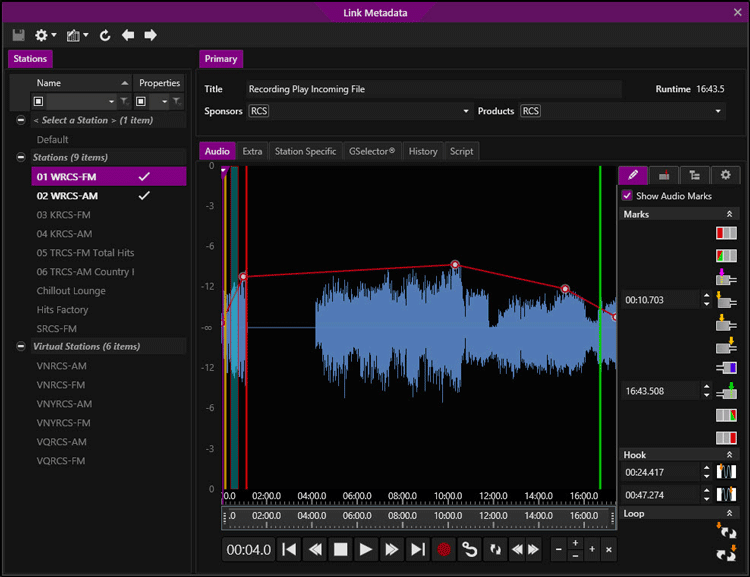
  button to refresh the waveform as the audio is being recorded. Any captured Cue Points will be shown as they occur in the Audio graph.
- Use the Marks tab or right-click the audio graph to insert marks in the audio. If Perform Marks Analysis is checked and marks are added during the recording of the audio, Zetta will not insert the Trim In, Trim Out and Segue markers when the recording is finished. However, if the audio is untouched (no marks are added during the recording), Zetta will analyze and add the Trim In, Trim Out and Segue markers when the recording is finished.
- Save
 the metadata card. This will refresh the Metadata card.
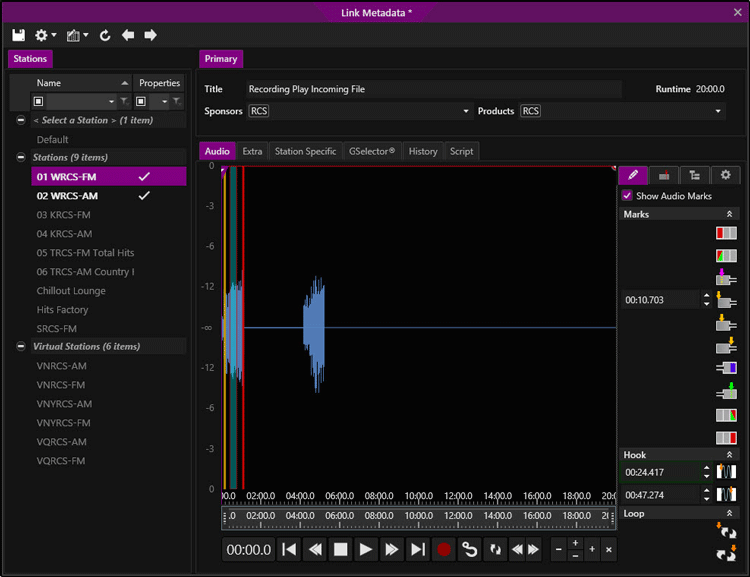
- When the audio is finished recording the Target Duration will change to show the actual Runtime of the audio file. The Spot Blocks that played on the recorded station had a Split Behavior of Master Silent, hence the region of silence after the captured Output Event.
Troubleshooting GPIO Issues
After the recordings have been processed, review the log to ensure they were recorded properly. If there are problems, recent opto activity can be viewed in the Tools | GPIO History. Contact RCS Support for additional assistance.
Welcome < Features < Background Recording
© 2007-2024 RCS All Rights Reserved.

 button.
 button to save the changes.
 button.
 button to save the GPIO device settings.
 to add a new.
  button to save the settings.
 button
 the Asset.
 drop-down button.
 button
 button


 the Command Mapping


 button to view the details of the captured cue point.


 the Command Mapping.


 to save the settings. See the Network Operation topic for more details on the settings in this window.
 drop-down button.
 button.
 to save the settings.


 button to view the details of the captured cue point.
 .
.
 .
.
 the Command Mapping.


 button to save the changes.


 button to view the details of the captured Virtual Event.

 the any changes to the Station Configuration
 . You should see the virtual events following the recorded event with the virtual events markers.


 to save the settings.
 button.
 button.
 button.
 button.


 button to refresh the waveform as the audio is being recorded. Any captured Cue Points will be shown as they occur in the Audio graph.
 the metadata card. This will refresh the Metadata card.
