Welcome < Modules < Library Module < Audio Marks Editor
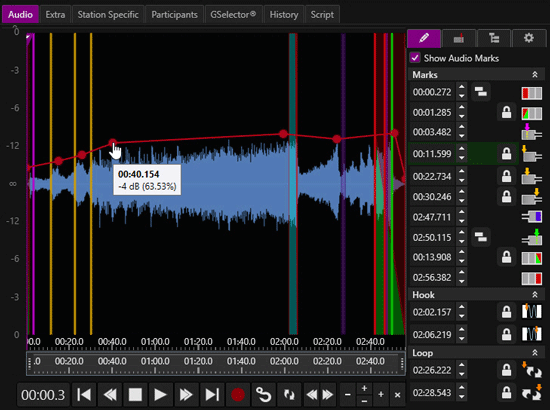
The Audio Marks Editor in Zetta® enables the user to view a single assets graph and insert or modify all relevant transition mark points that will be respected by the On-Air (Sequencer), Stacks player, Hot Keys® and Z-Player, using the Marks tab. The Cue Point tab is used to add Cue Point to execute commands when the audio plays. The Virtual Events tab is used to add virtual event markers. The Miscellaneous tab can be used to adjust the Time Stretch and Normalization values. Dragging and dropping an audio file from the file system or from Zetta Editor will attach that audio file to the asset and switch to the Audio tab (if not already shown).
Click any area in this image for help

Click any area in this image for help
The Audio Marks Editor is launched when double-clicking an asset in a module, such as the Library, Logs, Clocks, etc. The Audio Marks Editor is the default editor unless an additional editor is specified as the default editor in the External Editors tab of the Computers Configuration.
Below is a visual representation of the marks that can be used.
|
Cursor |
Trim In |
Fade In |
Mix In |
Intro 1-3 |
Early Segue |
Segue |
Fade Out |
Trim Out |
Volume Point |
Hook |
Loop |
Cue Point |
Virtual Event |
|
|
|
|
|
|
|
|
|
|
|
|
|
|
|
|
|
|
|
|
|
|
|
|
|
|
|
|
|
|
These markers can be moved by clicking and dragging the line that represents the marker. When dragging a marker in the audio graph the audio in-line with the location of the mouse cursor will play. This allows the user to drop the marker in the correct location. To have the audio stutter when the marker is held in place, simply hold the SHIFT key while dragging. To turn off all audio play while dragging, hold the CTRL key. To disable the play of audio deselect the “Audio-scrubbing when adjusting marking points & placing Virtual Log Events (hold Shift to stutter, Ctrl to suspend)” option in the Preferences window.
In this Topic: show/hideshow/hide
When the asset metadata card is opened the default tab displayed is the Audio tab. The following editing features allow the user to adjust the element for on-air play:
|
|
Volume – The volume control will change the volume of the track. To adjust the volume click and drag the volume point or the line between two points to the desired volume level. To insert additional volume points right-click the graph and choose Insert Volume Point or double-click the line (when the hand cursor appears) to insert a volume point. When the mouse is hovered over a volume point, the mark point, dB and the volume percentage are displayed in a tool tip. Optionally, double-click and existing Volume Point to remove it. The first and last volume point can be re-positioned by dragging the volume point to the desired position. Double-clicking on the first or last volume point will reset their levels back to 0 dB (100%). The Volume points will be red |
Waveform graph - When opening an audio event for the first time, the Audio tab will generate a waveform graph for that audio. After the waveform graph has been generated, a visual representation of the audio will be displayed that can be edited.
Timeline – The Timeline allows the user to navigate to any place in the audio by clicking and dragging the play marker to the desired location.
Zoom/Pan – The Zoom/Pan is part of the timeline. It allows the user to zoom into the graph and pan to the left or right. The mouse wheel can also be used to zoom in and out of the graph. To Zoom into a specific section of the graph using the mouse wheel, simple hover the mouse cursor over the desired location in the graph and use the mouse wheel scroll up to Zoom in.

Play Cursor Position - The time to the left of the play controls shows the time of the play cursor position for the audio file.
 |
Zoom In/Out graph – The buttons to the right of the play controls can be used to zoom in and out of the graph vertically and horizontally for more precise editing. Use the Page buttons to page right and left. Use the X button to Zoom out full. |
The Play Controls are located at the bottom of the Marks Editor.
|
Go to start – The Go to start button will move the play marker to the beginning of the audio or Trim In if defined. |
|
|
Rewind – The rewind button will rewind the audio by five seconds every time it is used. |
|
|
Stop – Stop will stop the play and moves the play marker back to the starting point or Trim In point of the audio. |
|
|
Play – Play will play the audio starting from the play marker. The Marks Editor will use the assigned Audition Stream Group to play the asset. |
|
|
Pause - The Pause button will pause the audio playing and hold the play position. |
|
|
Fast forward – Fast Forward will fast-forward the play marker five seconds in the audio each time it is clicked. |
|
|
Go to end – The Go to end will move the Play marker to five seconds before the segue point or five seconds before the Trim Out point of the audio if a segue is not set. |
|
|
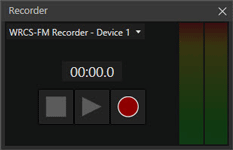
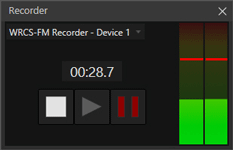
Record – The record button launches a simple recorder, that allows the user to choose an audio input that can record audio to be played later from Zetta. Use the Voice Tracker/Metadata Card Audio Input setting in the Audio Assignments tab of the Computers configuration window to set the default audio input. |
 |
Hook - The Hook button plays the Hook defined for the asset. |
 |
Loop - The Loop button places the cursor at the Loop in point and starts to play the Loop the Loop will continue to play until the audio is stopped. When the Loop button is in Loop mode |
The Marks  tab shows the Marks, Hook, and Loop information. Each section shows the time
  of each marker and an icon
 ![]() that represents the type of mark. Selecting the icon will set the mark where the play cursor is located in the graph of the audio. Clicking this time will start the audio playing from the selected mark and will continue playing to the end of the audio or until stopped
that represents the type of mark. Selecting the icon will set the mark where the play cursor is located in the graph of the audio. Clicking this time will start the audio playing from the selected mark and will continue playing to the end of the audio or until stopped ![]() manually. Clicking the marks adjustment up and down arrows to the right of a set marker will step the marked time by 100 milliseconds (default). The Marks adjustment step can be changed in the Preferences configuration.
manually. Clicking the marks adjustment up and down arrows to the right of a set marker will step the marked time by 100 milliseconds (default). The Marks adjustment step can be changed in the Preferences configuration.
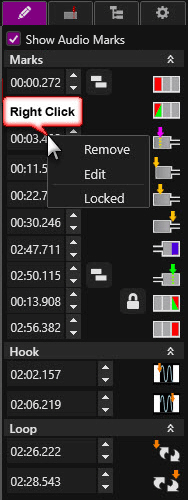
Right-clicking the time bubble will display a menu to remove, edit or lock the mark.
Remove - Click Remove to remove the Marking point.
Edit - Selecting Edit will change the time  bubble so the time value can be edited manually.
Locked - The locked option can be used to protect the Marking point when replacement audio with similar length is imported for the asset. The option will lock or unlock the marking. The following marks are lockable: trim in, fade in, mix in, intros, early segue, segue, fade out, trim out, hook, loop, and volume points.
Example: You have an existing News audio asset with Marks, Hook or Loop. The audio for this news asset changes daily. With the Mark(s), Hook or Loop locked the audio will be updated with the import but the Mark(s), Hook or Loop will remain the same. If the Mark(s), Hook or Loop are not locked the Mark(s), Hook or Loop will be removed.
Intros and Volume Points are locked as groups. Either all are locked or none are locked. If all intros are locked, a locked icon will show for all three intros in the Metadata Card even if they don't all have values. If a Volume Point is locked, all points are locked and the point will be all red  .
.
Marks created in the marks tab for an asset that has a metadata scope of Cuts will be cut specific. Which means each Cut for an asset can have different marks.
The Show Audio Marks option allows the user to show/hide the set audio marks from the graph of the audio. When this option is checked, the marks are shown, if it is unchecked they are hidden. This option is also available in the View section of the right-click menu of the graph. This setting is persistant per user login session.
|
|
Trim In – Trim In marks the start point of the audio. Audio before the Trim In point will be ignored. |
|
|
|
Fade In - The Fade In marks the fade end point for the beginning of the audio. When the audio is played it will fade up for the length of the Fade. The value for the Fade In reflects the duration of the Fade In. |
|
|
|
Mix In - When the Mix In marker is set it allows the user to create for a "deeper" segue with the preceding event. Normally, Zetta will line up the previous events Segue with the next event's Trim In (or audio start if no Trim In set). If there is a quiet opening or fade in for the audio, the user may choose to start the next event earlier than the previous event's segue marker. If Mix In is set, we overlap previous event's Segue mark with next event's Mix In mark. |
|
|
Intro – In most cases, the intro is the audio before the vocals begins. The audio can be marked with up to three intro points to show where the accents in the introduction are when playing in the log. |
||
|
|
|
Intro 1 |
|
|
|
Intro 2 |
|
|
|
Intro 3 |
|
|
Early Segue – The Early Segue is a special type of a segue mark that acts in a conjunction with a Link-Song chain, or 'Bed' asset flag. |
|
|
|
Segue - The Segue point mark defines where the next event should start in Live-Assist or Automation mode. Enable the Auto Fade Songs at Segue in the Playback tab of the Station Configuration to have songs with a set Segue start to fade at the Segue when the song is played by the Sequencer. To preview the Segue in the Marks Tool setup an Opening and Ending asset in the Marking Tool Segue Preview section of the Preferences Configuration. |
|
|
|
Fade Out - The Fade Out, marks the start of the fade at the end of the audio. When the audio is played it will fade down for the length of the Fade. The value for the Fade Out reflects the duration of the Fade Out. |
|
|
|
Trim Out – Trim Out marks the end point of the audio. Audio after the Trim Out point will be ignored. |
|
|
|
Play Segue - The Play Segue button is displayed if the Marking Tool Segue Preview option is configured in the Preferences Configuration for the user. This button is used to preview the transition markers Trim In and Segue for the current asset based on the settings defined in the Marking Tool Segue Preview preference. Clicking on the Play Segue button next to the Trim In button in the Marks tab, starts the playback of the opening asset, beginning at xx number of seconds ahead of the segue point. When the segue point of the opening asset plays, the current assets audio will also start to play. If playback continues to the segue point of the current asset, the defined ending asset will begin to play at that point. Clicking on the Play Segue button next to the Trim In button in the Marks tab, starts the playback of the current asset, beginning a xx number of seconds ahead of the segue point. When the segue point of the current asset plays, the ending assets audio will also start to play. Set the transition seconds in the Test Transition section of the Marking Tool Segue Preview preference. |
|
Hook In – The Hook In is used to mark the starting point of a Hook created from a section of the audio. |
|
|
Hook Out – The Hook Out is used to mark the ending point of a Hook created from a section of the audio. |
See the Hooks section of the guide for more information.
 |
Loop In – The Loop In is used to mark the starting point of a Looped section of the audio. |
 |
Loop Out – The Loop Out is used to mark the ending point of a Looped section of the audio. |
Cue Points  can be used to add embedded cue markers at various points in an audio file to perform tasks such as those available in the Command Mappings tab. Cue Points can be configured in the System Configuration Command Mappings tab or an asset specific cue point can be configured using the <Custom> option. To add a Cue Point to the Audio click the Add New Cue Point
  button in the Cue Points tab to the right of the graph. Use the drop-down to select a system mapped Cue Point or select <Custom> to open the Edit Custom Cue Point window.
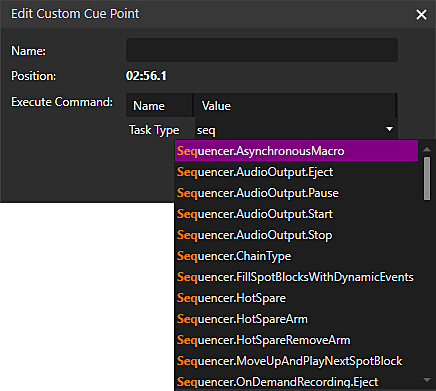
Give the Cue Point a descriptive Name as to its task. Select or enter the Task Type for the Execute Command that Zetta is to perform for this cue point when the asset is played.
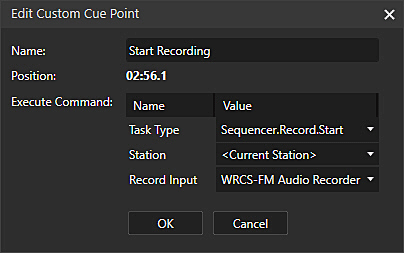
Select the additional parameters based on the Task Type selected. This Cue Point is then saved with the asset; it does not show in the Command Mappings tab.
Hovering the mouse cursor over a Cue Point in the Audio graph will show a tooltip for the Cue Point.
To view the Cue Point options right-click a cue point in the list.
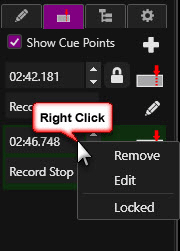
Remove - To remove unwanted Cue Points from an asset simply right-click the cue point in the cue points tab on the right side of the graph and select remove from the resulting menu.
Edit - To edit an existing Cue Point simply right-click the cue point in the cue points tab on the right side of the graph and select Edit. This will open the Edit Custom Cue Point window.
Locked - The locked option can be used to protect the cue point when replacement audio with similar length is imported for the assets. The option will lock or unlock the cue point.
Example: You have an existing News audio asset with a Cue Point at the beginning and one at the end. The audio for this news asset changes daily. With the cue points locked the audio will be updated with the import but the cue points will remain the same. If the cue points are not locked the cue points will be removed.
|
Important Note! |
If the audio imported is shorter than the last cue points position of the existing audio then any locked cue point whose old position was before the new trim in or after the new trim out/length are moved to trim in or trim out. |
The Show Cue Points option allows the user to show/hide the set Cue Point marks from the graph of the audio. When this option is checked, the marks are shown, if it is unchecked they are hidden. This option is also available in the View section of the right-click menu of the graph. This setting is persistant per user login session.
Virtual Log Events  can be used to mark events in a long audio event or program. A Virtual Event can be a Song, Link, Spot, Voice Track, Quick Record or Custom asset. The Assets are shown with the Log Event colors and fonts defined in the Themes & Appearances window.
Note: The Metadata Card will not update dynamically if you change Log Event colors in Themes. Close and reopen the Metadata card to view the change.
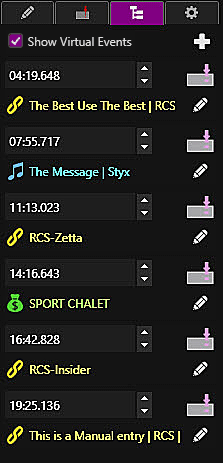
The Virtual Log Event Markers are used to mark these events in the long program. To add an existing Asset as a Virtual Log Event, simply drag and drop the asset from the Library to the Virtual Log Events pane or audio graph. When dragging and dropping an asset or marker in the audio graph the audio in-line with the location of the mouse cursor will play. This allows the user to drop the asset or marker in the correct location. To have the audio stutter when the marker is held in place with the mouse cursor, simply hold the SHIFT key while dragging. Optionally, to turn off all audio play while dragging, hold the CTRL key. To disable the play of audio deselect the “Audio-scrubbing when adjusting marking points & placing Virtual Log Events (hold Shift to stutter, Ctrl to suspend)” option in the Preferences window.
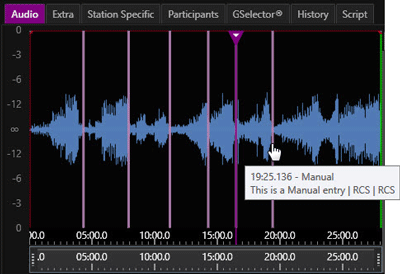
If multiple selected events are dragged into the audio graph the virtual event markers will be placed evenly in the audio graph. Optionally, click the Add New Virtual Log Event  button in the Virtual Log Events tab to open the Virtual Log Event details window. Use the Library Module to drag and drop an asset to the Drop Asset to assign field.
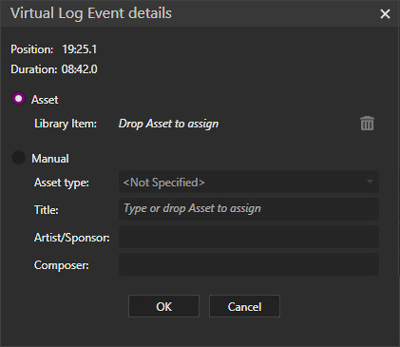
Optionally, if the asset does not exist in the Library, click the Manual option and enter the details of the event. If a similar asset does exist in the Library, drag and drop that asset to the Title field to auto populate the fields for easy editing. The Virtual Log Event marker is shown in the Audio as a light purple line. These Virtual Events can be shown in the On-Air module using the Filter  button. To include these Virtual Log Events in the Queue, enabled the 'Include Virtual Events in the Queue' option in the Log Settings tab of the Station Configuration window. If Live Metadata is configured for the station, the Live Metadata for these events is sent.
To view the Virtual Log Event options right-click a Virtual Log Event in the list.
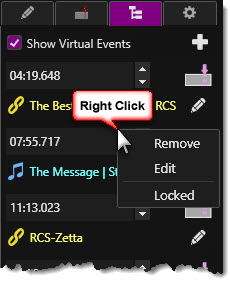
Remove - To remove unwanted Virtual Events from an asset simply right-click the event in the Virtual Events tab on the right side of the graph and select remove from the resulting menu.
Edit - To edit an existing Virtual Event simply right-click the Virtual Event in the Virtual Events tab on the right side of the graph and select Edit. This will place the cursor in the position time field for manual editing of the time of the Virtual Log Event.
Locked - The locked option can be used to protect the Virtual Event when replacement audio with similar length is imported for the assets. The option will lock or unlock the cue point.
Example: You have an existing News audio asset with a Virtual Event at the beginning and one at the end. The audio for this news asset changes daily. With the Virtual Event locked the audio will be updated with the import but the Virtual Events will remain the same. If the Virtual Events are not locked the Virtual Events will be removed.
Click the Edit  button to open the Virtual Log Event details window.
The Show Show Virtual Events option allows the user to show/hide the set Virtual Events marks from the graph of the audio. When this option is checked, the marks are shown, if it is unchecked they are hidden. This option is also available in the View section of the right-click menu of the graph. This setting is persistant per user login session.
Click any area in this image for help
Click any area in this image for help
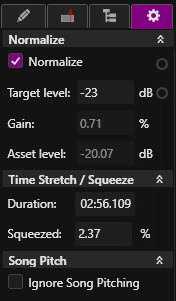
The normalize section is station specific and the values shown in this section are based on the values set in the Configuration | Stations | Audio Processing | Normalization section for the specific station. This section is not visible for the Default station or for assets with a Cuts metadata scope. The following options are available in this section:
Normalize – The Normalization is pulled from the station specified normalization but can be removed for a specific asset by deselecting the box. When it is adjusted from the station specific setting, the override circle ![]() is filled. To reset this field to its default value, click the override circle
is filled. To reset this field to its default value, click the override circle  to the right of the field and select Reset.
Target level dB – The Target level dB value is pulled from the station specified normalization but can be adjusted for a specific asset. When it is adjusted here the override circle ![]() is filled. To reset this field to its default value, click the override circle
is filled. To reset this field to its default value, click the override circle  to the right of the field and select Reset.
Gain % - The Gain % is the percentage of Gain based on the normalize value.
Asset level dB – The Asset level dB is the Assets original dB value.
Time Stretch / Squeeze allows the user to non-destructively stretch or squeeze an assets playback to meet a specific length of time. The user can type in the desired duration they would like and the Percentage of stretch or squeeze for the audio will be displayed. A maximum and minimum warning range can be set in the Audio Processing tab of the System Configuration window. Time Stretch settings are cut specific for assets that have a metadata scope of Cuts. Which means each Cut for an asset can have a different Time Stretch configuration.
If the calculated Time Stretch exceeds the warning range, set in the Audio Processing tab, the font color for the Squeezed percentage will turn orange and a warning indicator in the upper right hand corner of the Metadata Card will be displayed.

If the calculated Time Stretch exceeds the error range (.5 – 2.0) the font color for the Squeezed percentage will turn red and an error indicator in the upper right hand corner of the Metadata Card will be displayed.

When Time Stretch is being used and an audio marker is changed, such as the Trim for the audio, the desired duration will remain unchanged, but the time stretch percentage will be adjusted to achieve the desired duration.
When a Time Stretched asset is scheduled in the Log the duration time and Runtime for the asset will be displayed with an underline so the user can easily see the audio has been Time Stretched.

The Song Pitch section is shown in the Adjustments tab of a song asset. Enabling the Ignore Song Pitching option will tell Zetta to ignore the Pitch Songs by setting in the Playback tab of the Station Configuration window when this song is played by the sequencer.
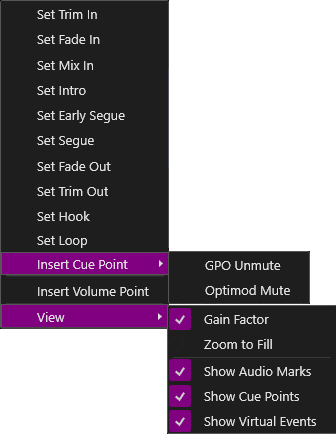
By right-clicking the Audio Marks graph the user is presented with a list of editing options.
Audio markers can easily be inserted by using the mouse or keyboard shortcuts. By right-clicking on the desired audio event within the graph the Trims, Mix In, Intros, Early Segue, Segue, Hook, Loop, Fade In, Fade Out and Volume points can be easily added to the audio asset from the generated menu. This menu can also be used to enable or disable the Gain Factor set in the Stations Configuration Audio Processing tab and change the view of the graph. See the Audio Marks Editing Features section of this topic for more details on inserting Volume Points.
Once the markers are inserted, they can easily be adjusted by hovering over the desired marker until the positioning hand or arrows appear.

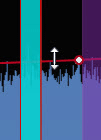
Then click and drag the marker to the desired location. The numeric value of the marker will be displayed in the marks tab. This value will adjust as the marker is moved to a new position. The user can also edit this value by right-clicking the value in the Marks tab and selecting Edit. Using the mouse the user can click or highlight a portion of the numeric field and enter the desired value. When dragging a marker in the audio graph the audio in-line with the location of the mouse cursor will play. This allows the user to drop the marker in the correct location. To have the audio stutter when the marker is held in place, simply hold the SHIFT key while dragging. To turn off all audio play while dragging, hold the CTRL key. To disable the play of audio deselect the “Audio-scrubbing when adjusting marking points & placing Virtual Log Events (hold Shift to stutter, Ctrl to suspend)” option in the Preferences window.
The Insert Cue Point option in the right-click menu can be used to insert any predefined Cue Point from the Command Mappings tab of the System Configuration window. Hover the mouse over the insert Cue Piont option to view the list of available Cue Points.
The View options will show a submenu of options that will change the visual representation of the graph and the marks.
The Gain Factor option will enable or disable the normalized gain value set on the audio. When Gain Factor is checked it is enabled.
The Zoom to Fill will change the graph to fill the editing window when applied to the graph.

Normal View

Zoom to Fill
The right click menu allows for quick access to the show options for Marks, Cue Points and Virtual Events. The Show Audio Markers, Show Cue Points and Show Virtual Events can be used to show or hide the marks in the audio graph. When the specific option is checked its marks are shown, if it is unchecked its markers are hidden.
The Keyboard can also be used to control the play controls, the zoom/pan and the insertion of marks of the audio graph. For a full list of commands that can be created, see the System Keyboard Mappings table. Using the default keyboard mapping the keyboard can do the following:
Use the Space bar to Play or Stop the play of the audio. When the graph has focus, pressing the space bar will start the audio playing. If the audio is already playing, pressing the space-bar will stop the audio from playing.
Use the CTRL + Minus will Zoom out on the graph, down to 100%
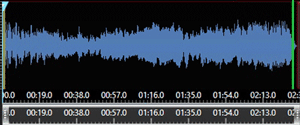
Use the CTRL + Plus will Zoom in on the graph.
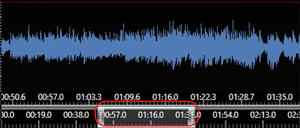
Use CTRL + Left Arrow to Pan Left
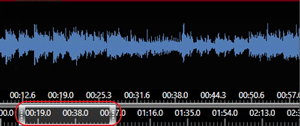
Use the CTRL + Right Arrow to Pan Right
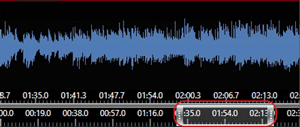
**The Mouse wheel can be used to Zoom in and Out of the Wave form vertically.
The following lists the MarksTool command mappings that exist in Zetta.
|
System Keyboard Mapping |
Execute Command |
Parameters |
Description |
|
|
MarksTool.Autoscrub |
Step (seconds) |
AutoScrub will step the play marker by the specified number of seconds forward or back continually depending on the device used for the mapping. If Auto Scrubbing is started while stuttering is in progress, the play marker will jump seek to the next offset, stutter at that position for the seek interval, then jump again, stutter at the next position for the seek interval and so on. This will continue till the end or beginning of the audio is reached or is stopped (either by moving the scrub wheel to the center position or by using stop command). If the scrubbing wheel, of the device, is moved back to the center position while seeking, seeking will stop and regular stutter will continue in a loop in the current seek position. Stopping will stop both scrubbing and stuttering. This command is designed to be used with a Jog/Shuttle wheel such as one of the JL Cooper devices supported in Zetta. |
|
|
MarksTool.FastForward |
Step (seconds) |
Fast Forwards moves the play marker forward by the specified number of seconds, every time it is used. |
|
|
MarksTool.HookPlay |
<None> |
Plays the Hook of the audio shown in the marks tool. |
|
|
MarksTool.JumpBeginning |
<None> |
Jumps to the Beginning of the audio shown in the marks tool. |
|
|
MarksTool.JumpEnd |
<None> |
Play cursor will move to 5 seconds before the Segue marker, Trim Out or End of file depending on what Marking Points are present. |
|
|
MarksTool.Loop |
<None> |
Puts the Marks Tool in Loop mode to play the loop defined for the audio shown in the Marks Tool. |
|
|
MarksTool.Mark.CuePoint |
CuePoint |
Inserts the selected cue point into the marks tool at the cursor position. |
|
|
MarksTool.Mark.FadeIn |
<None> |
Marks the Fade In duration position. |
|
|
MarksTool.Mark.FadeOut |
<None> |
Marks the Fade Out duration position. |
|
Alt + End |
MarksTool.Mark.HookEnd |
<None> |
Marks the cursor position in the marks tool as the Hook End position. |
|
Alt + Home |
MarksTool.Mark.HookStart |
<None> |
Marks the cursor position in the marks tool as the Hook Start position. |
|
|
MarksTool.Mark.Intro |
<None> |
Inserts an Intro marker at the cursor position in the Marks Tool |
|
|
MarksTool.Mark.LoopEnd |
<None> |
Inserts a Loop End Marker at the cursor position in the Marks Tool |
|
|
MarksTool.Mark.LoopStart |
<None> |
Inserts a Loop Start Marker at the cursor position in the Marks Tool |
|
|
MarksTool.Mark.MixIn |
<None> |
Inserts a Mix In marker at the cursor position in the Marks Tool |
|
|
MarksTool.Mark.Reset |
<None> |
Removes all marking points from the Asset. |
|
|
MarksTool.Mark.Segue |
<None> |
Inserts a Segue marker at the cursor position in the Marks Tool |
|
Control + Home |
MarksTool.Mark.TrimIn |
<None> |
Inserts a Trim In marker at the cursor position in the Marks Tool |
|
Control + End |
MarksTool.Mark.TrimOut |
<None> |
Inserts a Trim Out marker at the cursor position in the Marks Tool |
|
MarksTool.Mark.VolumePoint |
<None> |
Inserts/removes a Volume Point at the current play cursor position in the Marks Tool. |
|
|
Control + Left |
MarksTool.PanLeft |
<None> |
Shifts the Zoom/Pan tool at the bottom of the graph display to the left |
|
Control + Right |
MarksTool.PanRight |
<None> |
Shifts the Zoom/Pan tool at the bottom of the graph display to the right |
|
|
MarksTool.Pause |
<None> |
This command will pause the audio playing in the Marks Tool. |
|
|
MarksTool.Play |
<None> |
This command will play the audio in the Marks Tool. If the marks tool is in Hook mode it will play the hook, if it is in Loop mode it will play the loop. |
|
|
MarksTool.PlaybackMode |
<None> |
This command will toggle the playback Mode of the Marks Tool. (Hook, Loop, All Audio) |
|
|
MarksTool.PlayPause |
<None> |
This task will pause the playback of the audio playing in the Marks Tool. |
|
|
MarksTool.PlayStop |
<None> |
If nothing is playing, playback will start. If playback has started, playback will stop and move the play head cursor to the position that play started. |
|
|
MarksTool.Record |
<None> |
Opens a small recorder for recording audio |
|
|
MarksTool.RefreshWaveform |
<None> |
This task will refresh the graph in the marks tool. |
|
|
MarksTool.Rewind |
Step (seconds) |
Moves the play marker back by the specified number of seconds in the audio, every time it is used |
|
|
MarksTool.Scrub |
Step (seconds) |
Identifies how many seconds to move the current file position. Will leave the file playback in whatever state it is currently in (stop, paused, playing or stuttering) This value can be a positive or negative double value. Common setting are 0.1 and -0.1 seconds |
|
|
MarksTool.Stop |
<None> |
This command will stop the playback of the audio and move the play cursor to the position play started. |
|
|
MarksTool.Stutter |
Step (seconds) |
Identifies how many seconds to move the current file position and then stutter at that position, this value can be a positive or negative double value. Common setting are 0.1 and -0.1 seconds |
|
Control + Add |
MarksTool.ZoomIn |
<None> |
This command will Zoom In to the graph using the Zoom/Pan tool below the graph |
|
Control + Subtract |
MarksTool.ZoomOut |
<None> |
This command will Zoom Out of the graph using the Zoom/Pan tool below the graph |
To learn how to create keyboard mappings see the Command Mappings section of this guide.
Each user will have their own style for editing Library assets. The following instructions will give a quick rundown of how to use the marks editor.
|
|
To edit an asset from the Library with the Audio Marks editor follow these steps: |
 button.
 button to add the Mix In marker.
 button.
 right-click on the audio graph and choose Insert Volume Point.
 button.
|
|
To create a Cue Point to send Live Metadata information for a specific asset follow these steps: |
 button
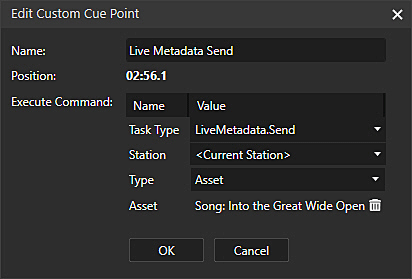
 the Asset.
Welcome < Modules < Library Module < Audio Marks Editor
© 2007-2024 RCS. All Rights Reserved.