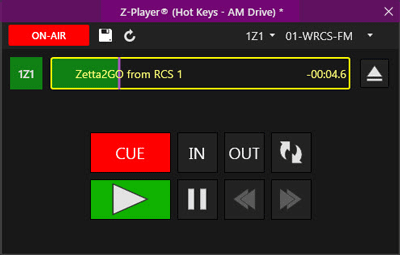
The Z-Player is designed to allow a user to drag and drop an audio item from anywhere in Zetta and load it onto a very specific playback stream. The dropped item will be a reference to the item from where it was dropped and the current settings assigned to that event. The Z-Player allows the user to Cue up the audio and set Loop markers for looping a section of the audio. The Z-Player can be used to loop a segment of an audio such as, looping a song intro as a bed for speech or Voice Tracks. Loop-in and loop-out define a range in the audio, much like a hook-in/hook-out. The main difference is that when Looping is enabled Zetta will jump back to the Loop-in position and continue to play until stopped. The Z-Player audio can be set to play in Audition mode or On-Air by simply clicking a button. The Z-Player also can be controlled with Command Mappings using a GPIO device such as JLCooper devices. The Z-Player can be customized for the user using the Z-Player Themes, Docking and Layouts.
Click any area in this image for help

Click any area in this image for help
In this Topic: show/hideshow/hide
When the Z-Player Module is opened it displays the following window:
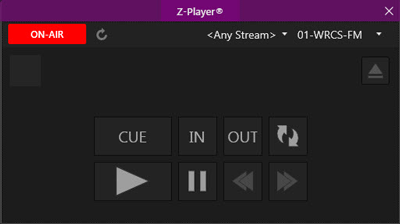
When an asset is dropped into the Z-Player the module header will be renamed to display the location where the asset was dropped from. If an audio asset is dragged and dropped into the Z-Player with the default stream setting of <Any Stream> the play controls may be disabled until the CUE button is selected.
Use the Stream drop-down to select a specific play stream for the audio. When the CUE button is selected, most of the audio controls will be enabled for On-Air play, using the selected Stream Group for the Z-Player in Playback tab of the Station Configuration or the Computer Z-Player Stream Group if one is defined. The Backwards and Forwards buttons are not available in the On-Air mode.
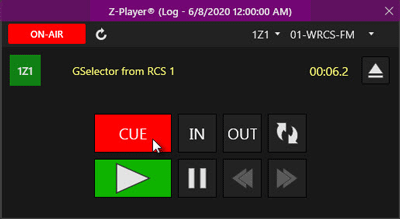
Clicking the Audition/On Air button will change the Z-Player to use the Audition Stream Group for the computer. All play controls are enabled in Audition mode.
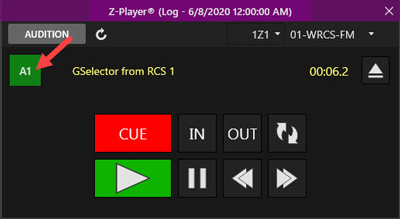
In audition mode, click on the Progress bar of the event to set the start position or drag and drop the audio start position to the desired location.


Once the start position is set, right-click the CUE button to set the start CUE position, note the purple line representing the selected CUE position.

Now use the Z-Player Audio Controls to manipulate the audio. The progress bar will show the event progress, similar to the On-Air and Logs modules. The colors of the progress bars can be changed in the Progress Bars section of the Log Editor section of the Themes & Appearances Configuration.
The functions in the toolbar of this Module include:
|
|
Playback Mode – The Playback Mode button can be used to switch between the Audition Stream Group for the computer and the Z-Player Stream Group for the station selected or the Computer Z-Player Stream Group if one is defined. The default mode is On Air; however, this can be changed using the Default Computer Role option in the Details tab of the Computer Configuration window. If an asset that has a Split Behavior and/or Tag is played, a Split command will not be sent when playing in Audition mode. This Mode button can be controlled with the Z-Player Change Playback Mode user right. The Mode button can also be controlled using a GPIO device with the ZPlayer.TogglePlaybackMode Zetta Command. Stacks are locked in Audition mode when the Site Replication Site Status is 'Armed' or 'Reconcile' for the station. |
 |
Save - The save button is available when an asset is dropped from the Hot Keys or Stacks. When Z-Player saves the event the event is saved in direct relation from where the audio is dropped. If the audio is dropped from anywhere else in Zetta it can be marked with a loop and played ON-AIR, but the changes cannot be saved. Example of Z-Player Referencing: If you drop a log event from the Hotkeys onto the Z-Player, Z-Player now contains a direct reference to that event. You can add a Loop Cue and Loop Marker to the Z-Player then save your changes. These settings will be applied directly to the event from where it was dropped. |
|
Reload Asset - Use the reload button to reload the asset from the dropped location. If the event has been deleted from the original location the Z-Player will not reload the asset, but will remove the current asset and remain empty. |
|
|
Select Stream - The Steam selection drop-down is used to select a stream for the Z-Player. The user can select a specific stream to use or select <Any Stream> to let Zetta select the next available stream. Use the Module Stream field in the command mapping tasks for Z-Player to specify the stream selected here. The stream selection is only used in On-Air mode. If a stream in not available a warning |
|
|
Select Station – The Select Station drop-down allows the user to select the station that the Z-Player will play on. When the Station selection drop-down is clicked a cursor is made available allowing the user to type and quickly locate the desired station. |
Directly below the Toolbar are the Play Controls for the Z-Player module.
In this section: show/hideshow/hide
The icon to the left of the progress bar for the audio event is the Active Stream and is used to identify the stream that is In Use. If the active stream is in use by another module the stream icon will display GRAY with RED stream text. This means if the asset is played on that stream it may have a direct effect on On-Air Play.
The progress bar shows information similar to other event list detail progress bars in Zetta. The border of the progress bar changes color based on the state of playback. If the audio is paused, the border will be yellow, if the audio is playing the border will be blue and if the audio is in Stutter mode it will be bordered in orange. The progress bar also shows any defined loop in purple. In audition mode, right-click on the Progress bar of the event to set the start position or drag and drop the audio start position to the desired location. Once the start position is set, right-click the CUE button to set the start CUE position, note the purple line representing the selected CUE position.
The Eject button to the right of the progress bar will eject the audio from the Z-Player.
The Cue button is a multipurpose button. The Cue button will cue up the audio and enable the play controls in the Z-Player. If nothing is playing and the Cue button is pressed AND HELD, the Z-Player will play from the current position until Released, when released the cursor will jump back to the original starting position. The Cue button will stop the play of audio and place the cursor play position at the start of the audio. If playback is Paused and/or the user uses the Backwards/Forwards buttons to fine-seek a position, pressing the button will set a new CUE position. Right-clicking the CUE button while playing or paused will set the new position to the current cursor position.
In, represents the Loop-in position within the audio file to which Zetta will jump back to when playback has reached the loop-out position and Looping is enabled. The IN button can also be used to jump to the Loop-in position during playback.
Out, represents the loop-out position of the audio. The OUT button can also be used to jump to the Loop-out position during playback
The Loop button puts the player in Loop mode where only the selected loop audio is played until looping is stopped. When the Loop button is selected to stop looping the audio will then play past the loop out position to the end of the audio.
Play, will play the audio from the cursor position. Clicking the button while the audio is playing will restart the audio from the original position.
The pause button is a multipurpose button. If audio is playing the button will pause the audio that is playing in the Z-Player. If the audio is paused and the pause button is selected again the play position will jump to the CUE position. If the pause button is selected yet again, after jumping to the Cue position, the cursor will jump to the Trim In position for the audio.
The Backwards and Forwards buttons are used to fine tune the position in the audio. If audio is playing or paused and one of the buttons is pressed, playback will go into SEEK MODE (continuously playing a small portion of the audio). Pressing the Backwards or Forwards button while in the SEEK MODE will take a short jump forwards/backwards in the audio. Selecting the CUE button while in SEEK MODE will set a new CUE position. Hitting PLAY while in Seek Mode will resume playback from the current position. These buttons are available in Audition mode.
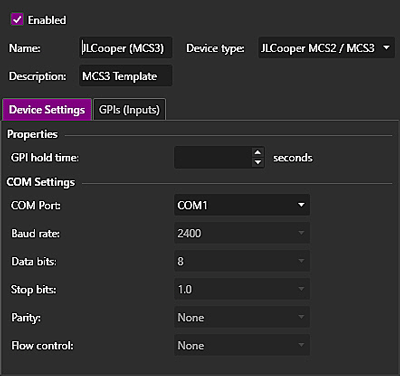
Zetta supports two JLCooper Media Control Stations, the MCS3 and MCS2 using a RS232 connection to the Computers Comport. These media control stations are typically used with the Z-Player Module in Zetta. There are Templates for the JLCooper MCS2 and MCS3 that can be imported from C:\Program Files (x86)\RCS\Zetta\Templates using the Import GPIO Devices  button.
|
|
To setup a JLCooper device to control the Z-Player, follow these steps: |
 button.
 button to add an Input.
Example GPI mappings:
MCS2 GPI button Mappings
GPI #1 = Shift Button
GPI #2 = REW Button
GPI #3 = FF Button
GPI #4 = Stop Button
GPI #5 = Play Button
GPI #6 = Record Button
GPI #7 = Jog Button
GPI #61 = Option Button
 button to save the GPIO / Routes settings for the selected computer.
 button.
 button the mapping is enabled by default.
|
Execute Command |
Parameters |
Description |
Comment |
|
ZPlayer.Arm |
Module Stream |
This is a special command that allows the Z-Player to attach to any log event currently playing on the assigned stream, when in On-Air mode. |
GPI, Cue Point or Keyboard |
|
ZPlayer.AutoScrub |
Step (seconds) Module Stream |
AutoScrub will step the play marker by the specified number of seconds forward or back continually depending on the device used for the mapping. If Auto Scrubbing is started while stuttering is in progress, the play marker will jump seek to the next offset, stutter at that position for the seek interval, then jump again, stutter at the next position for the seek interval and so on. This will continue till the end or beginning of the audio is reached or is stopped (either by moving the scrub wheel to the center position or by using stop command). If the scrubbing wheel, of the device, is moved back to the center position while seeking, seeking will stop and regular stutter will continue in a loop in the current seek position. Stopping will stop both scrubbing and stuttering. |
This command is designed to be used with a Jog/Shuttle wheel such as one of the JL Cooper devices supported in Zetta. GPI, Cue Point or Keyboard |
|
ZPlayer.Button.Cue |
Module Stream |
Command that operates like the CUE button being clicked, signals as a cue button up. |
GPI, Cue Point or Keyboard |
|
ZPlayer.Button.Pause |
Module Stream |
Command that operates as the PAUSE button being clicked. |
GPI, Cue Point or Keyboard |
|
ZPlayer.Button.Play |
Module Stream |
Command that operates like a PLAY button clicked, signals as a cue button up. |
GPI, Cue Point or Keyboard |
|
ZPlayer.Cue |
Module Stream |
Command will PAUSE the Z-Player and place the play cursor at the CUE marker position. |
GPI, Cue Point or Keyboard |
|
ZPlayer.Eject |
Module Stream |
Command that operates like a eject button clicked, signals as a eject button up. |
GPI, Cue Point or Keyboard |
|
ZPlayer.Loop |
Module Stream |
Command that operates like a LOOP button clicked, signals as a cue button up. |
GPI, Cue Point or Keyboard |
|
ZPlayer.Mark.Cue |
Module Stream |
This Command will set the CUE marker position at the current playback position. |
GPI, Cue Point or Keyboard |
|
ZPlayer.MarkLoopEnd |
Module Stream |
Command that operates like an OUT button clicked, signals as a cue button up (see Play/Pause/Stutter Mode). |
GPI, Cue Point or Keyboard |
|
ZPlayer.MarkLoopStart |
Module Stream |
Command that operates like an IN button clicked, signals as a cue button up (see Play/Pause/Stutter Mode). |
GPI, Cue Point or Keyboard |
|
ZPlayer.Pause |
Module Stream |
Command will PAUSE the Z-Player at its current file position, if not already paused. |
GPI, Cue Point or Keyboard |
|
ZPlayer.Play |
Module Stream |
Command will make the Z-Player start playing if it is not already playing. |
GPI, Cue Point or Keyboard |
|
ZPlayer.Refresh |
Module Stream |
This will refresh the Z-Player. |
GPI, Cue Point or Keyboard |
|
ZPlayer.Reset |
Module Stream |
This will reset the Z-Player. |
GPI, Cue Point or Keyboard |
|
ZPlayer.Save |
Module Stream |
This will Save the Audio settings in the Z-Player for the associated asset event in the Hot Keys or Stacks. |
GPI, Cue Point or Keyboard |
|
ZPlayer.SetPlaybackMode |
Playback Mode Module Stream |
When this command is used, it will set the Playback Mode of the ZPlayer module to On-Air or Audition. |
GPI, Cue Point or Keyboard |
|
ZPlayer.Scrub |
Step (seconds) Module Stream |
Scrub will step the play marker by the specified number of seconds forward or back depending on the device used for the mapping. If a keyboard is mapped holding down the key will cause the play cursor to continue to jump until it is released. This will leave the file playback in whatever state it is currently in (stop, paused, playing and stuttering) This value can be a positive or negative double value. Common setting are 0.1 and -0.1 seconds. |
This command is designed to be used with a Jog/Shuttle wheel such as one of the JL Cooper devices supported in Zetta. GPI, Cue Point or Keyboard |
|
ZPlayer.Stop |
Module Stream |
This command will make the Z-Player stop, if not already stopped and will reset the play cursor to the Trim In position. |
GPI, Cue Point or Keyboard |
|
ZPlayer.Stutter |
Step (seconds) Module Stream |
This option will stutter play the audio, this option is used for fine-tuning to a precise position within the audio. Stutter will start playing from the play marker for the specified seconds and then go back to the starting point and play the same number of seconds continuously in a loop until switched to a different play command or stopped by the user. If Stuttering is started while scrubbing is in progress, scrubbing will stop and regular stuttering will start at the current position. The Steps: identify how many seconds to move the current position and then stutter at that position, this value can be a positive or negative double value. Common setting are 0.1 and -0.1 seconds. |
This command is designed to be used with a Jog/Shuttle wheel such as one of the JL Cooper devices supported in Zetta. GPI, Cue Point or Keyboard |
|
ZPlayer.TogglePlaybackMode |
Module Stream |
Command that operates like the audition/onair toggle button, changes between onair and auditions streams. |
GPI, Cue Point or Keyboard |
For Example: If two Z-Player modules were open at the same time, one using the stream A and the other using stream B and a mapping was desired to start playing the Z-Player using stream A then the letter A would be placed in the Module Stream field for the mapping.
Leaving the Module Stream field blank will set the play stream to the default <Any Stream>.
 to save the mappings.
© 2007-2024 RCS. All Rights Reserved.