Welcome < Modules < Stacks Module
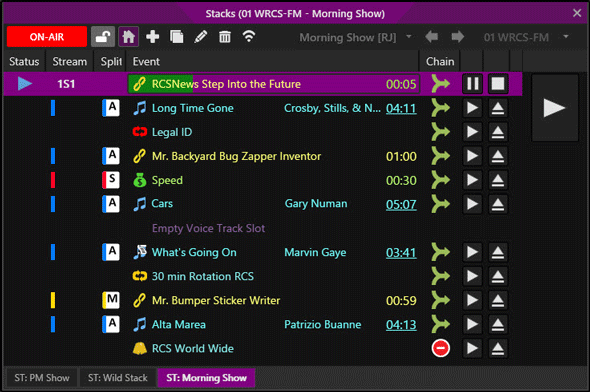
The Stacks Module is used to create a series of events. Stacks can be used to pre-program a series of events without having to manually add them to the log or program them into a scheduler. Stacks can be controlled using Command Mappings, see the Stacks Module table in the Zetta Commands section for more information on these commands.
An Asset can be auditioned from the Stacks module by simply middle-clicking the desired asset event in the Stack, changing to the Audition mode using the toolbar button or by clicking a desired play action or play position from the right-click menu.
The Access of a Stack can be Private for a single user, Public for all users or Public - Read Only for all users.
Note: Users with the 'View Configuration' Admin Right can edit, delete any Stack bank. Any banks owned by other users that are set to an Access of Private will be listed in the 'Public Stacks Banks' for this user with the 'View Configuration' Admin Right. Users without the 'View Configuration' Admin Right will not see these Private Stacks banks. Upon upgrade, all Stack banks will be Public and owned by the Supervisor user. Users can create copies of these banks for their 'Private' use.
Click any area in this image for help

Click any area in this image for help
In this Topic: show/hideshow/hide
The toolbar of the Stacks Module includes:
|
|
Playback Mode – The Playback Mode button can be used to switch between the Audition Stream Group for the computer and the Stacks Stream Group for the station selected or the Computer Stacks Stream Group if one is defined. The default mode is On Air; however, this can be changed using the Default Computer Role option in the Details tab of the Computer Configuration window. If an asset that has a Split Behavior and/or Tag is played, a Split command will not be sent when playing in Audition mode. This button is disabled when the selected Stack is playing On-Air. The Mode is persisted when changing Stacks. This Mode button can be controlled with the Stacks Change Playback Mode user right. The Mode button can also be controlled using a GPIO device with the Stacks.TogglePlaybackMode Zetta Command. Stacks are locked in Audition mode when the Site Replication Site Status is 'Armed' or 'Reconcile' for the station. |
 / / |
Lock/Unlock Stacks bank - The Lock and Unlock buttons are only visible if the Stacks Bank Locking option, in the User Preferences is set to Unlocked by default or Locked by default. When the Lock icon is shown the Stacks bank is Locked. In the Locked state the user cannot move a new asset from Library or any other module into Stack. The user cannot move an event within the Stacks bank. The user cannot eject an event. The user cannot delete or paste using keyboard shortcuts. The Stacks.ToggleBankLock Zetta Command can be set to a keyboard shortcut to allow for easy toggle of the Lock and Unlock state. |
 / / |
Auto Scroll – When pressed, the 'Auto Scroll' button will toggle between |
 |
Create new Stacks bank – The 'Create new Stacks bank' button will allow the user to create a new Stack. The Create new Stacks bank button will open the New Stacks bank window. |
 |
Copy current Stacks bank – The 'Copy current Stacks bank' will allow the user to create a new duplicate Stacks bank based on the current Stacks bank selected. The user can change the Name and set the Access of the copied bank. |
 |
Edit current Stacks bank - The 'Edit current Stacks bank' button will open the Edit Stacks bank window. All users with the 'View Configuration' Admin Right in the Accounts or Roles can edit any Stacks bank. |
 |
Delete current Stacks bank – The 'Delete current Stacks bank' button will delete the current Stack selected. Before Zetta deletes the Stack; it will prompt the user to confirm the deletion of the Stack. All users with the 'View Configuration' Admin Right in the Accounts or Roles can delete any Stacks bank. |
|
|
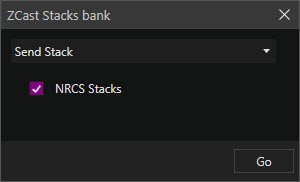
ZCast current Stacks bank - The 'ZCast current Stacks bank' button is used to send or request a stack using a ZCast Connection that has the permission to Allow Sending Stacks or Allow Requesting Stacks. Stacks banks that are received via ZCast will be set to an Access of Public and owned by the Supervisor account. |
 |
Distribute current Stacks bank via Site Replication - The 'Distribute current Stacks bank via Site Replication' button is used to publish any changes to the current Stack to the configured site replication servers. This button is only visible when Site Replication is configured. |
 |
Select Stacks bank – The 'Select Stacks bank' drop-down allows the user to select which Stacks bank to display. Note, the username in brackets to the right of the Stacks name
Click the drop-down to view the list of Stacks visible to this user. The top section of the menu 'My Stack Banks' shows the public and private Stacks that are owned by the current user. The bottom section shows the 'Public Stack Banks' that are visible to the current user. These public banks belong to other Zetta users. See the Access section of this topic for more details on Public and Private Stacks banks. Simply start typing in this field to filter the list of Stacks. Using the left and right arrows next to this select Stacks drop-down, will scroll through the available banks. This field is disabled when the Stack is playing On-Air. |
 |
Previous Stacks bank - The 'Previous Stacks bank' button will open the Stack listed before the current Stack. This field is disabled when the Stack is playing On-Air. |
 |
Next Stacks bank - The 'Next Stacks bank' button will open the Stack listed after the current Stack. This field is disabled when the Stack is playing On-Air. |
 |
Select Station – The 'Select Station' drop-down allows the user to select the station that the Stack will play on. Select the All Stacks option to view all the stacks in the Select Stack drop-down. When the Station selection drop-down is clicked a cursor is made available allowing the user to type and quickly locate the desired station. This field is disabled when the Stack is playing On-Air. |
The toolbar adjusts with the window size giving a drop-down  button for toolbar button selection.

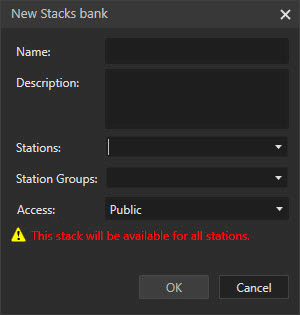
The Create new Stacks bank toolbar  button will open the New Stacks bank window. The New Stacks bank window is used to identify and configure the Stack. By default the new Stack will be available to all stations (Global). However, if station(s) or Station Group(s) is selected in this window the Stack will be specific to the station(s) or Station Group(s) selected.
|
Important Note! |
If a Stack is available to all stations (Global) the assets in the Stack must still be set to active for the desired station. Selecting a Station or Station Group for a Stack does not automatically make the assets in the Stack active for the station. |
Click any area in this image for help
Click any area in this image for help
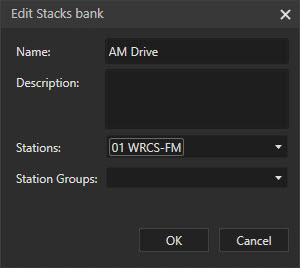
Use the Name field to give a Name to the Stack so it can be identified in the Select Stack drop-down.
A description can be entered to give detailed information about the Stack (optional).
The Stations drop-down can be used to select the station(s) that can select the Stack. When a Station is selected, the Stack will only be shown in the Select Stack drop-down of the toolbar for that selected Station(s). This is an optional field. Click the drop-down arrow to the right of the field to select a configured station. If the Stations / Stations Groups field is left blank the new bank is visible to all stations. If the user preference 'Assign current Station / Station Group for newly created Stacks banks' is enabled in user preferences, if a 'specific station' is selected in the toolbar, the station selected will be used to populate the 'Stations' field.
The Station Groups drop-down can be used to select a configured Station Group(s). When a Station Group(s) is selected the Stack will only be displayed for the Station(s) within the selected Station Group(s) in the Select Stack drop-down of the toolbar. This is an optional field. Click the drop-down arrow to the right of the field to select a configured Station Group. If the user preference 'Assign current Station / Station Group for newly created Stacks banks' is enabled in the user preferences, if 'All banks' is selected in the toolbar, the 'Station Groups' field will be populated with Station Group(s) derived from the current user's Station Group assignments (under Configuration | Accounts | Roles).
The Access option allows the user to set their Stacks bank to Private, Public or Public - Read Only. This field defaults to Public when adding a new Stacks bank. Any user with the 'View Configuration' Admin Right can modify the Access field regardless of the state of this setting. If the user does not have the 'View Configuration' Admin Right, the Access field is hidden for 'Public' and 'Public - Read Only' banks if the user does not own the bank. When a Zetta user account is deleted, any 'Public' and 'Public - Read Only' Stacks banks for that user will remain and "[Account Deleted]" will be shown in the Stacks bank selection drop-down next to the name of the bank.
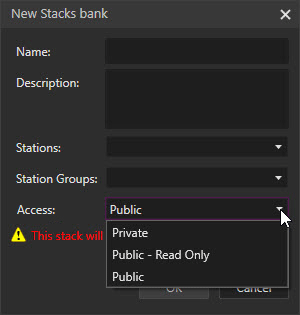
Private - The 'Private' option sets the bank so only the user that created the bank can see the Stacks bank in the bank selection drop-down. Only the owner of the private Stacks bank can view, execute, edit, copy or delete the bank. If the Zetta user account for this user is deleted, any 'Private' Stacks banks for the user will also be deleted.
Public - The 'Public' option sets the bank so any logged in user can select the Stacks bank. Any logged in user can view, execute, edit, copy and delete a 'Public' Stacks bank. The user will be warned when deleting a 'Public' Stacks bank. Stacks that are sent, via ZCast by any user, will be set to Public and owned by the Supervisor account on the receiving site.
Public - Read Only - The 'Public - Read Only' option sets the bank so any logged in user can select the bank. Any logged in user can view, copy and execute a 'Public - Read Only' Stacks bank. The user will be warned when deleting a 'Public - Read Only' Stacks bank.
Note: Upon upgrade, all banks will be Public and owned by the Supervisor user. Users can create copies of these banks for their 'Private' use. This Access setting is not observed in Zetta2GO.
The Edit current Stacks bank  toolbar button will open the Edit Stacks bank window. If the user does not have the View Configuration Admin Right, the user will not have an Edit button if a Stacks bank is selected that is owned by another user and the Access of the bank is set to 'Public - Read Only'.
Click any area in this image for help
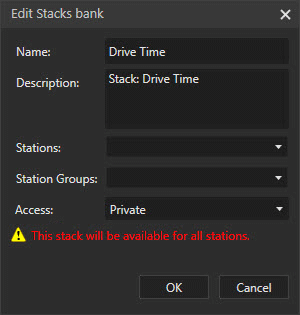
If the user does not have the 'View Configuration' Admin Right, the Access field is hidden for 'Public' Stacks banks if the user does not own the Stacks bank.
Click any area in this image for help
The Stacks Event List shows the status information for a Stack.
Status - The status column shows a blue arrow  when the event is playing.
Stream column displays the ID of the stream being used. When the station is configured as a Master Splits station the stream number will reflect the color selected in Themes & Appearances for the splits behavior of the event.
Split Behavior column shows an icon when a split behavior is selected for the scheduled asset. The Split Behavior column is visible when Splits are enable in the System Configuration | General tab. If an asset that has a Split Behavior and/or Tag is played, a Split command will not be sent when playing in Audition mode.
 icon will be visible in the Split Behavior column.
 icon will be visible in the Split Behavior column.
 icon will be visible in the Split Behavior column.
Event column shows the events in the log and the progress position. The colors of the progress bars can be changed in the Progress Bars section of the Log Editor section of the Themes & Appearances Configuration.


 Song,
Song,  Spot,
Spot,  Link,
Link,  Asset with Note,
  Asset with Script,
  Live Event,
  Live Event with Confirmation,
  Marked as Read,
  Bed with Auto-Fade,
  Voice Track and
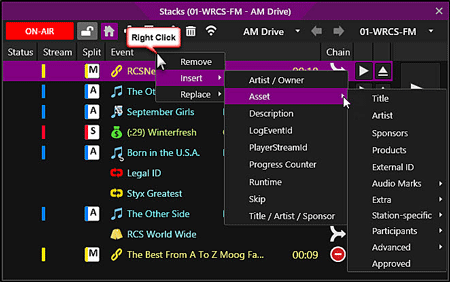
Additional information can be displayed in the Logs Module to customize the view. The following are the columns of information that can be added to the Logs Module:
Artist/Owner – Artist/Owner shows the artist or owner of the event.
Asset - Asset expands to another menu allowing the user to choose a field associated with a library asset.
Description – The Description is used for adding a description to the event as it is in the log.
LogEventId - The LogEventId column will show an Id number for the event.
PlayerStreamId – The Player Stream Id gives the Player Stream ID number that was used to play the element.
Progress Counter –The Progress Counter shows the progress information for the event that is playing.
Runtime – Runtime gives the run time length in seconds for the event.
Skip – Skip allows the user to skip or unskip an event in the Stack. When an event is marked as skipped it can still be played using the small play button. Skipped items will not Play when segueing from the current playing event into the next event. If Play Next is pressed (Big Play button) stacks will not play skipped events.
Status – Status gives the event status code in alphanumeric format.
Title – Title is used to show only the title of the element in the column.
Title/Artist/Sponsor – Title/Artist/Sponsor is used to show the Title, Artist and Sponsor in one column.
The Play Controls sections of the Stacks Module controls the playback of events.
|
Play / Pause - To start events; press the Play icon located on the event to play. To temporarily stop playback while retaining the current position in the audio event, click the Pause icon. When an event is marked as skipped it can still be played using this button. |
|
Stop - The Stop button is shown in the place of the Eject button when the event is played. The Stop button allows the user to stop the playback of the event located in the same line as the stop button. |
|
|
Eject - The Eject button is used to remove an event from the Stack list. |
|
Chain Type – The Chain Type column shows the action that is performed when the current event ends. Only Stop and Segue are supported in Stacks.
A default chain type can be set for events that are inserted/dropped into Stacks for each user using the Event chain when inserting into Stacks setting in the User Preferences. The color of these chain icons can be changed in the in the Log Editor section of the Theme & Appearances window. |
 |
Play Next - The large play button located at the far right of the Stacks Module is used to start the next cued event. |
Using the mouse to right-click an event in the Stack, a menu of the following additional options are displayed.
The Audition options are typically in the first two sections of the right-click context menu. These audition options are configured in the Context Menu Customization section of the Auditioning tab in the Preferences Configuration window. The audition section of this menu is used to play the audio on an audition play stream. The default options in this menu are Audition, Go To Start, Stop, Play-Pause, Opening, Segue and Closing. The top options are used for playback of the audio and the bottom options are used to select the marking point at which the audio will play. Clicking a marking point option from the menu will play the audio from the point selected. The By Default Audition from option is the checked option in the list of marking points. This means when middle-click on an asset event is made, the default action is to audition the asset from this checked marking point. If the default position marker is not set for the selected asset the audio will start from the Opening. This default can be changed temporarily by right-clicking on the context menu option that is to be set as default. This will change the default for ALL of the Audition context menus in Zetta for this users Zetta session. Optionally, the user can use the Audition Mode toolbar button to play the asset using the audition streams. See the Audition Module section of the guide for more information on auditioning assets.
A hook is a musical or lyrical phrase that stands out and is easily remembered which is used to make a song appealing and to "catch the ear of the listener". If the event has a hook, selecting 'Hook Enabled' from the right-click menu will tell Zetta to play only the hook instead of the entire asset.
The Edit audio option is used to choose an available audio editor, the user can select the Zetta Multitrack Editor, Zetta Single Track Editor or a configured External Editor. See the External Editors section of this guide for more details on adding editors.
This section provides step-by-step instructions for common tasks performed in the Stacks Module.
In this section: show/hideshow/hide
|
|
To create a new Stack, follow these steps: |
 button.
|
|
To add or delete events from a Stack, follow these steps: |
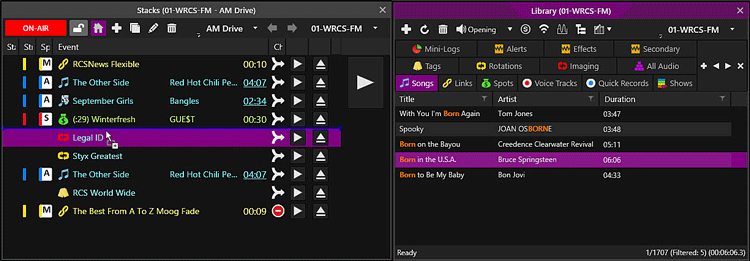
The events in a Stack can be set with different chain types to control how the events play. By default, all new events added are set to segue  into the next event until the end of the list is reached. If the last event has a chain type of segue, Zetta will segue into the first song in the Stack creating a loop of events.
|
|
To modify the chain type for events in a Stack, follow these steps: |
 icon.
icon.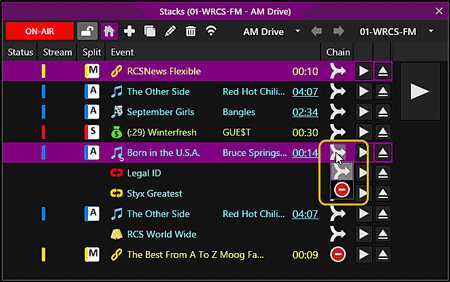
 Stop to stop play after the current event.
 Segue into the next event in the Stack list.
|
|
To Edit a Stack, follow these steps: |
 button. If the user does not have the View Configuration Admin Right, the user will not have an Edit button if a Stacks bank is selected that is owned by another user and the Access of the bank is set to 'Public - Read Only'.
Stacks can be copied to create a new or duplicate Stack with the same events.
|
|
To Copy a Stack, perform the following steps: |
 icon
icon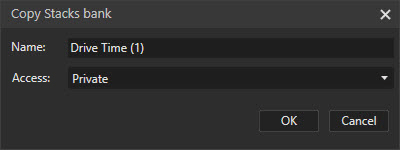
|
|
To execute events in the Stacks Module, perform the following steps: |
As the event plays, the status is displayed. The Stack Player will use the settings configured to segue into the next event or stop after the event is complete.
The ZCast button in the Stacks toolbar is used to send the selected Stacks bank to an Outbound ZCast Connection.
|
|
To ZCast a Stacks bank to an Outbound Connection, perform the following steps: |
 button.
The following sections will show ways to change the look of the Stacks Module.
Stacks Layout topics: show/hideshow/hide
|
|
To add columns to the Stacks Module in Zetta®, follow these steps: |
|
|
To replace a column in the Stacks Module in Zetta® with a different column, follow these steps: |
|
|
To remove a column in the Stacks Module in Zetta®, follow these steps: |
|
|
To move a column in the Stacks Module in Zetta® to a different location, follow these steps: |
|
|
To Save Stacks to a layout, follow these steps. |
Welcome < Modules < Stacks Module
© 2007-2024 RCS. All Rights Reserved.