This topic explains how to use macros in Zetta® to execute several events as if they were one event. There is no limit to the number of events that can be added to a macro and there is no limit to the number of macros that can be assigned to a station. Once a macro is created, it can be played an unlimited number of times. Macros can be played from the On-Air Module, Hot Key or added to a Station or Recorder Log/Clock. When the macro is played, the event list executes. Use the Macro section of the Themes & Appearances Configuration window to give the Macros in the log an appearance.
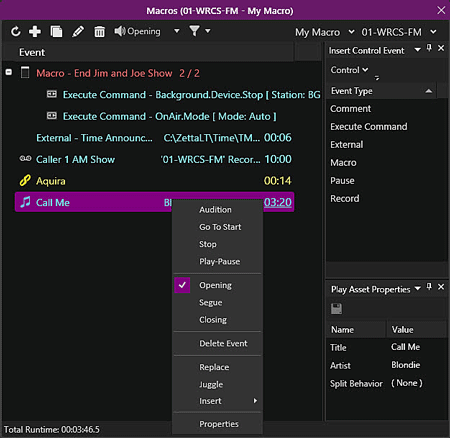
The macro configuration window is divided into three panes. The left side displays a list of events in the macro and the right side is divided in two sections; the top section is the consideration window which is used to select the event to add to the macro and the bottom section is the properties window which is for configuring the properties of the event to be added.
An Asset can be auditioned from the Macro Configuration window by simply middle-clicking the desired asset, clicking the Audition toolbar button or by clicking a desired play action or play position from the right-click menu.
Click any area in this image for help

Click any area in this image for help
In this Topic: show/hide show/hide
Macro right-click context menu
Macro Configuration Step-by-Step Topics
The Macro Configuration toolbar allows the user to add, delete, view and edit macros using the following toolbar options:
|
|
Refresh current Macro - The 'Refresh current Macro' button is used to refresh the macro window to the last saved state, discarding any unsaved changes. |
|
|
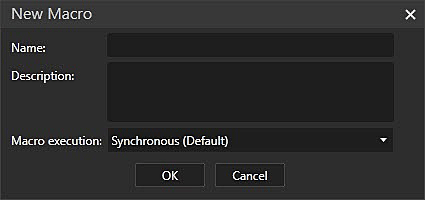
Create new Macro - The 'Create new Macro' button allows the user to create a new Macro. The New Macro window will open. |
|
|
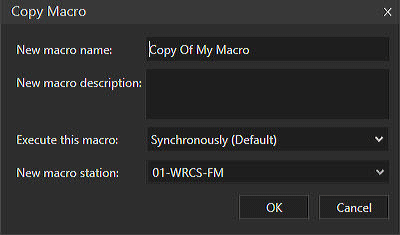
Copy current Macro - The 'Copy current Macro' button will copy a selected Macro to the same station or to a different station in the database. A Copy Macro window will open for the user to give the macro a new name and to select a station. |
|
|
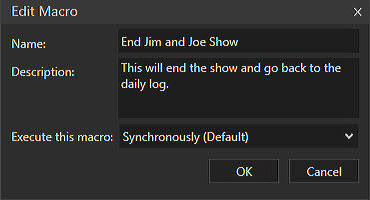
Edit current Macro - The 'Edit current Macro' button opens the Edit Macro window allowing the user to edit the Name, Description and method of execution. |
|
|
Delete current Macro - The 'Delete current Macro' button allows the user to remove a selected macro configuration from the database. The user will be prompt to confirm the deletion. This will remove the Macro from all areas where is is used such as, Logs, Clocks, Hot Keys, etc. |
|
|
Audition – The 'Audition' button will allow the user to listen to a selected piece of audio in the log locally without it going over the air. Using the arrow drop-down, the user can select the play action or the marking point of the audio to start playing based on the preferences specified in the Auditioning tab of the Preferences Configuration window. An Audition Stream Group and stream must be defined and an audio event must be selected in the log. Optionally, simply middle-click the title of the asset in the log to be auditioned and the asset will be auditioned based on the default marking point (shown on the button). If the default marker is not set for the selected asset the audio will start from the Opening. To stop the play of the audio simply middle-click the same asset or click the Audition button again. See the Audition Options section of this topic and the Audition Module topic of this guide for more information on auditioning assets. |
|
|
Publish Macro through Site Replication - The Publish Macro through site replication button is used to publish the macro to the configured site replication servers. This button is only visible when Site Replication is configured. |
|
|
Cycle Filter - The 'Cycle Filter' is used in Logs, Clocks and Macros to Filter based on Asset Type or Custom type. See the Logs Module topic for additional information on the Cycle Filter. |
|
|
Select Macro - The 'Select Macro' drop-down is used to select an existing Macro to view, edit or delete. When the Macro selection drop-down is clicked a cursor is made available allowing the user to type and quickly locate the desired macro. |
|
|
Select Station - The 'Select Station' drop-down is used to select a Station that the macro will be assigned. When the Station selection drop-down is clicked a cursor is made available allowing the user to type and quickly locate the desired station. |
The left side of the macro screen displays the events in the macro. Control Events, Songs, Spots or Links can be added to a Macro.
Macro Control Events - The following control events can be added to a macro by simple dragging and dropping the event from the consideration window to the Event List.
Total Runtime - The Total Runtime is displayed at the bottom of the window and is the calculated length of the events in the macro.
|
Important Note! |
The Execute Commands are executed by the selected stations sequencer. Therefore if a command is chosen that will open a module such as the Library module, then this event will occur on the machine running the sequencer for the selected station. |
This menu is similar to the options in the context menu of a Log or Clock. Using the mouse to right click an event in a Macro, a context menu of the following additional options is displayed.
Context Menu: show/hideshow/hide
The Consideration window lists various assets the user will consider for use in the macro. From the Consideration window a user can select an asset or control event using the Event Type drop-down menu. When selecting a Song or Link asset the user can use the Category Group drop-down menu to select from a configured category group.
The properties window displays the details about the Asset or Control Event. The information about the asset is pulled from the Metadata card for the asset.
The Create new Macro  and Edit current Macro
  buttons open a window allowing the user to create or edit a Macro's Name, Description or how it is Executed.

Name - The 'Name' is a short description of the macro and is used elsewhere in the application to recognize the Macro.
Description - The 'Description' expands further on the Name to describe the function of the Macro. The Description field is optional.
Macro Execution - The 'Macro Execution' drop-down is used to select how the Macro will be executed when played by the Sequencer. The choices are Synchronously (Default) or Asynchronous & play through Macro.
Synchronously (Default) – When a macro is executed synchronously, the sequencer will wait for the macro to finish before moving on to the next event.
Asynchronous & play through Macro - A Macro may contain commands that affect execution of the upcoming events. For that reason we do not automatically transition to the next event until the Macro has completed. Based on the type of commands and the Macro's complexity, this may introduce a minor delay between the events. If you are certain it's safe to trigger the upcoming event without waiting for the Macro to finish, selecting this option will instruct Zetta to "play through" the Macro without any interruptions. When using Asynchronously & play through the Macro there will be a Stream Trigger between the Log Event before the Macro and the one after:
Log Event 1 >>> Stream Trigger Log Event 2
Macro
Log Event 2
This section will provide step-by-step instructions for tasks in the Macros window of the Configuration menu.
In this section: show/hideshow/hide
|
|
To create a Macro in Zetta, perform the following steps: |
 button
|
|
To create a Macro in Zetta, perform the following steps: |
 button
|
|
To Edit a Macro in Zetta, perform the following steps: |
 button in the properties pane.
|
|
To Copy a Macro in Zetta, perform the following steps: |
 button
Once a macro has been created using the Macro Configuration option in the Configuration Menu of Zetta® the user can then Publish the Control Events to GSelector®.
|
|
To Publish a Macro Control Event to GSelector, perform the following steps: |
|
|
To delete an event from a macro, follow these steps: |
|
|
To Delete a Macro in Zetta, perform the following steps: |
 button
Note: This will remove the Macro from all areas where is is used such as, Logs, Clocks, Hot Keys, etc.
|
|
To Add a Macro to a Log or Clock in Zetta, perform the following steps: |
|
|
To Assign a Macro to a Command Mapping in Zetta, perform the following steps: |
|
|
To Add a Macro to a Hot Key in Zetta®, perform the following steps: |
© 2007-2024 RCS All Rights Reserved.