Welcome < Tools < Media Import
Zetta® contains a utility that allows the import of media assets directly into the Library. Media Import is accessed from the Tools Menu.
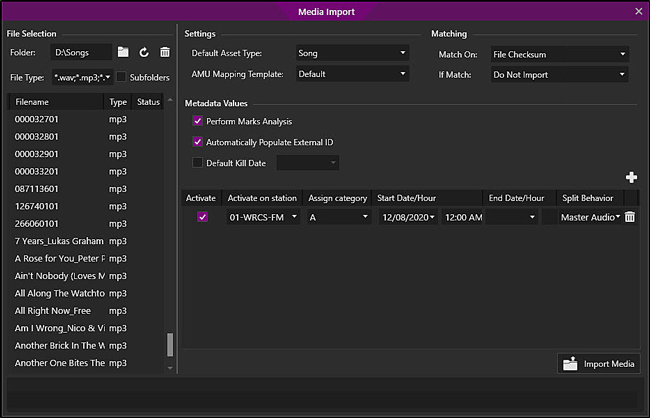
Click any area in this image for help
Click any area in this image for help
In this Topic: show/hideshow/hide
The following options are available when importing media assets. These settings are saved after import for the user so the next time the Media Import is used on this computer the user will see their last saved settings.
The Folder field is used to enter or browse  to the folder on the computer that contains the media assets to import. Use the Refresh
  button to refresh the File list. Use the Delete
  button to remove any selected files from the file list.
The file type drop-down menu will define what file types to look for and import. Media Import can import all the Supported Audio Formats. Optionally, use this field to enter the file extension for the file type to import.
Select the Subfolders option to allow the utility to parse subdirectories of the specified Folder.
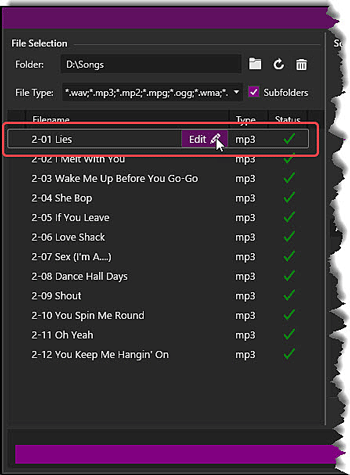
A list of files found by Zetta are listed by Filename and show the Type and Status of the file. The files in the list will be considered for import when the Import Media button is selected. Before Import, the user can right-click the filename and Remove the selected file(s) or Audition an audio asset. After import of the assets, the user can hover over File name to view an Edit  option. Click the Edit button to open the Metadata Card for the asset.
If the asset type information is not located in a data file using the AMU Mapping Template, the Default Asset Type drop-down is used to set the media asset type, so the audio asset is placed in the correct Library tab. This can be set to Song, Spot, Link, Voice Track, Quick Record or custom Asset Type.
The AMU (Audio Metadata Utility) Mapping Template is used to select a template to match metadata such as Composer, Arranger and Musician from an XML file to specific fields in Zetta. Templates can be created to match assets metadata tags to Zetta fields for import of the metadata. The Default Template, maps fields found in NexGen to fields found in Zetta. When an import occurs using the Default template, Zetta first looks for a NexGen XML file for the asset. If present, it will use only the XML file to read the NexGen Metadata. If no associated NexGen XML is used, Zetta will then check to see if the audio file is an MP3 file. If the file is an MP3 file, Zetta will read the ID3 metadata, if any from the file. If there is no NexGen XML and no MP3 ID3 metadata, Zetta will then use AFC to read the AFC metadata. Contact RCS Support for assistance in creating an AMU Mapping Template.
Default Template mapping
The following table shows the mapped NexGen fields and the corresponding mapped Zetta fields that will be used when an asset is imported using Default as the selected AMU Mapping Template.
|
NexGen XMLDAT Elements |
Zetta Field |
|
Album |
Album Title |
|
Artist |
Artists - The NexGenXML InputMetaDataType maps "Artist", "Artist_2"...."Artist_6" tags to the same "Artist" target tag. When mapped this way, the tool will fetch all the artists as an "Artist" Collection. |
|
Artist_2 |
|
|
Artist_3 |
|
|
Artist_4 |
|
|
Artist_5 |
|
|
Artist_6 |
|
|
Audio_Formats |
Audio Format - This will import 1 for PCM, 80 for MPEG, etc. This field is typically not imported. This field is displayed in Zetta by adding the Audio Format column to the Library Module. |
|
Cart |
External ID and Cut External ID - If the metadata scope of the Asset Type is Cuts, then this attribute will be added to the Cut External ID field in the Cut Specific tab of the Metadata Card. |
|
Channel |
Mono or Stereo - Use 1 for Mono and anything else for Stereo in the Metadata imported. |
|
Client |
Sponsors – Used for non-song asset types. |
|
Comments |
Comments |
|
Composer |
Participant\Composer - Added to the Participant tab as a Composer. |
|
Cross_Fade |
Segue Point |
|
Cut |
External ID in some situations - The Cut External ID is only used if the assets metadata scope is set to Cuts in the Asset Types tab of the System Configuration window. When the metadata scope is Station or Global and the Append Cut to Cart for External IDs is selected, the Cut will append to the Cart for the External ID. The format will be Cart-Cut and both the Cart and the Cut will be placed in the External ID field of the Extra tab. The Append Cut to Cart for External IDs option is found in the Auto Load tab of the System Configuration window. |
|
Ending |
Ending – This is a two letter code. |
|
End_Time |
End Date / Hour |
|
Erase_Time |
Kill Date |
|
Fade_Up_Start |
Trim In |
|
Fade_Up_Length |
Volume Marker |
|
Fade_Down_Start |
Trim Out, Volume Marker - FadeDownStart & FadeDownLength are used together to determine Trim Out. |
|
Fade_Down_Length |
Trim Out, Volume Marker - FadeDownStart & FadeDownLength are used together to determine Trim Out. |
|
HookStart |
Hook In |
|
HookEnd |
Hook Out |
|
Intro_1 |
Intro |
|
Intro_2 |
Intro |
|
Intro_3 |
Intro |
|
ISRC |
ISRC |
|
ISCI_Code |
ISCI |
|
Label |
Label |
|
Length |
Resource length - This field is typically not imported. |
|
Opening |
Opening – This is a two letter code |
|
Publisher |
Publisher |
|
Sample Rate |
Sample Rate - This field is typically not imported. This field is displayed in Zetta by adding the Sample Rate column to the Library Module. |
|
Start_Time |
Start Date / Hour |
|
Title |
Title |
|
Type |
Load respects SONG or SPOT types, otherwise the asset will be imported as the Auto Load Default type. Spot = 1, Song = 2 Enum(NexGen) to String(Zetta) type |
The Match On selection allows the user to set specific matching criteria used to determine if the media to be imported matches records already in the system. The following is a list of criteria:
Do Not Match – Will import everything.
Title and Artist/Sponsor – Title and Artist/Sponsor compares the title and the artist/sponsor for the asset to be imported with what is already in the library.
File path - File path compares the location of the file to be imported from with the file path of the audio that is to be loaded in the library
External ID – Compares based on the External ID of the file with what is loaded in the library. Automatically Populate External ID is automatically enabled when this Match On option is selected. This option can be used when importing audio from NexGen or V15.
File CheckSum – File CheckSum performs a checksum analysis of the file to verify the file does not already exist in the database.
Filename – Filename compares the filename of the audio being imported with the filename of the audio that already exists in the Library.
This section tells Zetta what to do only if a Match is found based on the Match On criteria.
Do not import – Do Not Import will skip the file based on the Match On criteria set.
Replace – The Replace will replace an existing asset audio and metadata based on the Match On criteria set.
Replace Audio Only – When the Replace audio only option is selected, Zetta will replace the existing audio file if match, but does not overwrite the metadata.
Merge Changed Fields - When the If Match is set to Merge Changed Fields, Zetta will update all and only the fields from the imported file that have non-blank values. For example, if an audio is imported along with its NexGen XML file and the NexGen file gives the title, artist, album, and start date. Zetta will change the existing asset’s title, artist, album, and start date to the values from the file. However, if the NexGen XML did not specify a start date, then Zetta would leave the start date unchanged.
Replace Station or Cuts Fields - If the imported asset matches an asset already in the database and If Match is set to Replace Station or Cut Fields, then Zetta will update only those fields found in the Station Specific tab or Cuts Specific tab of the metadata card of the matching assets. For example, if an audio is imported along with its NexGen XML file and the NexGen file gives the title, artist, album, and start date. Zetta will leave the asset’s title, artist, and album unchanged but will change its start date to the one in the NexGen XML file. The Replace Station or Cut Fields option is only available when the GSelector and ZCast features are both disabled in the General tab of the System Configuration and at least one Asset Type is set to the metadata scope of Cuts.
When the Perform Marks Analysis option is selected the audio imported will be analyzed based on the Marks Analysis Settings configured in Configuration | System | Audio Processing tab. If this option is deselected, no analysis will be performed and the audio will not be marked.
When this option is checked, the filename without an extension will be put into the External ID field on the asset unless the Automatically Generate Asset External ID is setup in the External ID tab of the System Configuration. If the Automatically Generate Asset External ID is setup then the External Id will be based on that setting. If the Match on = External ID option is set, Zetta will automatically enable this checkbox (as the External ID must be populated if Match on = External ID is set). This option can be used when importing audio from NexGen or V15.
The Default Kill Date will set the Kill date for all the imported assets. The Kill Date is the date to stop scheduling the audio and automatically delete it from the Media Library. This is typically done for Spots and some Links.
The bottom section of the import window is used to Add a Station to Activate the Media, assign a Category, set the Start and End Date/Hour for the assets. Optionally, use the Split Behavior drop-down to set the Split behavior of the asset for the selected station. See the Zetta Splits feature for more details on splits.
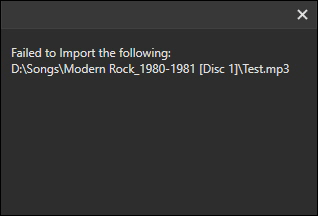
The Import Media  button is used to Import the files from the specified Directory. If any errors occur with the import process the user will be shown an error report after the import is finished, and a red warning icon will be shown in the file list status column.
|
Important Notes! |
The Import can be stopped at any time by clicking the Close |
|
|
To import Media Assets into the Library, follow these steps: |
 button to select a station to Activate the audio. If no station is selected the assets can be activated later individually or by using the Audio Utility to Mass Change assets.
button. Audio is imported and then displayed in the Media Library Asset List.
button to select a station to Activate the audio. If no station is selected the assets can be activated later individually or by using the Audio Utility to Mass Change assets.
button. Audio is imported and then displayed in the Media Library Asset List.|
Important Notes! |
The Import can be stopped at any time by clicking the Cancel |
Welcome < Tools < Media Import
© 2007-2024 RCS. All Rights Reserved.

 Icon.
Icon. 