Welcome < Modules < Logs and Clocks < Logs
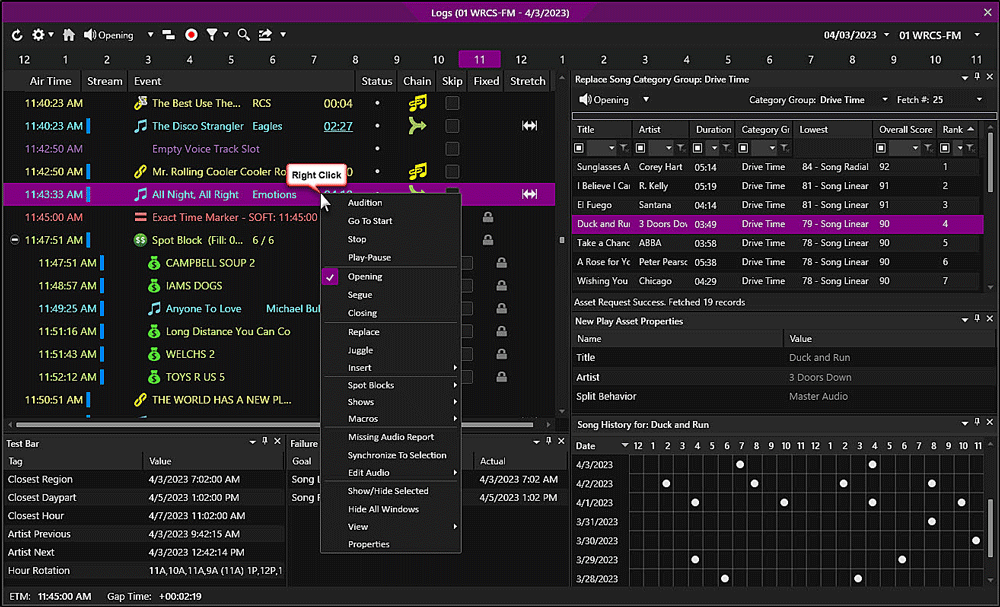
The Log Module is used to view and modify station programming for an entire day. To access the Logs Module, click Logs in the Modules menu. An Asset can be auditioned from the Logs module by simply middle-clicking the desired asset, clicking the Audition toolbar button or by clicking a desired play action or play position from the right-click menu.
Click any area in this image for help

Click any area in this image for help
In this topic: show/hideshow/hide
The Log Navigation toolbar simplifies the process of viewing the desired Station, Date, and Hour. The following Navigation aids are available in the toolbar of the Logs Module:
|
|
Refresh – The Refresh button can be used to refresh the Log after a Flat File Load or when changes are made to the log that do not display immediately. |
|
|
Advanced – The Advanced drop-down is used to select from a menu of options used to manipulate the current or future logs. A past day’s log cannot be changed. The following options are available from the drop-down arrow of this button: |
|
|
Option 1: Regenerate Log - When Regenerate log is selected the Regenerate Log window will open allowing the user to select the hours to regenerate and whether to suspend the sequencer during the log regeneration.
Option 2: Delete Log - When Delete Log is selected, the user will be prompt to confirm before proceeding. Logs for past dates cannot be deleted.
Option 3: Copy Log - Selecting the Copy Log option will open the Manage Hours window for Logs. Resolve Tags / Rotations / Imaging - Tags, Rotations and Imaging assets are typically resolved as they reach the queue in the Log. With the Resolve Tags / Rotations / Imaging option a user, with rights, can Resolve All of these assets in the selected log or Unresolve All. When a Tags, Rotations and Imaging are resolved the icon in the log will change to show the type of asset that will be played. Elements in the past cannot be resolved/unresolved. Right-click selected Tags / Rotations / Imaging to resolve/unresolve selected asset(s). GSelector Integration - The GSelector Integration tool is visible when GSelector Integration is enabled. The Reconcile Day option will send the entire days schedule to GSelector. The Reconcile Selected Hour will send only the currently selected hour to GSelector. The Selected hour is determined by the event that is currently selected. Renegotiate Split Spot Block Lengths - The 'Renegotiate Split Spot Block Lengths' option is visible when Zetta Splits® is enabled, the date selected is today or future date and the Station participates in longest Spot Block negotiation option is enabled for the selected station. This Tool will allow the user to renegotiate split spot block lengths after changes have been made to the log. This setting can be changed using an Execute Command with the Sequencer.RenegotiateSplitSpotBlockLengths command. Print Log - The Print Log option allows the user to print a copy of the log. The user can then choose to print the entire day or a range of hours. |
|
|
AutoScroll – When pressed, the AutoScroll button will toggle between |
|
|
Audition – The Audition button will allow the user to listen to a selected piece of audio locally without it going over the air. Using the arrow drop-down, the user can select the play action or the marking point of the audio to start playing based on the preferences specified in the Auditioning tab of the Preferences Configuration window. An audition Stream Group and stream must be defined and an audio event must be selected. Optionally, simply middle-click the title of the asset and the asset will be auditioned based on the default marking point (shown on the button). If the default marker is not set for the selected asset the audio will start from the Opening. To stop the play of the audio simply middle-click the same asset or click the Audition button again. If Tags, Imaging or Rotations are auditioned, the Next to Play asset for the current shift from within the selected Tag, Imaging asset or Rotation will be auditioned. See the Audition Options section of this topic and the Audition Module topic of this guide for more information on auditioning assets. |
 |
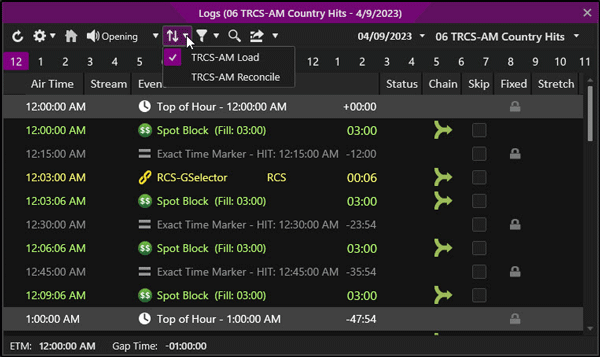
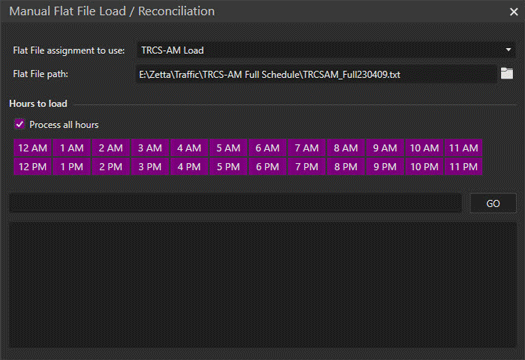
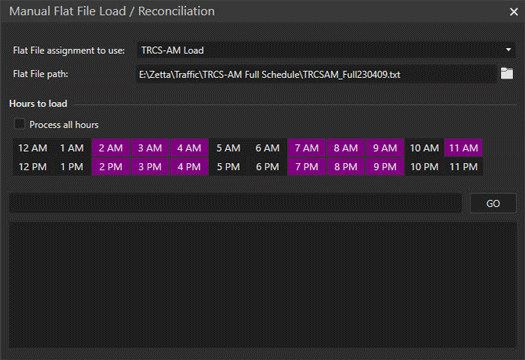
Flat File: Load or Reconcile manually - The Flat File button is used to load a flat file with Traffic and Music or reconcile a log using a created Flat File Assignment. This button will open the Manual Flat File Load / Reconciliation window for the default assignment. When traffic is reloaded a second time, a window opens to the previously processed files with the file name of the processed file. By default, assets that are loaded into Spot Blocks are loaded from the top of the spot block down. Use the Traffic Load Position Control Event to control where traffic loads in a spot block. When traffic is loaded into the current day, Traffic Load will request the queue from the sequencer and avoid loading into spot blocks that are less than 180 seconds (3 minutes) from the currently playing event. Right-click on an assignment in the list will make that assignment the default. |
|
|
ZCast selected log - The ZCast button is used to send or request a station log using a ZCast Connection that has the permission to Allow Sending Logs or Allow Requesting Logs. |
|
|
Publish Changed Hours through Site Replication - The Publish changed hours through site replication button is used to publish a log to the configured site replication servers. This button is only visible when Site Replication is configured. A Manual publish of logs will send the entire selected day for the selected station. When the log is not in sync the user will see a Not Synced |
|
|
Segue Editor® – When pressed, Zetta® will launch the Segue Editor. The Segue Editor will allow the user to auto post, set trim, segue and volume points for the selected log events. For more information about the Segue Editor, see the Segue Editor section of this guide. |
|
|
Voice Tracker® – When pressed, the Voice Tracker will open for the selected event in the log. This editor allows users to record voice tracks and set segues for the voice track, the previous event and the next event. The editor opens showing three tracks, the first being the event the user selected before opening the editor, the middle being the Voice Track and the third being the next event. For more information about the Voice Tracker, see the Voice Tracker section of this guide. When Multisite Voice Tracker is enabled this icon will have a drop-down arrow allowing the user to select the default action of the button. The action can be open Voice Tracker or open Multisite Voice Tracker. |
|
|
Multisite Voice Tracker® - When the plus is shown next to the Voice Tracker button, the system is setup for Multisite Voice Tracking. The drop-down next to the icon allows the user to select the voice track editor to use and the default action for the button. The action can be open Voice Tracker or open Multisite Voice Tracker. The default will be Multisite Voice Tracker. Right-click an option in the drop-down menu to change the default action. |
|
|
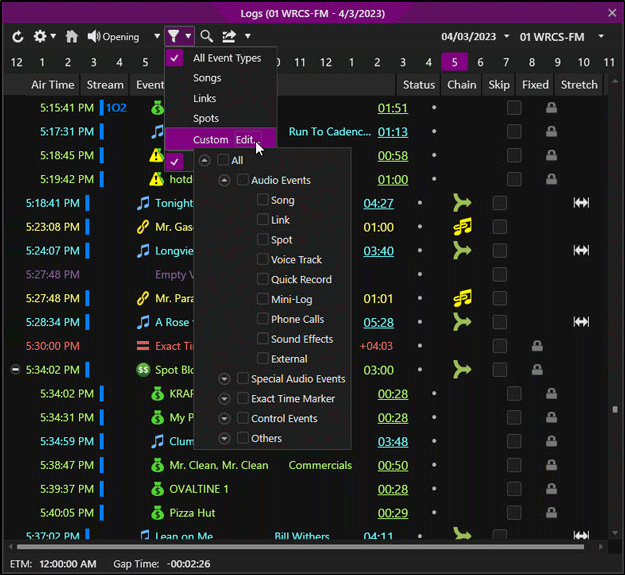
Cycle Filter - The Cycle Filter is used in Logs, Clocks and Macros to Filter based on Asset Type, Custom type and Injected assets. Injected events are shown by default. |
|
|
Search - The Search button will open/close the Search box to the right in the column header area. With the Logs module in focus, press CTRL+F to display the search box. Use the Esc key to close the Search field. |
|
|
Publish - The Publish button uses the Publish Configurations to Publish the selected content of the log. Use the drop-down arrow to view and select a publish instance. Right-click a publish instance from the list of instances in the drop-down to set the default instance that is used when the button is clicked. |
|
|
Station Select – The Select Station drop-down is used to select the name of the station’s log to view. When the Station selection drop-down is clicked a cursor is made available allowing the user to type and quickly locate the desired station. |
|
|
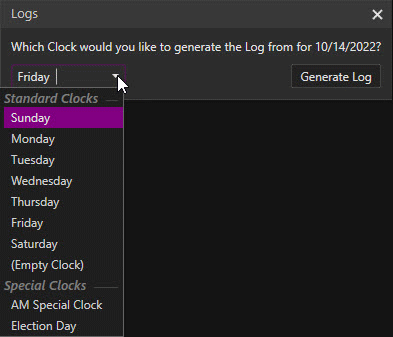
Log Date Select – The Date drop-down is used to select a past, present, or future log. Selecting a date for a GSelector integrated station where the log has not been generated will automatically pull the log from GSelector. Selecting a date, for a station that is not integrated with GSelector, where the log has not been generated will open the Log Generation window allowing the user to select a Standard Clock or Special Clock to use to generate the log. |
When the window is reduced in size the toolbar buttons will be hidden and a drop-down  button will be shown to allow access to these hidden toolbar buttons.
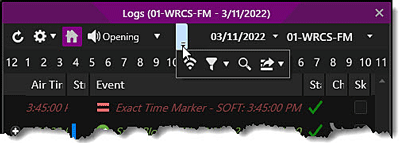
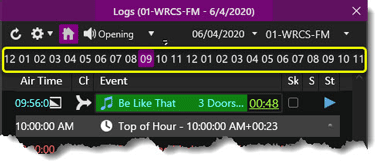
The Hour Selection area is located along the bottom of the toolbar. To navigate to a specific hour of the selected log, simply click on the hour number.
Use the Search  button in the toolbar to open/close the Search box. The Search box is found in the column header row in the right side of the window. Optionally, press CTRL+F to display the search box. Simply enter the text to search. Values that match in the Log will be highlighted. Zetta will search all visible columns and child events for a match.
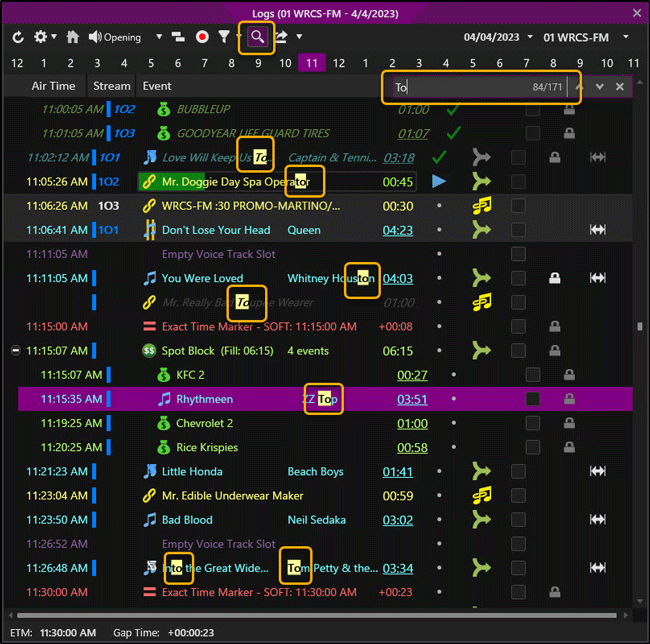
Zetta will narrow the search as the search value is typed. Use the Previous  and Next
  buttons to the right of the search text box to move through the findings. Optionally, use F3 to move to the next finding and Shift+F3 to move to the previous finding.
Use the Close  button, Esc key or the Search
  button to close the Search box. This will close the search box, but Zetta will retain the search string.
The Open, Previous and Next keyboard shortcuts can be changed in the Command Mappings window of the System Configuration using the following commands:
|
Important Note! |
If the Esc key is assigned to another Command Mapping it will not close the search. On upgraded systems if the CTRL+F, F3 or Shift+F3 are already assigned to Keyboard Command Mappings then the above commands will not be assigned for use with the search feature. |
The Log Events List allows the user to quickly view information for past logs and make manual modifications to logs not yet played. The log can be voice tracked and edited using the Event section of the Logs Module, see the Voice Tracker® topic in this guide for more details on voice tracking a log. The colors, fonts and font sizes for the Log can be changes using the Theme Management configuration. An Asset can be auditioned by simply middle-clicking the desired asset. The following topics discuss the different aspects of the Events list.
Default Log Event List Columns
Additional Log Event List Columns
The [+] and [-] controls are used to expand and contract Spot Blocks, Shows and Macros. Optionally, double-click the event to expand or contract the contents of these events.
Airtime column shows the scheduled airtime of the event. An icon is shown before the event if an event is a Hard-timed  event, an Injected
 ![]() event. An icon is also displayed if the Segue has been manually adjusted
event. An icon is also displayed if the Segue has been manually adjusted  by the user and if the event was Faded Early
  to meet an ETM. Hover the mouse pointer over the icon for additional information about the event.

Stream column shows the stream that will be used to play an asset event. When the station is configured as a Master Splits station the stream number will reflect the color selected in Themes & Appearances for the splits behavior of the event.
Event column shows the events in the log and the progress position. The Playing Item Border and the Playing item Background can be changed in the General section for the Log Editor in the Themes & Appearances Configuration window.

Tip: When using Splits the progress bar for silent events can be changed. The Silent Log Event Progress Bar option in Themes & Appearances changes the color of the progress bar for an event that is silent. This includes Spot Block headers, Master Silent Assets, Macro headers etc. This color change is shown in the Log, On-Air, Stacks, Hot Keys and Z-Player Modules.

When 10 seconds remain in the event, the progress bar will display the following color.

When 5 seconds remain, the progress bar will switch to another color.


 Song,
Song,  Spot,
Spot,  Link,
Link,  Spot Block,
  Asset with Note,
  Asset with Script,
  Live Event,
  Live Event with Confirmation,
  Marked as Read,
  Voice Track or Live VT,
  /
/ Show,
Show,  Bed with Auto-Fade,
  Macro,
  . This means it is just a reference to the show. Any changes to the show in the Library will be shown in the log. When the sequencer executes the Show the show contents is then copied to the log and the show icon changes
  . At this point any changes to the log are not reflected within the Show in the Library and any changes to the Show in the Library are not reflected in the playing show in the log. When Tags, Rotations and Imaging events are queued they resolve to the asset that will play and the icon also changes
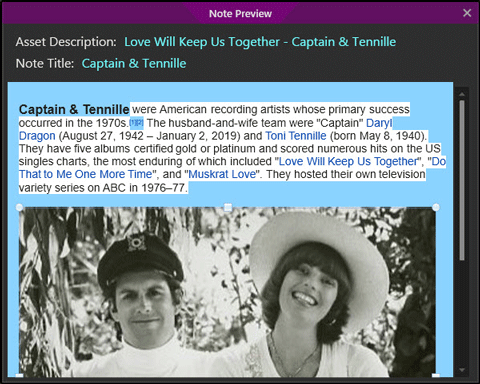
If there is something wrong with the asset the icon represented above will show a warning  or an Error
 ![]() . Simply hover the mouse over the warning or error and Zetta will display a tool tip to help in resolving the issue. Error Events can be themed in the Log Editor section of the Theme & Appearances window.
. Simply hover the mouse over the warning or error and Zetta will display a tool tip to help in resolving the issue. Error Events can be themed in the Log Editor section of the Theme & Appearances window.

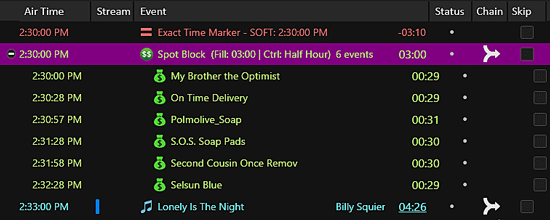

|
Important Note! |
A GSelector Local Block start and end will be shown in the Zetta log as a Comment. |
Status column shows what happened or is happening to an event, the color of some of these icons can be changed in the Log Event Status Icons section of the Themes & Appearances Configuration window. Simply hover the mouse over the status icon to view a tooltip about the status.
|
Status Icon |
Description |
|
|
Played - The Played status is shown when an event has played. |
|
|
Played Faded - The Played Faded status is shown when an event has played and was faded. |
|
|
Played Stopped - The Played Stopped status is shown when an event is stopped after its Requeue value that is configured in the Playback tab of the Station Configuration. Played Stopped is typically caused by a Hard ETM. |
|
|
Pending Played - The Pending Played status is shown when an event has played but is still pending such as a spot in a spot block that has played but the Spot Block as a whole is still playing. |
|
|
Current for Playing event |
|
|
Paused - The Paused status is shown when an event is paused by the Sequencer. |
|
|
Ready |
|
|
Not Played - The Not Played status is shown when an event did not play in the Log. An example is when a Synchronize to Selection has been performed to skip one or more Log Events. |
|
|
Played Faded Early - The Played Faded Early status is shown when an event has past the configured Requeue value during playback and was faded early by the Sequencer through a Play Next or similar command. |
|
|
Not Played Sequencer Expired - The Not Played with an Edit Code: Sequencer Expired is shown when an event is Not Played because it was expired by the sequencer. This can happen when the Sequencer is first started and skips assets in previous hours of the day. |
|
|
Not Played Skipped - The Not Played with an Edit Code User-Skipped status is shown when an event is skipped by the user in the Log. |
|
|
Current for Recording event |
|
|
Waiting Current - The Waiting Current status may be shown before a GPIO recording starts. |
|
|
Error - The Error status is shown when the Sequencer passes over an event that has an Error such as an Invalid Start or End Date. |
Chain Type column shows the action that is to be performed when the current event ends. The Segue and Stop chain types are available for all audio events. The Auto Post and Link-Song chain types are available for Links, Voice Tracks, Quick Recordings, Custom Assets and External Log events. Songs and Spots only support Segue and Stop chains. The Chain Type can be changed in the stations log by clicking on the chain type icon for the scheduled event. A default chain type can be set for events that are inserted into Logs, Clocks, Shows and Mini Logs for each user using the Event chain when inserting into Logs, Clocks, Shows and Mini Logs setting in the User Preferences. A Chain Override can be set on each asset, in the Extra tab of the asset metadata card, so the asset will always use the same chain type when insert into a Logs, Clocks, Shows and Mini Logs. See also the Setting the Chain Type in the Segue Editor topic of the Features section of the guide. The color of these chain icons can be changed in the in the Log Editor section of the Theme & Appearances window.
 |
Stop - Stop will stop the playback of the log after the event plays. |
 |
Segue - Segue will segue the current event into the next event. |
 |
Auto Post - The Auto Post Chain type allows the Link to be back-timed from the Intro of the Song about to play. The Song and Link are then started by the sequencer and synchronized so the Link finishes at the end of the Intro period. See the Auto Posting Events topic for more information. |
 |
Link-Song - Link-Song will set the start of the next event at the early segue point of the previous event, so long as the intro is not too short, then the link ends at the intro of the next event. If the event does not have an early segue point Zetta will follow the setting for the 'Link-Song Chain Segue Alignment when Early Segue Mark is not set on the Link' option in the Log Settings tab of the Stations Configuration. |
|
Important Note! |
A Link-Song/Auto Post Log Event will be treated as a Segue should the next Log Event NOT be valid to play. Any play asset that follows is valid except for a show or mini-log. Where Backtiming fixed events are used:
|
Skip column shows if the event was or will be skipped. The event is also shadowed in gray by default. To delete an event from the log, highlight the event and press Shift+Delete to remove the event. The user will be prompt to confirm the deletion. This Appearance can be changed in the Themes & Appearances configuration window.

Fixed - The Fixed column displays a lock  in the column showing the event is a fixed event that is required to play, Backtiming will be performed to account for the fixed event. The fixed option can be enabled or disabled in the properties window for the event. Optionally, click the fixed icon/column to display a menu allowing for the stretch to be enabled or disabled.
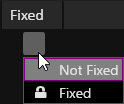
Tip: This Fixed property, in the properties window, will be disabled if the user doesn't have right to "Edit Properties" in Log. Exact Time Markers and Top of hour are by default Fixed and disabled. Spot Block and Macro are Fixed and disabled when the Fixed Events Log settings are enabled in the Station Configuration window.
The event will also be set as Fixed when inserted if the Default to Fixed for inserts option is set for Logs in the Station | Log Event Settings window.
Stretch - The Stretch column will show the stretch  icon for the event that is being stretched to ETM. The stretch option can be enabled or disabled in the properties window for the event. Optionally, click the stretch icon/column to display a menu allowing for the stretch to be enabled or disabled.
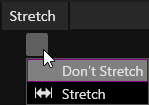
Tip: Stretch property, in the properties window, will be disabled if the user doesn't have right to "Edit Properties" in Log.
The event will also be set as Stretch when inserted if the Default to Stretch for inserts option is set for Logs in the Station | Log Event Settings window.
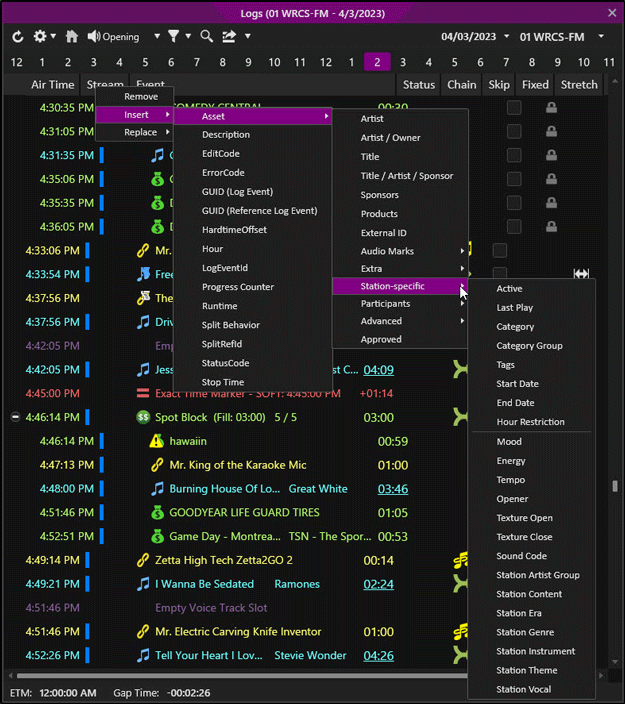
Additional information can be displayed in the Logs Module to customize the view. The following are the columns of information that can be added to the Logs Module by right-clicking anywhere in the header of the event list:
Asset - Asset expands to another menu allowing the user to choose a field associated with a library asset.
Description – The Description column is used for adding a description to the event as it is in the log
EditCode – The Edit Code gives useful information about changes made to the log based on the status (User-copied, User-moved, Skipped, Sequencer resync) in alpha numeric format
ErrorCode – The Error Code displays any error code as to why an event did not play, such as missing audio, player not running, etc.
GUID (Log Event) - The GUID is a unique identifier used in GSelector Integration to keep the events in sync.
GUID (Reference Log Event) - The 'GUID (Reference Log Event)' column is used for ZCast. This column will show the GUID (Log Event) of the other site.
HardtimeOffset - The HardtimeOffset column shows the time in seconds from the last hard timed event in the Log.
Hour - The Hour column shows the Hour number for each hour, this is based on military time.
LogEventId - The LogEventId is the ID number that Zetta uses to track the event.
Progress Counter - The Progress Counter displays the progress of the currently playing asset and the following 2 assets in the log.
Runtime – The Runtime field will display the amount of time the asset will take to play from Trim In to Segue. If integrated with GSelector the runtime sent to GSelector is the Mix In to Segue. If the Mix In is not set the Trim In to Segue will be sent as the runtime.
Split Behavior column shows an icon when a split behavior is selected for the scheduled asset. The Split Behavior column is visible when Splits are enable in the System Configuration | General tab.
 icon will be visible in the Split Behavior column of the Log.
 icon will be visible in the Split Behavior column of the Log.
 icon will be visible in the Split Behavior column of the Log.
StatusCode – Status Code gives the event status code in alpha format, such as Ready, Queued, Played, Not Played etc.
Stop Time – Stop Time gives the time the event stopped playing.
Stream – Stream is used to view the stream the event will use when played. Hover the mouse over the number to view information about the play device being used.
The bottom of the Logs window shows the time of the next scheduled ETM and the Gap Time from the currently playing event to the ETM. A negative gap time means the estimated time to the ETM is under scheduled. A positive gap time means the estimated time to the ETM is over scheduled. The positive gap time displays the gap with pre-drops applied but as if the last event will not fade early. A tooltip is shown when hovering the mouse over the Gap Time and the Pre-fade icon.
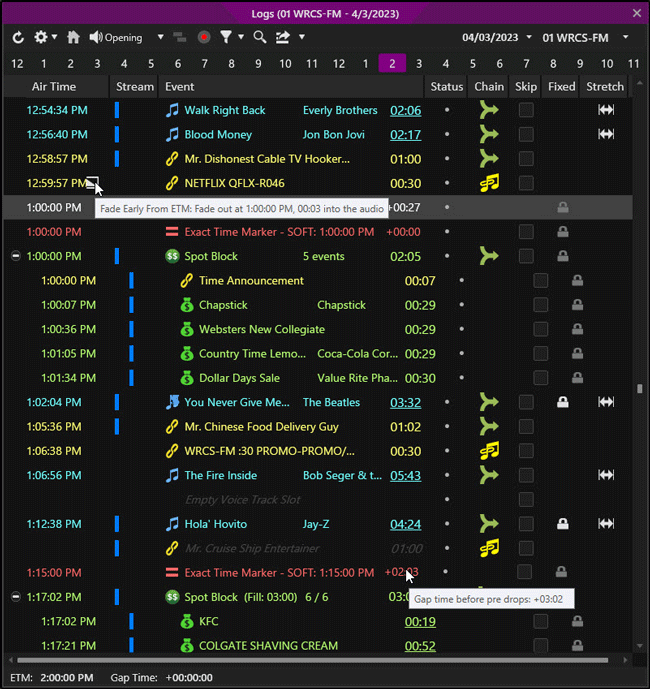
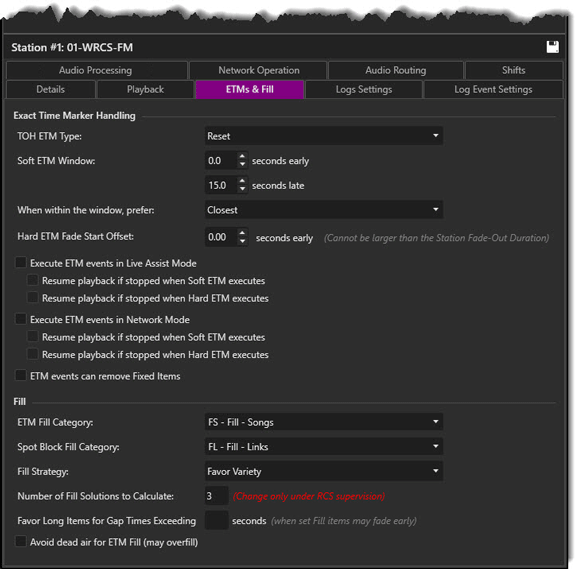
Each hour of the Log is marked with a Top of Hour comment. The Top of Hour comments can be set an ETM Type in the ETMs & Fill tab of the Station Configuration window. This setting defaults to Reset. When the TOH ETM type is set the Top of Hour markers in the Log will show the Gap Time for the hour. When the TOH ETM type is set to None, no Gap Time is shown in the Top of Hour marker in the Log.
|
Important Note! |
The TOH ETM does not have a stretch setting, therefore any events with a stretch flag placed between this ETM and a preceding ETM will not be stretched/squeezed. This ETM setting will not act as a traffic marker for loading traffic from a third party system. It is recommended this setting be set to none and an ETM Control Event be placed in the log for a traffic marker. |
Using the mouse to right click an event in the Log and a menu of the following additional options is displayed.
In this section: show/hideshow/hide
Resolve Tags / Rotations / Imaging
Log Windows - Show/hide selected shows the windows selected in the View submenu. Hide All windows hides all open windows.
The Audition options are typically in the first two sections of the right-click context menu. These audition options are configured in the Context Menu Customization section of the Auditioning tab in the Preferences Configuration window. The audition section of this menu is used to play the audio on an audition play stream. The default options in this menu are Audition, Go To Start, Stop, Play-Pause, Opening, Segue and Closing. The top options are used for playback of the audio and the bottom options are used to select the marking point at which the audio will play. Clicking a marking point from the menu will play the audio from the point selected. The By Default Audition from option is the checked option in the list of marking points. This means when the Audition button in the toolbar is clicked, the default action is to audition the asset from this checked marking point. If the default marker is not set for the selected asset the audio will start from the Opening. This default action can be changed temporarily by right-clicking on the context menu option that is to be set as default. This will change the default for ALL of the Audition context menus in Zetta for this users Zetta session. Optionally, the user can simply middle-click the title of the asset to be auditioned and the asset will be auditioned based on the default marking point. See the Audition Module section of the guide for more information on auditioning assets.
Tags, Rotations and Imaging assets are typically resolved as they reach the queue in the Log. With the Resolve Tags / Rotations / Imaging option a user, with rights, can Resolve or Unresolve these assets in the selected log. When a Tags, Rotations and Imaging are resolved the icon ![]() in the log will change to show the type of asset that will be played. Elements in the past cannot be resolved/unresolved. Right-click the selected Tags / Rotations / Imaging, select Resolve Tags / Rotations / Imaging from the resulting menu and then Resolve Selection or Unresolve Selection to resolve/unresolve the selected asset(s). To Resolve All or Unresolve All use the Advanced
in the log will change to show the type of asset that will be played. Elements in the past cannot be resolved/unresolved. Right-click the selected Tags / Rotations / Imaging, select Resolve Tags / Rotations / Imaging from the resulting menu and then Resolve Selection or Unresolve Selection to resolve/unresolve the selected asset(s). To Resolve All or Unresolve All use the Advanced  toolbar option. This option is only visible when the asset is an unresolved Tag, Rotation or Imaging. Resolving a previously resolved Tags / Rotations / Imaging with re-resolve the event to the Next to Play asset.
The replace event option will open the corresponding Consideration window and the properties window. The Replace of Spot Blocks is disabled with GSelector Integration.
The Insert menu option opens a second menu to a list of events that can be inserted into the log/clock/macro.
The Insert Song option opens the Song Consideration window and the Properties window for the asset. From the consideration window a Song can be selected. The asset can be auditioned before selecting it for the log/clock/macro by simply middle-clicking the asset. Songs can also be inserted into the log/clock/macro by dragging and dropping one or multiple assets into the log/clock/macro.
The Insert Link option opens the Link Consideration window and the Properties window. From the Consideration window a Link can be selected. The properties window will show the details about the link. The asset can be auditioned before selecting it for the log/clock/macro by simply middle-clicking the asset. Links can also be inserted into the log/clock/macro by dragging and dropping one or multiple assets into the log/clock/macro.
The Insert Spot option opens the Spot Consideration window and the Properties window. From the Consideration window a Spot can be selected. The properties window will show the details about the Spot. The asset can be auditioned before selecting it for the log/clock/macro by simply middle-clicking the asset. Spots can also be inserted into the log/clock/macro by dragging and dropping one or multiple assets into the log/clock/macro.
The Insert Other Audio option displays a list of assets created using the Asset Types tab in the System Configuration window. This option also lists Voice Track, Quick Record, Show and Mini-Logs. Selecting an Other Audio opens the Consideration window and the Properties window for that asset type. From the Consideration window an asset type can be selected. The properties window will show the details about the asset. The asset can be auditioned before selecting it for the log/clock/macro by simply middle-clicking the asset. Other Audio can also be inserted into the log/clock/macro by dragging and dropping one or multiple assets from the corresponding library tab into the log/clock/macro.
|
Important Note! |
The Log(s) must be generated for all the days that a Mini-Log will span prior to adding the Mini-Log. Zetta will not allow a Mini-Log to span to a day's log that has not been previously generated. If a Mini-Log is dropped into a station where the assets in the Mini-Log are not active for the station, the assets will show an alert in the log and the inactive events will not play.
|
The Insert Tag option opens the Tag Consideration window and the Properties window. From the Consideration window a Tag can be selected. The properties window will show the details about the Tag.
The Insert Rotation option opens the Rotation Consideration window and the Properties window. From the Consideration window a Rotation can be selected. The properties window will show the details about the Rotation.
The Insert Imaging option opens the Imaging Consideration window and the Properties window. From the Consideration window an Imaging rotation of assets can be selected. The properties window will show the details about the Imaging asset. The Assets within the Imaging rotation use an ordered rotation and the asset that will play is resolved in the log when the Imaging enters the Sequencer queue.
Control Events are inserted into the log/clock/macro using the right-click menu from any location in the event list, then selecting a Control Event from the Consideration Window. See the Control Events topic for more information.
The Spot Blocks, Shows and Macros options are used to expand or contract the event in the log. By default the Spot Blocks, Shows and Macros are contracted, allowing the user to only see the properties of the spot block. In expanded form, the child events in the become visible. Spot Blocks, Shows and Macros can also be expanded manually by using the + to the left of the airtime of the event, by double-clicking the Spot Block, Show or Macro or automatically, every time the On-Air/Log/Clock is open, by setting the Parent/Child event options in the Preferences window.
The Edit audio option is used to choose an available audio editor, the user can select the Zetta Multitrack Editor, Zetta Single Track Editor or a configured External Editor. See the External Editors section of this guide for more details on adding editors.
The Mark as Read option is only visible when right clicking a Live Event Asset. The Mark as Read is used to tell Zetta that the Script for the asset has been read. Clicking this option marks the asset as Played. When the Live Event is marked as read the script icon in the log event will change to green  .
.
A Bed can be placed in the Clock or Log by dragging and dropping the asset from the Library. Assets, with the exception of Songs or Spots, can be marked as a bed using the Extra tab of the asset's metadata card. When these assets are placed in the log the asset following the bed will start at the bed's early segue point. If the bed does not have an early segue point the following asset will start and the bed's trim in point. The Bed will end at either the bed's trim out, the following assets segue point or the earliest start of the asset following the bed whichever is earliest.
This section contains step-by-step instructions for common log maintenance tasks.
In this section: show/hideshow/hide
Load Traffic/Music Flat File into a Log
Copy Multi-Hour Ranges from one Log/Clock to another Log/Clock
Add Columns to the Logs Events list
Replace Columns in the Logs Events list
Remove Columns in the Logs Events list
|
|
To Generate a Log from a Clock in Zetta, follow these steps: |
|
|
To Regenerate a Log in Zetta, follow these steps: |
 button
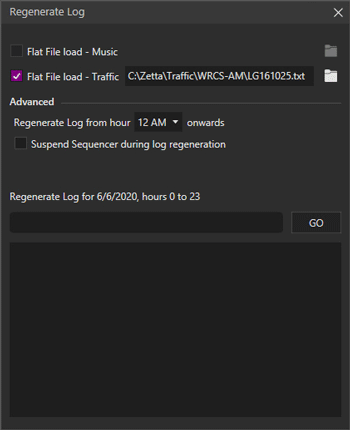
 Load Traffic/Music from Flat File button after the log has been generated to load Music/Traffic.
|
|
To Load a Traffic Flat File into a Log in Zetta follow these steps: |
|
|
To add events to a station log in Zetta follow these steps: |
|
Important Note! |
The order in which the Library assets are highlighted is the order the assets will be placed in the log. |
See also the Consideration window.
An event is not deleted from the log but instead it is marked to be skipped.
|
|
To skip an event or multiple events from a station log, follow these steps: |
All segue changes made to the copied events will be retained.
|
|
To Copy events in a station log in Zetta follow these steps: |
All segue changes made to the moved events will be retained.
|
|
To move events in a station log in Zetta follow these steps: |
The Juggle of Spot Blocks is disabled with GSelector Integration.
|
|
There are two ways to juggle events in a log or clock, follow these steps: |
Alternatively
Zetta can synchronize to selection anywhere into today's or tomorrow's log.
|
|
To move events in a station log in Zetta follow these steps: |
For more information and features on playing from a specific point in today's or tomorrow's log, see the section on Synchronize to Selection in the Features section of this guide.
|
Important Note! |
Audio that is currently playing must be stopped to synchronize to a past point in today's log. |
Several important notes before using the feature:
|
|
To Copy Multi-Hour regions in Logs and Clocks, perform the follow these steps: |
Tip: Zetta can copy and paste in reverse order. When selecting a region, start at the bottom, and advance up using a cursor up key while holding SHIFT. Use CTRL+C to copy, select the target Log or Clock, then CTRL+V to paste. The updated Log or Clock will be in reverse order. All segue changes made to the copied events will be retained.
|
|
To add columns to the Log Module in Zetta follow these steps: |
|
|
To replace a column in the Log Module in Zetta with a different column, follow these steps: |
|
|
To remove a column in the Log Module in Zetta follow these steps: |
|
|
To move a column in the Log Module in Zetta to a different location in the window follow these steps: |
|
|
To run a Missing Audio Report for a day's log, perform the following steps. |
|
|
To print the log, perform the following steps. |
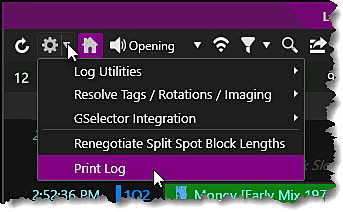
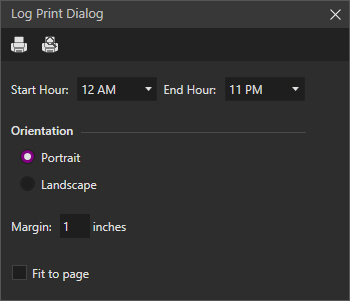
 to see the results before printing.
 when satisfied with the look of the print out.
|
|
To use the Cycle Filter in Logs and Clocks, follow these steps. |
 in the toolbar of the logs or clocks module.
Welcome < Modules < Logs and Clocks < Logs
© 2007-2024 RCS. All Rights Reserved.