Welcome < Tools < Recorder Logs
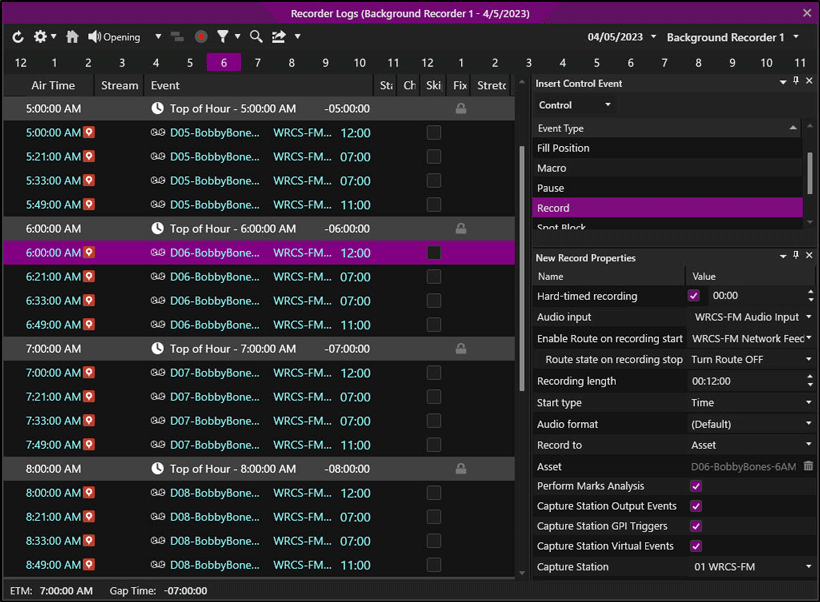
Recorder Logs are used with Recorder Clocks for accomplishing Background Task such as recording a Show or Network Feed for play in a stations log. The Recorder Logs and Recorder Clocks can also be used for other background tasks for On-Air stations such as, changing the fill category, changing the sequencer mode, changing a split master selection for a station or running a macro. The Recorder Logs function similarly to the Station Logs Module. Many of the toolbar and right-click menu options are the same. See the Logs Module and Control Events topics for more information. The Recorder Clocks and Recorder Logs are only visible after a Background Recorder station has been created in Configuration menu and the Background Recorder service has been started in the Startup Manager. For the most part once Background Recording is setup, the Recorder Logs will only be used to verify the Background Recorder is running and functioning correctly. To add color to the Recorder Logs see the Themes & Appearances section of the guide.
Click any area in this image for help

Click any area in this image for help
In this Topic: show/hideshow/hide
See the Background Recording Features section for more information on Recording a Network Show and Play while recording.
The Recorder Log toolbar simplifies the process of viewing the desired Background Recorder Log, Date, and Hour. The following Navigation aids are available from the top of the Recorder Logs:
 |
Refresh – The Refresh button can be used to refresh the Log when changes are made to the log that do not display immediately. |
 |
Advanced – The Advanced drop-down is used to select to Regenerate Log, Delete Log, Copy Log, Print Log and Resolve/Unresolve Tags/Rotations/Imaging for the current or future logs. A past day’s log cannot be changed. See the Logs Module for additional information on this toolbar button. |
  |
AutoScroll – When pressed, the AutoScroll button will toggle between |
 |
Audition – The Audition button will allow the user to listen to a selected piece of audio locally without it going over the air. Using the arrow drop-down, the user can select the play action or the marking point of the audio to start playing based on the preferences specified in the Auditioning tab of the Preferences Configuration window. An Audition Stream Group and stream must be defined and a piece of audio must be selected. Optionally, simply middle-click the title of the asset and the asset will be auditioned based on the default marking point (shown on the button). If the default marker is not set for the selected asset the audio will start from the Opening. To stop the play of the audio simply middle-click the same asset or click the Audition button again. See the Audition Options section of the Logs Module topic and the Audition Module topic of this guide for more information on auditioning assets. |
 |
ZCast selected log - The ZCast button is used to send or request a Background Recorder Log using a ZCast Connection that has the permission to Allow Sending Logs or Allow Requesting Logs. |
|
|
Publish Selected Log through Site Replication - The Publish selected log through site replication button is used to publish a log to the configured site replication servers. This button is only visible when Site Replication is configured. A Manual publish of logs will send the entire selected day for the selected station. When the log is not in sync the user will see a Not Synced |
 |
Segue Editor – When pressed, Zetta® will launch the Segue Editor®. The Segue Editor will allow the user to auto post, set trim, segue and volume points for the selected log events. For more information about the Segue Editor®, see the Segue Editor section of this guide. |
 |
Voice Tracker – When pressed, the Voice Tracker® will open for the selected event in the log. This editor allows users to record voice tracks and set segues for the voice track, the previous event and the next event. The editor opens showing three tracks, the first being the event the user selected before opening the editor, the middle being the Voice Track and the third being the next event. For more information about the Voice Tracker®, see the Voice Tracker section of this guide. |
 |
Cycle Filter - The Cycle Filter is used in Logs, Clocks and Macros to Filter based on Asset Type or Custom type. See the Logs Module topic for additional information on the Cycle Filter. |
|
|
Search - The Search button will open/close the Search box to the right in the column header area. With the Clocks module in focus, press CTRL+F to display the search box. This Search box works the same as the Logs Search box. |
 |
Publish - The Publish button is used to publish an event or a collection of events from the Recorder Log using a configured Publish Type. See the Publish Content topic in the Logs and Clocks folder of this guide for more information. |
 |
Station Select – The Select Station drop-down is used to select the name of the Background Recorder’s log to view. When the Station selection drop-down is clicked a cursor is made available allowing the user to type and quickly locate the desired station. |
 |
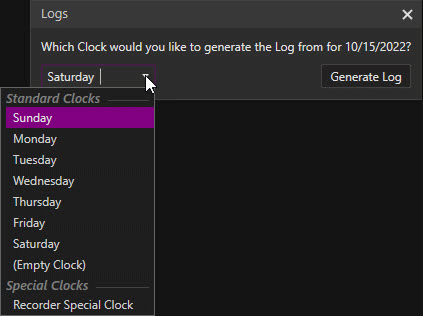
Log Date Select – The Date drop-down is used to select a past, present, or future log. Selecting a Date where the log has not been generated will open the Log Generation window allowing the user to select a Standard Clock or Special Clock to use to generate the log. Optionally select (Empty Clock) to create a log with only Top of Hour markers. |
|
Hour Selection Area – The Hour Selection Area is located along the bottom of the toolbar area. To navigate to a specific hour of the selected log, simply click on the hour number. |
 |
When the window is reduced in size the toolbar buttons will be hidden and a drop-down  button will be shown to allow access to these hidden toolbar buttons.

Once all the events are placed in the Recorder Clock, the Recorder Clock can be generated.
|
|
Perform the following steps to Generate a Recorder Log: |

Welcome < Tools < Recorder Logs
© 2007-2024 RCS. All Rights Reserved.