The reports tool can be used to pull information from the database about Activity and Missing Audio. A Missing Audio report can also be performed from the log by right-clicking a location in the log and selecting Missing Audio Report.
Click any area in this image for help
Click any area in this image for help
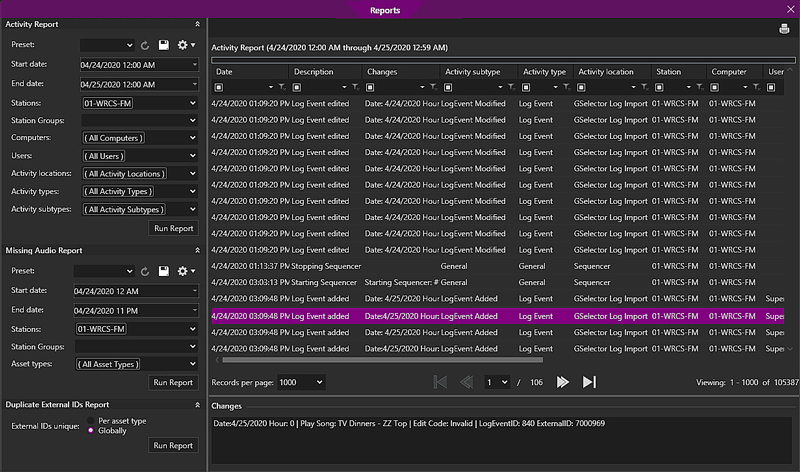
The Reports window is divided into two panes. The left pane shows the type of reports and the filtering options. The right pane shows the data based on the filtering used for the report. These reports can then be printed  to the default printer. The data for the reports can also be copied to Excel for data manipulation, simply highlight the data needed in the right pane using SHIFT or CTRL keys then press CTRL+C to copy.
In this Topic: show/hideshow/hide
The Activity Report is used to view a report of Activity in Zetta. The Activity Report settings are located at the top section of the left report pane.
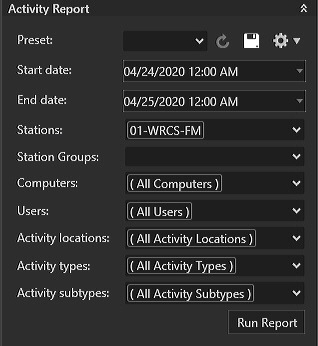
The Activity Report can be customized with the following options:
Preset - A Preset is a set of saved settings for the report. The Preset Setting allows the user to Create, Select, Save, Modify, Copy or Delete a Preset. Presets can be Private, Public or Public - Read Only. Hovering the mouse over the selected Preset will show the access of the Preset (Private, Public or Public - Read Only). Preset changes are captured in the Activity Reports with additional detail such as the name of the Preset that was changed, the user that made the change and date/time of the change. The following Toolbar buttons can be used to select and configure a Preset.
 button to refresh the setting back to the saved settings for the selected preset.
 button to open the Save Preset window to create and Save a Preset.
 button to Modify, Copy or Delete a Preset.
Note: The Supervisor User and any user who has the 'View Configuration' Admin Right can modify/delete other users read only presets. When an account is deleted, all the private presets owned by that user will be deleted. Any Public and Public-Read Only Presets will remain and [Account Deleted] will be shown in the Preset name.
Start Date – A report can be pulled for dates going back as far as is set in the Configuration | Scheduled Maintenance Utility.

End Date – A report can be run up to the current day.
Report details
Any combination of the following report details can be added to the report. These fields allow multiple values:
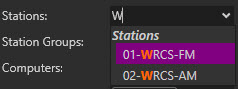
Stations – The Stations drop-down can be used to select any Station, Background Recorder or Virtual Station. Optionally, use the Station Group drop-down to select the (All Stations) to have all the stations in Zetta included in the report. Simply type in the field to quickly select any station.
Station Groups - The Station Groups drop-down can be used to select a group of stations instead of selecting individual stations from the Station drop-down. Optionally, use the Station Groups to select (All Stations).
Computers – Using the Computers drop-down, any or all the configured computers can be added to the report.
Users – Using the Users drop-down, any or all of the configured users can be added to the report.
Activity Locations – Using the Activity Locations drop-down, any or all of the following locations can be added to the report.
Note: When GPIO is selected for an Activity Location select (All Computers) in the Computers field.
Activity Types –Using the Activity Types drop-down to select any or all of the following types can be added to the report
Activity Sub Types - The Activity Sub Types displays what action happened in the Activity Type at the Activity Location.
Example: If a user adds an event to the Log using the On-Air module, the Activity Sub Type would be "LogEvent Added" with the Activity Type as "Log Event" in the Activity Location "On-Air".
After running a report, the following information is displayed in the top section of the right pane. These columns can be sorted, in ascending or descending order, by clicking the column heading. The columns can be remove and re-inserted as needed by right-clicking the heading and selecting the desired option. The following columns can be reorganized to fit the user’s needs and the data can be customized into a report using Custom Filtering and Grouping.
Date
Description
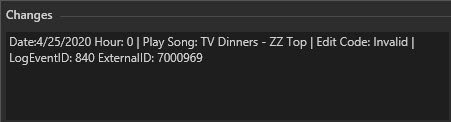
Changes
Activity Location
Activity Type
Activity Sub Type
Station
Computer
Username
Tracking ID
Device Name
Device Type
Event Name
Event Type
Signaling
The bottom section of the right pane of the activity report will show a full view of the changes information when an event is highlighted.
The report can then be printed to the default printer.
At the bottom of the results pane there is a Pagination control. There are three parts to this control which are described in separate sections below. The Records per page drop-down allows the user to control the number of rows of data that are displayed in the results. The default is 1000 rows of data. Use the drop-down to select from the possible options to increase or decrease the amount of data presented in the results pane. Optionally, select All to view all the results on one page. The Pagination provides a drop-down of the page numbers. The current page is indicated in the drop-down out of x number of pages. The arrows can be used to go to the Previous  or Next
  page or the First
  and Last
  page. The results window will automatically refresh on selection of a new value. To the far right shows the record that is being viewed out of the total records for the page and the total records for the report.
The Missing Audio Report will return assets that are missing the audio and assets with volume level set to 0%. The Missing Audio Report settings are in the middle section of the left report pane.
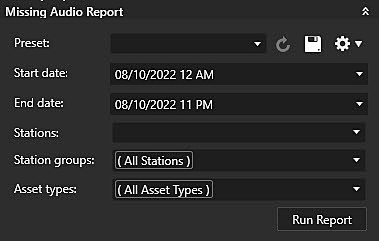
The Missing Audio Report can be customized with the following options:
Preset - A Preset is a set of saved settings for the report. The Preset Setting allows the user to Create, Select, Save, Modify, Copy or Delete a Preset. Presets can be Private, Public or Public - Read Only. Hovering the mouse over the selected Preset will show the access of the Preset (Private, Public or Public - Read Only). Preset changes are captured in the User Activity Reports with additional detail such as the name of the Preset that was changed, the user that made the change and date/time of the change. The following Toolbar buttons can be used to select and configure a Preset.
button to refresh the setting back to the saved settings for the selected preset. button to open the Save Preset window to create and Save a Preset. button to Modify, Copy or Delete a Preset.Note: The Supervisor User and any user who has the 'View Configuration' Admin Right can modify/delete other users read only presets. When an account is deleted, all the private presets owned by that user will be deleted. Any Public and Public-Read Only Presets will remain and [Account Deleted] will be shown in the Preset name.
Start Date – A report can be pulled for dates going back as far as is set in the Configuration | Scheduled Maintenance Utility.

End Date – A report can be run up to the current day.
Report Details
Any combination of the following report details can be added to the report. These fields allow multiple values:
Stations – The Stations drop-down can be used to select any Station, Background Recorder or Virtual Station. Optionally, use the Station Group drop-down to select (All Stations) to have all the stations in Zetta included in the report. Simply type in the field to quickly select a station.
Station groups - The Station groups drop-down can be used to run the missing audio report for all stations in any Station Group.
Asset Types - Use the Asset Types drop-down to filter any asset type.
The missing Audio Report will display the following information in columns in the right pane, allowing the user to determine what day and hour of the log and asset was missing audio:
Date
Hour
Title
Artist
Type
External ID
Error
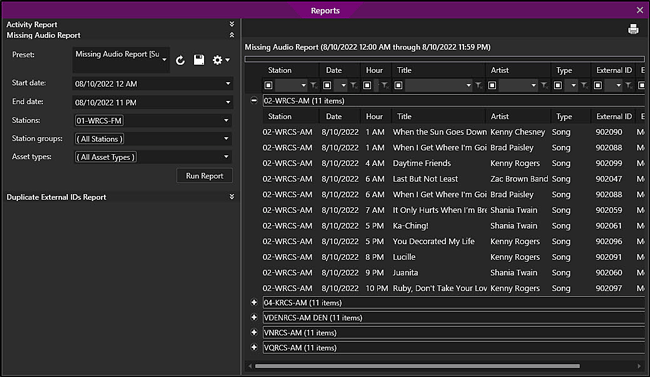
Simply double-click the asset in the right pane of the report to display the MetaData Card for the asset. These columns can be sorted, in ascending or descending order, by clicking the column heading and the Columns can be reorganized to fit the user’s needs. The data can be customized into a report using Custom Filtering and Grouping. The columns can be remove and re-inserted as needed by right-clicking the heading and selecting the desired option. The report can then be printed to the default printer.
The Duplicate External IDs Report can be run to look for duplicate ID's per Asset Type or Globally. The Duplicate External IDs Report will display the following information in columns in the right pane, allowing the user to determine which asset to edit and which asset will retain the current ID:
External ID
Title
Cut Name
Artist
Type
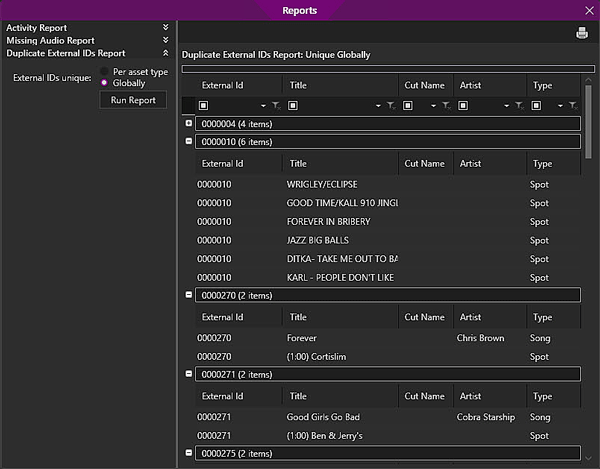
Simply double-click the asset in the right pane of the report that has the duplicate ID that needs changed, select the Extra tab in the metadata card and change the External ID to something unique. The columns can be removed and re-inserted as needed by right-clicking the heading and selecting the desired option. The columns can be reorganized to fit the user’s needs and the data can be customized into a report using Custom Filtering and Grouping.
The following sections contain step-by-step instructions on how to use the Reports window.
In this Section: show/hideshow/hide
|
|
To Create a Preset in the Reports window, follow these steps: |
button from the Activity Report or Missing Audio Report Preset toolbar to open the Save Preset window.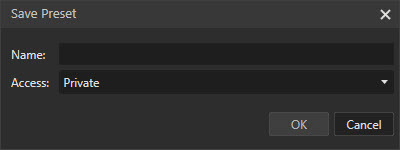 button in the Preset Toolbar again.
|
|
To Modify a Preset in the Reports window, follow these steps: |
button.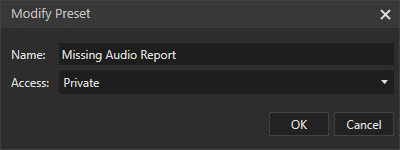 button in the Preset Toolbar.
|
|
To Copy a Preset in the Reports window, follow these steps: |
button.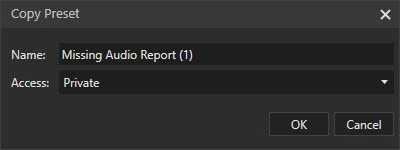 button in the Preset Toolbar.
|
|
To Delete a Preset in the Reports window, follow these steps: |
button.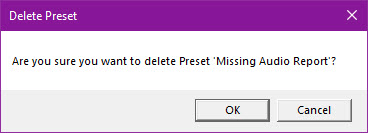
|
|
To Create an Activity Report in the Reports window, follow these steps: |
|
|
To Create an Missing Audio Report in the Reports window, follow these steps: |
|
|
To Run a Duplicate External IDs Report in the Reports window, follow these steps: |
© 2007-2024 RCS. All Rights Reserved.
