Welcome < Configuration < Working with Security < Accounts Configuration
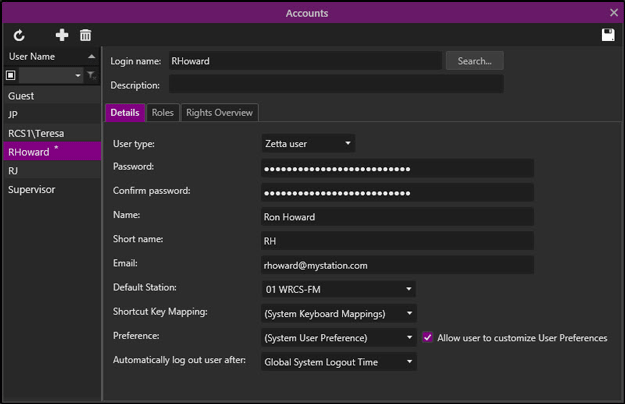
The Account Configuration in Zetta® is used to configure User Accounts. User accounts can be customized to enhance the Zetta user experience. Zetta has two default accounts: the Supervisor account, which has no password (use this account to setup Zetta) and the Guest account, which also has no password that can be used for testing user account settings. The left pane of the Accounts configuration window lists the configured accounts; use this window to select the account to edit. The right pane of the Accounts configuration window is used to identify and configure specific parameters for each user.
Click any area in this image for help
Click any area in this image for help
In this Topic: show/hideshow/hide
The toolbar at the top of the window contains the following options:
 |
Refresh Accounts - The Refresh Accounts button will refresh the screen to its last saved state, undoing any changes that have been made. |
 |
Add Account - Use the Add New Account button to create new user accounts. |
 |
Remove Account – Use the Remove Account button to delete a selected user account. |
 |
Save – Use the Save button to save the configuration. |
The User Name pane to the left displays the configured accounts by Login Name. This list can be sorted in ascending or descending order by clicking the column heading. The Custom Filtering field below the column header can be used to filter the list. Simply type into the field to narrow the list to the account needed. See the Custom Filtering section of the guide for additional help using the filtering.
The 'Login Name' is the name the user will use to login to Zetta, when setting up a windows account this login will match the user’s domain or computer login. Select the User type of 'Windows user' to enable the Search button to seach the domain or local computer for a user login name. Using the search feature for finding a domain account, will auto-fill the Login Name, Name, and Email address for the user. This is the User Name that is displayed in the Accounts List.
The 'Description' field can be used to enter the user’s position such as PD, Board Op or GM to give the account more meaning. (optional)
User Type - The User Type is used to select if the user is a Zetta user or a Windows user.
Window user – The 'Windows User' is selected when the user account will be matched with a domain or computer account.
Zetta user - The default setting of 'Zetta user' allows the user to create a user and password separate from windows.
Name – Use the 'Name' field to expand on the user’s name, allowing for the first and last name of the user to be entered.
Short Name - The 'Short Name' is just a shortened version of the user's name such as the user's initials. When used the short name is displayed in the Talent Grids. (optional)
Email – An Email address can be entered this will be used in a future release of Zetta. (Optional)
Default Station – The 'Default Station' selection is the station that will be selected for this user when they open the Logs, Clocks, Library or Station Configuration. See the Station Configuration section of this guide for more details on adding stations.
Shortcut Key Mappings – The 'Shortcut Key Mappings' allows each user to have a Custom Keyboard Mapping for their user login. See the Command Mappings section under System Configuration section of this guide for more details.
Preference – The 'Preference' option allows each user to have custom preferences and theme for their login account. The default preference is the (System User Preference). See the Preferences section for more details on creating a preference.
Allow the User to Customize User Preferences - When the 'Allow the User to Customize User Preferences' option is enabled a User Preferences menu option will be shown in the User Name drop-down in the title bar of the Main application window. This allows the user to change their preferences when their security rights prevent them from accessing the Configuration menu. To reset the Users Preferences back to the original configured preference, simply disable the 'Allow the User to Customize User Preferences' option, save the account changes and then re-enable the option.
Automatically Log Out Users After - The 'Automatically Log Out Users After' setting defaults to use the Global System Logout Time setting that is set in the General tab of the System Configuration window. However, this setting can be change to Never or to a Specific Amount of Time in minutes. When a Specific amount of Time value is set, Zetta will force a logout of the User after there has been no activity for the time value set. At five minutes before the value set where no activity has been detected a warning will display showing the amount of time remaining. If the 'Automatically Log Out Users After' value set is five minutes or less, the warning will display when half the time is remaining. The minimum value that can be set is 1.
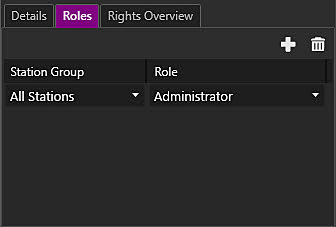
The Roles tab is used to assign a Station Group and a Role to the Account.
|
Add Role – The 'Add Role' button adds a line to the selected a Station Group and Role for the account. |
|
Remove Role – The 'Remove Role' button removes the selected role and corresponding Station Group from the account. |
The rights overview tab in the accounts is used to add or remove additional rights for the user that the role they are a member of may not have. First select the station to view the current rights using the Station Select drop-down. See the Working with Security topic for more information on the specific rights listed.
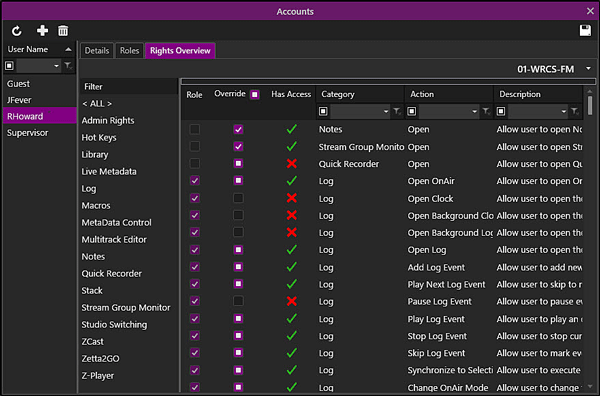
Filter
The filter column to the left is used to select the different aspects of Zetta to display the defined privileges that can be changed. This allows the user to view ALL privileges or just the privileges for a specific category such as the Log module or the MetaData for the assets.
Rights
The Rights section is divided into the following columns that can be filtered using the filter mentioned above or by using Zetta Filtering. The columns can also be sorted using Grouping by clicking the thick line above the column headings or in ascending or descending order by clicking on the heading.
Role - The 'Role' column shows those rights that are inherited from any Role the user is assigned to.
Override - The 'Override' column is used to remove a right that is inherited by a role or add an additional right that may not be part of the role the user is assigned to.
Has Access - The 'Has Access' column shows a green check when a user has rights to the described action or a red X when the user does not have rights to the described action.
Category – The 'Category' column lists all the area of the application that have defined privileges.
Action – The 'Action' column display the action that is being allowed when the privilege is selected.
Description – The 'Description' column gives an expanded explanation of what is being allowed when the item is selected.
This section will provide step-by-step instructions for tasks in the Accounts window of the Configuration menu.
In this section: show/hide show/hide
Creating Station Groups and Roles in Zetta before creating accounts will make applying security quick and easy when dealing with multiple users with the same level of security. Creating Station Groups allows the administrator to limit the access users have to specific stations, while the Roles determine what areas of Zetta a group of users can access. To limit users access further see the Talent Grids section of this guide.
|
|
To create a Zetta User account, perform the following steps: |
button
button to select the role(s) to add to the account, see the Create Roles section of this guide for more information on adding Roles. button to save the new User Account.|
|
To create a windows user account, perform the following steps: |
button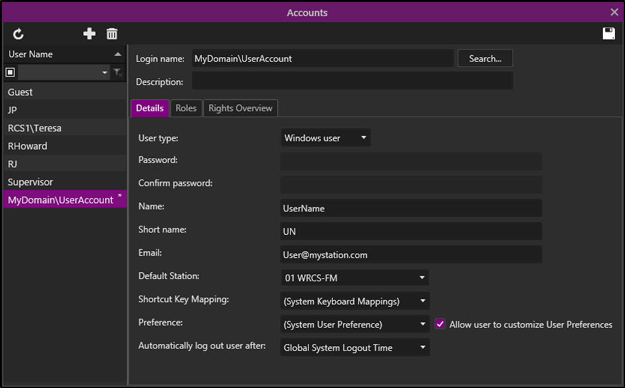 button to select the role(s) to add to the account, see the Create Roles section of this guide for more information on adding Roles. button to save the new User Account.
|
|
To delete User Accounts, perform the following steps: |
button.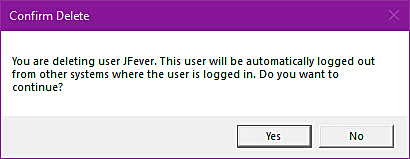
It is a good idea to create Station Groups and Roles before assigning them to an Account.
|
|
To assign a user to a Station Group and Role in Zetta®, perform the following steps: |
button Button.Welcome < Configuration < Working with Security < Accounts Configuration
© 2007-2024 RCS All Rights Reserved.
