
The Audition Module allows the user to view the auditioning of any audio asset in Zetta. The Audition module shows a progress bar with the transitions and count down similar to the On-Air module. It also shows the marks and waveform in the graph section of the module with a timeline across the bottom. The look and feel of the Audition Module is controlled and customized by each user based the size of the module and the user's preferences. The module can be used to play the Closing, Early Segue, Hook, Hook In, Hook Out, Intro, Intro 1, Intro 2, Intro 3, Loop, Loop In, Loop Out, Opening, Segue, Trim In and Trim Out of the asset in Audition mode. The module can be Docked and saved in a Zetta Layout. To load audio into the Audition Module, simply middle-click the title of an asset in the Library, Logs, Hot Keys, Stacks or On-Air modules. Optionally, drag and drop an asset from another module to the Audition module. This will load the asset into the module and start playing it from the selected default marking point. When an asset is auditioned the station normalization and any audio stretch/squeeze values set in the Misc tab of the metadata card are applied. If Tags, Imaging or Rotations are auditioned from the Library, Logs or Clocks, the Next to Play asset from within the selected Tag, Imaging asset or Rotation will be auditioned.
Click any area in this image for help
Click any area in this image for help
As the module is resized the timeline...

...and waveform graph will be hidden showing only the Audition button, Configured buttons, Stream, Progress bar and Eject button.

In this Topic: show/hideshow/hide
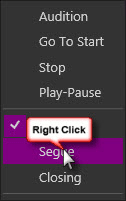
The Audition button context menu drop-down to the left of the play control in the Audition module is configured in the Context Menu Customization section of the Auditioning tab in the Preferences Configuration window. This button and menu are used to play the audio on an audition play stream. The default options in this menu are Audition, Go To Start, Stop, Play-Pause, Opening, Segue and Closing. The top options are used for playback of the audio and the bottom options are used to select the marking point at which the audio will play. Clicking a marking point from the menu will play the audio from the marking point selected. The By Default Audition from option is the checked option in the list of marking points. This means when the Audition button is clicked, the default action is to audition the asset from this checked marking point. If the default marking point is not set for the selected asset the audio will start from the Opening. This default can be changed temporarily by right-clicking on the context menu option that is to be set as default. This will change the default for ALL of the Audition context menus in Zetta for this users Zetta session. To stop the play of the audio, click the Audition button again.
The Transport buttons to the right of the context menu are used to control the playback of the audio in the Audition Module. The buttons shown are configured in the Audition Module Customization section of the Auditioning tab in the Preferences Configuration window. The default transport buttons shown are the Go To Start, Stop and Play-Pause buttons.
Tip: The order of the transport buttons in the module is determined by the order of the buttons configured in the Audition Module Customization section of the Auditioning tab in the Preferences Configuration window.
|
Go to start – The Go to start button will move the play marker to the beginning of the audio or Trim In if defined. |
|
|
Rewind – The rewind button will rewind the audio by five seconds every time it is used. |
|
|
Stop – Stop will stop the play and moves the play marker back to the starting point or Trim In point of the audio. |
|
|
Play – Play will play the audio starting from the play marker. This is the same button used for Play-Restart, Play-Pause and Play-Stop. When Play-Pause is clicked the Pause button will be shown until the button is clicked again or the audio is stopped. When the Play-Stop button is clicked the Stop button will be shown until the button is clicked again or the audio is stopped. With Play-Restart the button will remain the same. However when the audio is restarted it will restart from the last play marker. |
|
|
Pause - The Pause button will pause the audio playing and hold at the current play position. |
|
|
Fast forward – Fast Forward will fast-forward the play marker five seconds in the audio each time it is clicked. |
|
|
Go to end – The Go to end will move the Play marker to five seconds before the segue point or five seconds before the Trim Out point of the audio if a segue is not set. |
The Marking Point buttons to the right of the transport buttons are used to control the point of playback of the audio in the Audition Module. The buttons shown are configured in the Audition Module Customization section of the Auditioning tab in the Preferences Configuration window. The default Marking Point buttons shown are the Opening, Segue and Closing buttons. If the marking point is not set in the asset metadata card, the button for the marker will be disabled in the Audition module.
Tip: The order of the marking point buttons in the module is determined by the order of the buttons configured in the Audition Module Customization section of the Auditioning tab in the Preferences Configuration window.
|
|
Closing - The Closing button will play the audio at the end of the asset based on the Preroll Closing seconds set in the Audition Settings section of the Preferences Configuration window. |
|
|
|
Opening - The Opening button will start playing the audio from the beginning or Trim In. |
|
|
|
Early Segue – The Early Segue button will play the audio starting at the Early Segue point. The early segue point is typically used when linking media events using the Link Segue Mode. |
|
|
|
Fade In - The Fade In marks the fade end point for the beginning of the audio. When the audio is played it will fade up for the length of the Fade. |
|
|
|
Fade Out - The Fade Out marks the start of the fade at the end of the audio. When the audio is played it will fade down for the length of the Fade. |
|
|
|
Hook - The Hook button will play the Hook of the asset if marked. |
|
|
|
Hook In – The Hook In button will start the audio playing from the Hook In marking point and continue to play to the end of the audio or until the stop button is clicked. |
|
|
|
Hook Out – The Hook Out button will start the audio playing from the Hook Out marking point and continue to play to the end of the audio or until the stop button is clicked. |
|
|
|
Intro – In most cases, the intro is the audio before the vocals begins. The audio can be marked with up to three intro points to show the accents in the introduction of the audio. The Intro button will start the play of audio at the last intro marked. If all three intros are marked this button will start the play of audio at intro 3. |
|
|
|
|
Intro 1 - The Intro 1 button will start playing the audio from the first intro marker. |
|
|
|
Intro 2 - The Intro 2 button will start playing the audio from the second intro marker. |
|
|
|
Intro 3 - The Intro 3 button will start playing the audio from the third intro marker. |
|
|
Loop - The Loop button places the cursor at the Loop in point and starts to play the Loop the Loop will continue to play until the audio is stopped. When the Loop button is in Loop mode |
|
|
|
Loop In – The Loop In button will start the audio playing from the Loop In marking point and continue to play to the end of the audio or until the stop button is clicked. |
|
|
|
Loop Out – The Loop Out button will start the audio playing from the Loop Out marking point and continue to play to the end of the audio or until the stop button is clicked. |
|
|
|
Mix In - When the Mix In marker is set it allows the user to create for a "deeper" segue with the preceding event. Normally, Zetta will line up the previous event's Segue with the next event's Trim In (or audio start if no Trim In set). If there is a quiet opening or fade in for the audio, the user may choose to start the next event earlier than the previous event's segue marker. If Mix In is set, we overlap previous event's Segue mark with next event's Mix In mark. |
|
|
|
Segue - The Segue point mark defines where the next event should start in Live-Assist or Automation mode. The Segue button will start the audio playing from the Segue marking point. |
|
|
|
Trim In – Trim In marks the start point of the audio. Audio before the Trim In point will be ignored. The Trim In button will start the audio playing at the Trim In marker. |
|
|
|
Trim Out – Trim Out marks the end point of the audio. Audio after the Trim Out point will be ignored. This option is typically used with the OnAir.AuditionIndex, OnAir.AuditionIndexNoStop and Audition.Marker command mappings where a preroll is defined. |
|
The button just to the left of the progress bar for the audio shows the active stream. This will identify the stream that is currently in use for the audio asset shown in the progress bar. Click the Stream button to show a list of Audition streams available for the assigned Audition Stream Group for the Computer. If a stream is playing audio, a speaker icon will be shown next to the stream short name configured for the Play device. Use this button to switch between streams. Use this button to switch between streams when auditioning multiple assets at once.

|
Important Note! |
When an asset is played from the Metadata card or Segue Editor the asset uses the Audition Stream Group. Therefore if an asset is playing in the Metadata Card or the Segue Editor the stream in use will show a speaker icon in this menu, but no audio will be shown as playing in the progress bar of the Audition Module. Use the Stream Group Monitor to view the asset playing on the streams of the Audition Stream Group. |
The progress bar shows the title, artist/sponsor, countdown and transition colors that are similar to the On-Air module. Click anywhere in the progress bar to set the start/play position. Use the mouse to click and drag the audio to adjust the start/play position. The colors of the progress bars can be changed in the Progress Bars section of the Log Editor section of the Themes & Appearances Configuration.

The Eject  button will eject the audio from the active play stream of the Audition Module and from the Audition Microbar. Optionally, right-click in the Audition Microbar to eject the asset.
The Graph shows the waveform of the audio selected. The waveform will show all the marking points set in the Metadata Card. When the waveform is double-clicked with the mouse, Zetta will move the play cursor to that marking point, create a temporary Last Play marker and start playing the audio. This Last Play marker is the point the audio will start when the Play-Stop and Play-Restart buttons are used. To replay the audio from a specific marking point use the marking point buttons. Right-clicking the graph waveform will produce an additional context menu allowing the user to show/hide markers or remove the Gain Factor.

Zetta allows the user to work in the metadata card of the asset being auditioned while it is viewed in the audition module. This allows the user to make changes to the marking points and see the change reflected in the Audition module.
|
Important Note! |
When an asset is played from the Metadata card or Segue Editor the asset in the Audition Module is unloaded. |
Right-click anywhere in the waveform of the Audition Module to access the View options.
Gain Factor
The Gain Factor option will enable or disable the normalized gain value set on the audio. When Gain Factor is checked it is enabled.
The right click menu allows for quick access to the show options for Marks, Cue Points and Virtual Events. The Show Audio Markers, Show Cue Points and Show Virtual Events can be used to show or hide the marks in the audio graph. When the specific option is checked its marks are shown, if it is unchecked its markers are hidden.
The following commands can be configured in the Command Mappings to control the Auditioning of assets in Zetta.
|
Execute Command |
Parameters |
Description |
Comment |
|
Audition.CycleDefault |
<None> |
This command is used to cycle through the marking point controls configured for the Audition context menu. |
GPI, Cue Point or Keyboard |
|
Audition.Default |
<None> |
This command will Audition the selected audio from the current default auditioning marking point (shown on button or with check mark in the audition context menu). |
GPI, Cue Point or Keyboard |
|
Audition.Eject |
<None> |
This command will Eject the audio on the current active stream. |
GPI, Cue Point or Keyboard |
|
Audition.EjectAll |
<None> |
This command will Eject all audio from all audition streams. |
GPI, Cue Point or Keyboard |
|
Audition.FastForward |
Step (seconds) |
Fast Forward will fast-forward the play marker X number of seconds in the audio each time it is used. |
GPI, Cue Point or Keyboard |
|
Audition.GoToEnd |
<None> |
This option will Play the Segue and end of the audio. |
GPI, Cue Point or Keyboard |
|
Audition.GoToStart |
<None> |
This option will place the play marker at position 0. If the audio is currently playing it will restart from the Trim In (position 0). |
GPI, Cue Point or Keyboard |
|
Audition.Marker |
Quick Mark Preroll (seconds) |
This command will play the selected Quick Mark and continue to play unless the mark is the Hook or Loop. |
GPI, Cue Point or Keyboard |
|
Audition.Pause |
<None> |
This command will pause the current active stream. |
GPI, Cue Point or Keyboard |
|
Audition.PauseAll |
<None> |
This command will pause all the audition streams |
GPI, Cue Point or Keyboard |
|
Audition.Play |
<None> |
This command will play the selected audio using an audition play stream. |
GPI, Cue Point or Keyboard |
|
Audition.PlayPause |
<None> |
This command will either play or pause the audio on the current active stream depending on its current state. |
GPI, Cue Point or Keyboard |
|
Audition.PlayRestart |
<None> |
This command will either play or restart the audio on the current active stream depending on its current state. |
GPI, Cue Point or Keyboard |
|
Audition.PlayStop |
<None> |
This command will either play or stop the audio on the current active stream depending on its current state. |
GPI, Cue Point or Keyboard |
|
Audition.Rewind |
Step (seconds) |
This will rewind the play marker X number of seconds in the audio each time it is used. |
GPI, Cue Point or Keyboard |
|
Audition.SelectDefault |
Quick Mark |
This command will change the current default auditioning marking point (shown on button or with check mark in the audition context menu) to the selected Quick Mark. |
GPI, Cue Point or Keyboard |
|
Audition.Stop |
<None> |
This command will Stop the audio on the current active stream. |
GPI, Cue Point or Keyboard |
|
Audition.StopAll |
<None> |
This command will Stop all audio on all audition streams. |
GPI, Cue Point or Keyboard |
© 2007-2024 RCS. All Rights Reserved.


 the loop will repeat until the Loop button is clicked again and Loop mode is disabled.


