
Important Note!
Before using this tool, it is recommended that a backup be created of the Zetta Database.
Welcome < Tools < Metadata Import
The Metadata Import tool is used to import asset metadata into Zetta® using a spreadsheet or tab delimited file. The Metadata Import utility is available in Zetta under Tools | Metadata Import. The utility is currently only available to the Support user or Supervisor. It is hidden from all other users regardless of permissions granted.
There are many uses where this tool could be useful but the most common ones are:
|
Important Note! |
Before using this tool, it is recommended that a backup be created of the Zetta Database. |
Click any area in this image for help
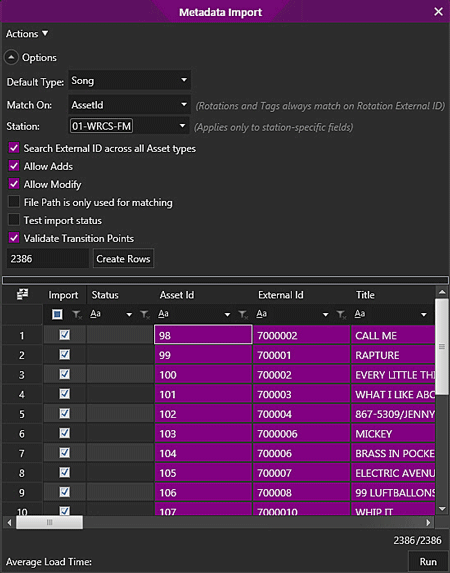
Click any area in this image for help
In this Topic: show/hide show/hide
Click the Actions button to view the following available actions that can be performed in the Metadata Import window.
Check All - The Check All action is used to mark all rows created in the grid for import.
UnCheck All - The UnCheck All button is used to uncheck all the created rows in the grid.
Clear Grid - The Clear Grid action will remove the pasted metadata from the cells of the grid but leave the created rows.
Delete All Rows - The Delete all rows action will remove the entries pasted into the rows and delete the created rows.
Clear Status Column - The Clear Status column will clear the Status column so the Import can be ran again.
Find Duplicates - The Find Duplicates will scan data in the grid and based on the Match On option will show if the grid contains any duplicates. Use the Grouping bar to get a better picture of the duplicates found.
The Options are used by Zetta to match what already exists in the database and then tells Zetta what to do when a match occurs.
Default Type - The Default type option is only used when adding new assets (with this set the Asset Type does not have to be provided in the grid). To change the type of existing assets an Asset Type column must be provided for in the grid. This can be set to Song, Spot, Link, Voice Track, Quick Record or Custom Asset type.
Match On – The Match On selection allows the user to set specific matching criteria used to determine if the metadata to be imported matches records already in the system. Rotations and Tags always match on Rotation External ID. The following is a list of criteria:
Station - When station specific data is included in the imported metadata, that data will be applied to the station specific tab of the metadata card for the station(s) selected in this field. This is a multi-selection field allowing for the selection of multiple stations. Use the drop-down to select the station(s). Optionally, use the keyboard to enter the name of the station for quick selection. To remove a selected station, right-click and select Remove or press the backspace on the keyboard. Selecting the Default station will apply the data to all stations where the default setting is respected. If no station is picked, the station-specific columns will be ignored.
Columns used for Station Specific values are as follows:
|
Column |
Value |
|
Active |
True or False |
|
Start Date |
Date (yyyy-mm-dd) |
|
End Date |
Date (yyyy-mm-dd) |
|
Category |
Category Name - If Category column has a value, Zetta will use it only for a song or link and only for stations that have a song or link category with that name. |
|
Split Behavior |
Master Silent, Master Audio, or Master Monitor (will also accept translated names if Zetta is translated) |
|
Standard Station Attributes: Mood, Energy, Tempo, Opener, Texture Open, Texture Close, Sound Code |
Value (use the name, not the Id number). Sound Code can be multiple values separated by a semi-colon. |
|
Standard Cut Attributes: Display Title, Display Artist, Display Album, Display Composer |
Value (Asset must have a metadata scope of Cuts) |
|
Value (Use the name, not the Id number). If field allows multiple values, then you can list several values separated by semi-colons. |
|
|
Tag External ID |
External ID - Use to Add/Update a Tag |
|
Tag Name |
The Name of the Tag. |
|
Tag Kill Date |
Date (yyyy-mm-dd) |
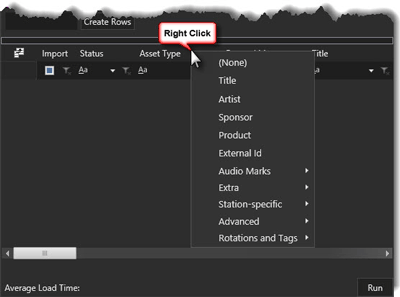
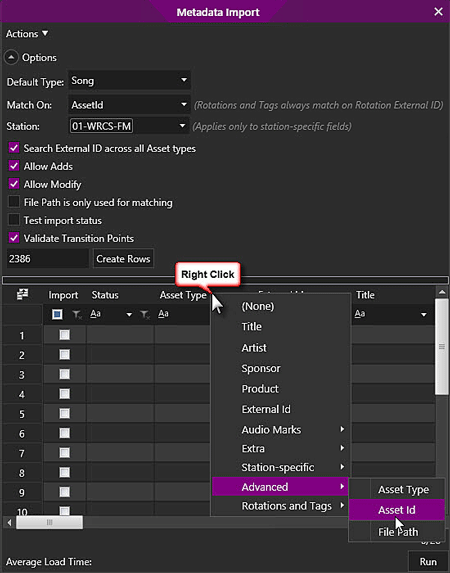
None of the fields are shown by default. Right-click on a column header and choose one of the columns from the context menu.
Search External ID across all Asset types - This option is useful when loading audio first, such as Songs but now when importing the metadata which could cover different asset types, such as Links. This will guarantee Zetta searches the entire library (any asset type) before creating a new asset. If Zetta finds an asset of the same ID as a song but the asset should be a link, Zetta will move that asset to Links. (The Asset Type column must be defined as Link).
Allow Adds - When the Allow Adds option is checked Zetta will create a new asset if a matching asset cannot be found. This option is based on the Match On setting.
Allow Modify - When the Allow Modify option is selected, existing assets that match will be updated with the new data. The combination of Allow Adds / Allow Modify checkboxes allows for Add Only, Update Only or Add and Update combinations.
File Path is only used for matching - If a File Path is provided as a column in the metadata grid for matching purposes this option should be checked. Unchecking it will trigger re-managing the already associated audio file on the existing asset.
Test Import Status - This option is used as a "dry run". This will simulate the import and populate the Status column to tell display what will happen with each row. When the test is complete Group the grid based on the Status column to give a better overview of how many items will be added/updated or if there was an error encountered for any row. Uncheck this option when ready to import the metadata.
Validate Transition Points - This option verifies that trim in/out are within bounds of the audio file. It also verifies that intro, early segue, segue are within bounds of trim-in/out. If an invalid transition point is found then that item will not be import and the existing value in the dB will stay in the dB.
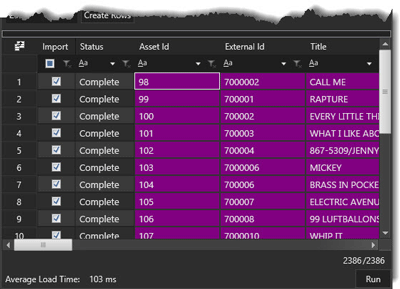
Create Rows - The Create Rows field and button are used to create the rows necessary to add the data to the grid. Count the Rows of information in the spreadsheet or tab delimited file, insert that number into the field and click the Create Rows button.
The Data Grid has a maximum of 26 data columns. The first five Columns are assigned by default to the metadata that is most commonly used by every asset and those fields that are commonly used for matching metadata to those assets already in the Zetta database. The Column data header can be changed to match the data in the column by right-clicking the header and selecting the field from the resulting menu.
To add or update a rotation or asset in a Rotation, enter the External ID of the Rotation into the Rotations External ID column. The adding and editing of Rotation metadata, in the Metadata Import, uses four columns:
An asset being updated/created can optionally reference a Rotation. The rotation being referenced can already exist or be a brand new rotation. If the rotation exists the asset would be added to the existing rotation. If the rotation does not exist it will be created and the asset will then be added to the newly created rotation. A Rotation is referenced by the External ID of the Rotation when it is placed in the Rotation External ID field of the Data Grid. If the Rotation External ID is blank the other Rotation columns will be ignored. If additional Rotations are provided, Zetta will update the above field values based on the last metadata imported (last one in the list wins). Zetta will not clear the Rotation field if the field is left blank. A rotation can be created without a member asset by typing Rotation into the Asset Type column and entering an External ID into the Rotation External ID field.
Metadata Import handles Tags similar to the way it handles Rotations. To add an asset to a Tag, give a value in the Tag External ID column. The asset will be added to the tag in every station listed in the Station field. If the station field is empty, no asset will be added to the Tag. Metadata values for Name and Kill Date of a Tag can also be added/updated using the Tag Name and Tag Kill Date columns. A Tag is referenced by the External ID of the Tag when it is placed in the Tag External ID field of the Data Grid. If the Tag External ID is blank the other Tag columns will be ignored. If a Tag External ID is specified which doesn't exist in Zetta, then a new tag will be created. A Tag can be created without a member asset by typing Tag into the Asset Type column and entering an External ID into the Tag External ID field.
Metadata Import supports all forms of Custom Fields. If the field is global or cuts scope, then the asset will be updated regardless of whether stations are selected in the Station field. If the field is a station scope, the value will be applied in all selected stations that are appropriate. If the Custom Field supports multiple values such as, Sound Code the values can be entered using a semi-colon (;) to separate the values. If a value is specified for an attribute-style field which is not in the Custom Fields pool of values, the new value will be added to the pool and used for the asset. However, if the attribute doesn't allow new values, then the value will be ignored.
This will display the Average Load Time per asset when the Import has completed. The more options selected will result in a longer load time.
The run button will run the Metadata Import based on the actions and options selected for the metadata.
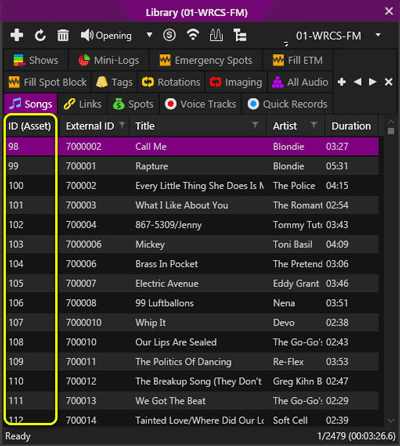
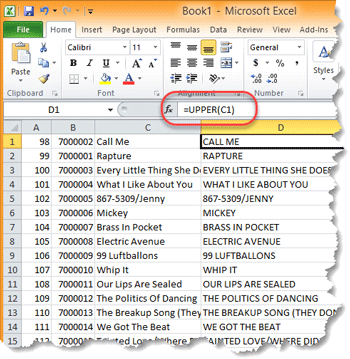
This section will illustrate how to make changes to the assets that already exist in the Zetta database. This section will show how to export the current metadata and import the metadata back into Zetta after making some changes. The following example will show how to change the Title of the Songs in the Library to all UPPERCASE characters and change the External ID.
|
|
To Import Metadata changes into Zetta, follow these steps: |
Welcome < Tools < Metadata Import
© 2007-2024 RCS All Rights Reserved.
