Welcome < Modules < Logs and Clocks < Clocks
The Clocks module contains "templates" used by the system to generate logs. A clock schedule is created for each day of the week for each station, and contains all recurring events that typically happen throughout the day. This is useful for those stations that are not integrated with GSelector®. The system can have some stations linked to GSelector, while others are not integrated. The clocks module will not be visible if all stations are integrated with GSelector. When the Clocks Module is open it displays a Top of Hour comment for each hour marker. The Clock module can also be used to create Special Clocks. Special Clocks are identical to ordinary daily clocks except that they can be used to generate Logs for holidays or special events.
Click any area in this image for help

Click any area in this image for help
There are literally thousands of different clock formats that can be created, all depending on the type of programming the stations are running. In their most basic format, clocks contain spot blocks of commercials. They may also contain source changes, mode changes, songs to be played, plus any of the other log Control Events available.
In this Topic: show/hide show/hide
Clocks right-click context menu
Clocks Module Step-by-Step Topics
Insert a Media Event into a Clock
Replacing an Event in the Clock
The Clocks Module of the Modules Menu has the following toolbar options:
|
|
Refresh - Use the refresh button to refresh the view of the clock. |
|
|
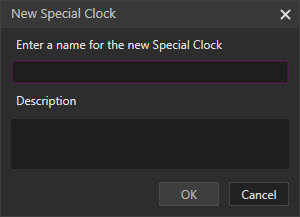
Add a New Special Clock - The Add a New Special Clock button will open the New Special Clock window. Use the window to give the Special Clock a Name and Description. |
|
|
Manage Clock Hours - The Manage Clock Hours button opens the Manage Hours window, this window is used to copy, paste or delete hours to manipulate and change the contents of the clocks for the selected station. |
|
|
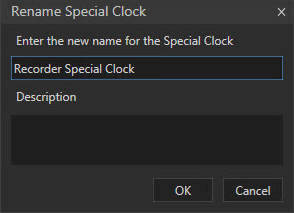
Change the name or description of the Special Clock - The Change the name or description of the Special Clock button will open the Rename Special Clock window. Use the window to rename the selected Special Clock or change the Description. This button is only visible when a special clock is selected. |
|
|
Delete the Special Clock - The Delete the Special Clock button will delete the selected Special Clock. The user will be prompt to confirm the deletion. This button is only visible when a special clock is selected. |
|
|
Audition – The Audition button will allow the user to listen to a selected piece of audio locally without it going over the air. Using the arrow drop-down, the user can select the play action or the marking point of the audio to start playing based on the preferences specified in the Auditioning tab of the Preferences Configuration window. An Audition Stream Group and stream must be defined and a piece of audio must be selected. Optionally, simply middle-click the title of the asset and the asset will be auditioned based on the default marking point (shown on the button). If the default marker is not set for the selected asset the audio will start from the Opening. To stop the play of the audio simply middle-click the same asset or click the Audition button again. If Tags, Imaging or Rotations are auditioned, the Next to Play asset from within the selected Tag, Imaging asset or Rotation will be auditioned. See the Audition Options section of the Logs Module topic and the Audition Module topic of this guide for more information on auditioning assets. |
|
|
Publish Changed Hours through Site Replication - The Publish changed hours through site replication button is used to publish a clock to the configured site replication servers. This button is only visible when Site Replication is configured. A Manual publish of clocks will send the entire selected day for the selected station. When the clock is not in sync the user will see a Not Synced |
|
|
Cycle Filter - The Cycle Filter is used in Logs, Clocks and Macros to Filter based on Asset Type or Custom type. See the Logs Module topic for additional information on the Cycle Filter. |
|
|
Search - The Search button will open/close the Search box to the right in the column header area. With the Clocks module in focus, press CTRL+F to display the search box. This Search box works the same as the Logs Search box. |
 |
Select Clock – The Select Clock drop-down is used to select a Standard Clock or Special Clock for the station selected. |
 |
Station Select – The Select Station drop-down is used to select the name of the station’s Clock to view. When the Station selection drop-down is clicked a cursor is made available allowing the user to type and quickly locate the desired station. |
When the window is reduced in size the toolbar buttons will be hidden and a drop-down will be shown to allow access to these hidden toolbar buttons.
The Hour Selection area is located along the bottom of the toolbar area. To navigate to a specific hour of the selected clock, simply click on the hour number.

The Clock Events List allows the user to quickly view information for clocks and make manual modifications to clocks. The Clocks event List is similar to the Logs Events List. The user can add events to a Clock by right-clicking a position in the Clock or dragging a dropping and asset from the library.
Using the mouse to right click an event in the Clock and a context menu of the following additional options is displayed. See the Logs topic for more information.

In this section: show/hideshow/hide
The properties window displays the details about the Asset or Control Event. The information about the asset is pulled from the Metadata card for the asset. When a Control Event is selected the properties window can be used to Edit the Control Events Values. This window opens when selecting to Insert or Replace an event in the log or when selecting the properties option from the right-click menu.

Asset Properties

Control Event Properties
Special Clocks are identical to ordinary daily clocks except that they are created with the express purpose of taking the place of an ordinary daily clock. Special Clocks can be used to generate logs for specific Holidays or special event days. Clicking the Add a New Special Clock  button will open the New Special Clock window. In this window, Enter a name for the new Special Clock and a Description. The description is optional.

Then, click the OK button in the New Special Clock window, to create the Special Clock for the selected Station. The new Special Clock can then be selected from the Select Clock drop-down for the selected Station in Clocks. Once edited the Clock can then be used to generate a Log for the Station.

Clicking the Change the name or description of the Special Clock  button will open the Rename Special Clock window for the selected Special Clock. In this window, Enter the new name for the Special Clock or change the Description. The description is optional. Click OK to save the changes.

For information on Inserting Control events into a Clock see the Control Events Topic. To copy, paste or delete clock hours see the Manage Clock Hours topic.
In this section: show/hideshow/hide
Insert a Media Event into a Clock
Replacing an Event in the Clock
|
|
To Insert media events into a station clock in Zetta® follow these steps: |


|
|
To Replace events in a station Clock Zetta® follow these steps: |
|
|
To skip an event or multiple events from a station clock, follow these steps: |
|
|
To delete an event from a station clock, follow these steps: |
RCS recommends using the Manage Clock Hours window for manipulating hours in a stations clocks. The following method can be used to copy hours in a clock from clock to clock in the same station or from station to station.
Several important notes before using the feature:
|
|
To Copy Multi-Hour regions in Clocks, perform the follow these steps: |
|
|
To Pin or auto-hide the consideration windows in the Clocks module, use the following steps: |
Welcome < Modules < Logs and Clocks < Clocks
© 2007-2024 RCS. All Rights Reserved.