
Welcome < Modules Overview < On-Air Module
The On-Air Module gives a quick overview of what is going on with the station. It shows what is currently playing on the sequencer of a station. The On-Air Module is used to control playback of the station log, controlling what plays out the Sequencer (On-Air) Stream Group. It is used to start, pause, stop or eject what is playing On-Air for the station. The On-Air module also has hidden panes for Network control, allowing the user to change Routes, and fire GPO and GPI commands. Zetta® runs on an advance centralized database which enables a user to open multiple modules of the same type simultaneously. This allows the user to open an On-Air module for each station and control all the stations from one computer. An Asset can be auditioned from the On-Air module by simply middle-clicking the desired asset or by clicking a desired play action or play position from the right-click menu.
To access the On-Air Module, click On-Air from the Modules menu.
Click any area in this image for help

Click any area in this image for help
This module allows the user to control the on-air output, for each station.
In this Topic: show/hideshow/hide
Date/Time/Hour Status Information
Selecting the Station/Viewing Station Status
Add an Asset to the On-Air Module
The Date and Time display allows the user to see the following information:
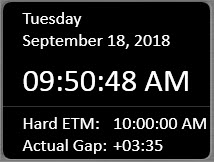 |
Day of the week |
|
Date |
|
|
Current time (HH:MM:SS) |
|
|
Next Exact Time Marker (ETM) |
|
|
Actual Gap Time (overfill/under-fill) |
The Station Selection/Status area has a drop-down to change the station being viewed and see the station status. The size and color of the font for the station name can be changed using the On-Air Themes & Appearances options from the Configuration menu. The Station drop-down can be used to select a station. Only active stations with a Sequencer Computer assigned to the station will show in this drop-down.
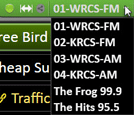
When the Station selection drop-down is clicked a cursor is made available allowing the user to type and quickly locate the desired station.

The Station Status icon is color coded to provide the ability to quickly see the status of a station or splits station.
|
|
When the station is currently playing audio, it is considered On Air and the status will be shown in green. |
|
|
When the station is paused, play is pause, it is considered Paused and the status will be shown in yellow with the pause symbol. |
|
|
When the station is stopped, not playing audio, it is considered Idle and the status will be shown in yellow. |
|
|
If the station is not responding, it is considered Off Air. The Status will be red and the title header of the On-Air module will be gray. |
|
|
When the Player is offline the status will be shown in gray. |
The Hot Spare icon will be displayed to the right of the status icon when a Hot Spare is armed for the station. A tooltip will be shown with a list of the Hot Spares that are armed for the station. The Hot Spare icon is shown in grey when a Hot Spare is armed.
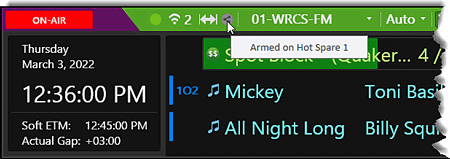
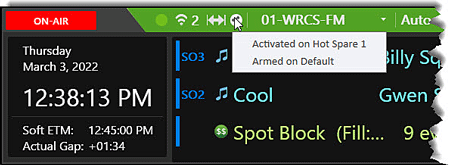
The Hot Spare icon will change to a white color when the Hot Spare is activated and the tooltip will show a list of the armed and activated Hot Spares for the selected station.
Zetta uses pitchless stretch/squeeze to meet ETM events. When the Stretch option is selected on an ETM, Zetta will stretch or squeeze the preceding events in the log that are set with Stretch, to meet the Hard Time set for the ETM. The Stretch option of an asset is set in the properties window of the Zetta Clock/Log or in the Timing field of the GSelector Clock/Log Editor. The Maximum Stretch and Squeeze percentage for a Station can be set in the Playback tab of the Station Configuration window. An Execute Command can also be added to the log using the task type SequencerSetMaxStretchSqueeze to set this percentage value. In Auto or Live Assist mode, when assets are being stretched/squeezed an icon will appear in the On-Air window title bar  and the runtime of the event will be underlined.
The Station Mode changes the operating mode for the selected station.
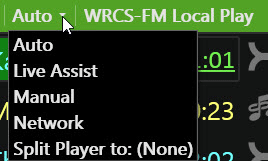
The following modes can be selected in the On-Air Module:
Auto – Auto mode is used to specify that each event should segue into the next. When a station is in Auto, all events are started according to the marked segue points. Live Events are invalid in this mode. In Auto mode the title header of the On-Air module will be green by default. This color can be changed in the On-Air section of the Themes and Appearances window.
Live Assist – Live Assist mode is used during live shows. In Live Assist mode the title header of the On-Air module will be orange by default. This color can be changed in the On-Air section of the Themes and Appearances window. Live Assist utilizes the following chain types to assist in a smooth transition between events, with the ability to stop the log after playing a group of chained events to resume a live show. The following Chain Types can be selected from the On-Air module when the station is in Live Assist mode. In Auto mode or Manual mode the Chain Type can only be changed in the station log using the Logs Module. The color of these chain icons can be changed in the in the Log Editor section of the Theme & Appearances window.
 |
Stop - Stop will stop the play of the log after the event plays. |
 |
Segue - Segue will segue into the next event |
 |
Auto Post - The Auto Post Chain type allows the Link to be back-timed from the Intro of the Song about to play. The Song and Link are then started by the sequencer and synchronized so the Link finishes at the end of the Intro period. See the Auto Posting Events topic for more information. |
 |
Link-Song - Link-Song will set the start of the next event at the early segue point of the previous event, so long as the intro is not too short, then the link ends at the intro of the next event. |
Manual – Manual mode is used to specify that all events should wait for user interaction to begin. When a station is in Manual, each element must be fired manually. In Manual mode the title header of the On-Air module will be red by default. This color can be changed in the On-Air section of the Themes and Appearances window.
Network Mode - Network mode is used with GPIO Devices, Shifts, and Imaging to play a Network feed instead of local audio. See the Network Mode Features section for additional information. Live Events are invalid in this mode. In Network mode the title header of the On-Air module will be blue by default. This color can be changed in the On-Air section of the Themes and Appearances window.
Split Player - Split Player mode will set the Station to a Split Player for a selected Split Master Station. When the mode is changed to Split Player the currently playing event will finish playing. If the current event is a Spot Block, Show or Macro it will play in its entirety.
|
Important Note! |
When the mode is changed, if a split command comes in while the event is playing, Zetta will process the split command which could result in overlapping audio. |
When the Master Station is communicating correctly with the Local Split Stations the status icon will be green and a Listening icon with a number will appear in the On-Air title bar of the Master Station.

When the Splits station is in Splits Player mode the title header of the On-Air module will be purple by default and will show a status  for the master station. The color of the title header can be changed in the On-Air section of the Themes and Appearances window. When the Show Master Log Events in Split's On-Air Module option in the Splits tab of the Splits Station Configuration is checked, the events playing on the master station will be shown in the On-Air module of the splits station. This allows users to see events playing from the master station and the splits player in the On-Air module of the splits station. The On-Air module will show the Master Log Events with a Master
  icon and the title header of the On-Air module will have a show/hide filter
  icon. This filter can be used to switch the view between showing and hiding the master log events. See the Splits feature topic for more information on using the Split Player mode. Live Events are invalid in this mode.

The color of the stripe on the left of this icon  can be changed by modifying the 'Split Master Event color' option in Themes & Appearances.
The Event Filter  can be used to Show or Hide Virtual Log Events in the On-Air module. When enabled, when an event with Virtual Log Events is queued by the sequencer the virtual log events in the asset will show below the parent event with a Virtual Log Event
  icon. The 'Include Virtual Events in the Queue' option in the Log Settings tab of the Station Configuration window will need to be enabled for this feature. This Events Filter
  button also gives access to the option on Splits stations to show or hide Master Log Events in the On-Air module. These Master Log Events will show the events from the master with a Master
  icon. The Show Master Log Events in Split's On-Air Module option in the Splits tab of the Splits Station Configuration will need to be enabled for this feature.
The current shift is displayed to the right of the Station mode. Shifts are configured in the Station Configuration Shifts tab. The Shift can be changed using a Command Mapping, an Execute Command event or a Macro scheduled in the log/clock. If a shift name is not visible, then no shift is active for the station.
When the Emergency Alert System feature is setup, EAS alerts will be visible in the title header above the on-air events list. Clicking the alert will open the alert window.
The Site Status button is shown in the upper left corner On-Air module when the station is a member of the station group selected for the option Participate in Live Log Reconciliation in the Replication Profile tab of the Site Replication Manager.
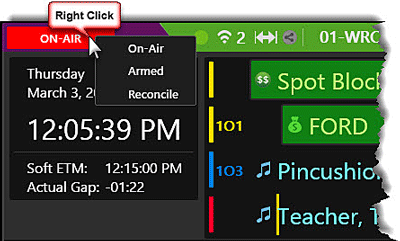
The user can right-click the button to change the status or use the Sequencer.SetOnAirSiteStatus command task to change the status. The Site Status button has three modes:
 |
On-Air - The 'On-Air' option will set any other site that is set as 'On-Air' to 'Reconcile' and start publishing status changes to other sites. When the user selects this option they will be prompt with the following message. Click OK to make the status change. When switching from 'On-Air' mode to 'Reconcile' mode, the Sequencer will shut down, leaving only the currently playing Log Event to finish. If the station is currently playing a Spot Block on the site switching from 'On-Air' status, the user may want to wait until the last log event in the Spot Block starts before changing the status.
|
 |
Armed - The 'Armed' option will allow the operation of the Sequencer and accept status changes from the current On-Air site but will not publish any status changes to other sites. With the site in 'Armed' status, a site that is about to take over the 'On-Air' status can start their Sequencer and cue up the log to where they want to be without sending statuses. This allows them to perform a Sync to Selection which will drop Log Events but not publish those statuses. This should only be used temporarily when switching between sites, not for long periods of time. Note: Using Sync to Selection provides the chance of assets being left in the 'Ready' state on the site going to 'Reconcile' mode. When the sequencer is next started, these assets will be loaded into the top of the sequencer unless the time has passed midnight and the sequencer starts in the following day. When the user selects this option they will be prompt with the following message. Click OK to make the status change. Hot Keys, Stacks and Z-Player are locked in Audition mode when the Site Status is 'Armed' for the station.
|
 |
Reconcile - The 'Reconcile' option will stop the playback of the log at the end of the currently playing event and shutdown the Sequencer for the station on this site. The Reconcile site will accept status changes from the site with the current 'On-Air' site status. When the user selects this option they will be prompt with the following message. Click OK to make the status change. Hot Keys, Stacks and Z-Player are locked in Audition mode when the Site Status is 'Reconcile' for the station.
|
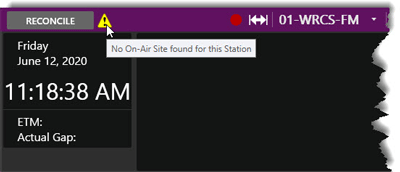
If there is no site set as On-Air for the station, a warning is displayed next to the button.
The event list allows the user to see the currently playing event and the next events to play on all configured play streams contained in the Sequencer Stream Group. The sequencer assigns play streams to playable events only, events that do not have audio are not assigned a play stream such as, Live Spots, inactive assets or assets with missing audio files. When the station is configured as a Master Splits station the stream number will reflect the color selected in Themes & Appearances for the splits behavior of the event.
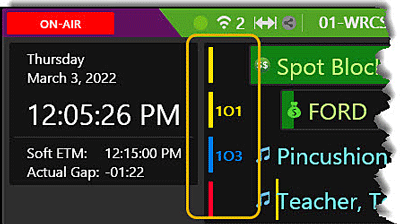
The default view of this module shows the first three events. Expand the height of the window to view additional events below the default three. To change the colors, fonts and font sizes of the On-Air module use the Themes & Appearances Configuration. The colors of the progress bar can be changed in the Progress Bars section of the Log Editor section of the Themes & Appearances Configuration.

Tip: When using Splits the progress bar for silent events can be changed. The Silent Log Event Progress Bar option in Themes & Appearances changes the color of the progress bar for an event that is silent. This includes Spot Block headers, Master Silent Assets, Macro headers etc. This color change is shown in the Log, On-Air, Stacks, Hot Keys and Z-Player Modules.
As events play, the progress of the event shows in the background of the event description:

If an intro is set, the intro of the event will be shown in yellow and the time display will show the time of the intro and/or the time to the end of the intro. The Yellow color will increase with intensity with each intro in the Song. Each Intro mark is shown in the event. The colors of the progress bars can be changed in the Progress Bars section of the Log Editor section of the Themes & Appearances Configuration.

This progress bar will change color twice towards the end of the event. The colors of the progress bars can be changed in the Progress Bars section of the Log Editor section of the Themes & Appearances Configuration.:
ü When 10 seconds remain in the song, the progress bar will display the following color:

ü When 5 seconds remain, the progress bar will switch to another color:

If the Show Progress for Live Events is enabled in the Playback tab on the Station Configuration and the event is a Live Event, the progress bar will display in Purple when using Manual or Live Assist mode. Once the Live Event gets to 10s and 5s left it will change to the 10s left and 5s left progress bars shown above (just like normal Assets). The colors of the progress bars can be changed in the Progress Bars section of the Log Editor section of the Themes & Appearances Configuration.

If the event has a cue point marker it will display in red. Hovering the mouse over the red cue point will show the name of the cue point.

When an event is Paused, the event will show the progress of the paused event with a yellow glow around the progress bar:

To the left of the event description, is the ID or Short Name of the play stream assigned to play the event is displayed:

Hovering the mouse pointer over the number displayed will show a tool tip with information about the play device:

To the right of the event description, the user can view the time elapsed and the time remaining in the song. Double-Clicking the time will toggle the display to show either the time remaining to the end…

…Or the time elapsed and the total time of the song.

The event list also displays an icon signifying the type of media event that is scheduled to play and any note associated with the event. The color of these icons will vary based on the Themes & Appearances Configuration. The following is a list of these icons:
 Song
Song
 Spot
Spot
 Link
Link
 Spot Block
![]() Custom Asset Type
Custom Asset Type
 Asset with Note
 Asset with Script
 Live Event
 Live Event with Confirmation
 Marked as Read
 Voice Track
![]() Quick Record
Quick Record
![]() Record
Record
 /
/ Show - When a Show is placed in the log it shows a shortcut icon
 . When the sequencer executes the Show the show contents is then copied to the log and the show icon changes
  .
.
![]() Tags - When a Tag asset is resolved in the Log the icon
Tags - When a Tag asset is resolved in the Log the icon  will change to show the asset type that will play.
![]() Rotation - When a Rotation asset is resolved in the Log the icon
Rotation - When a Rotation asset is resolved in the Log the icon  will change to show the asset type that will play.
![]() Imaging - When an Imaging asset is resolved in the Log the icon
Imaging - When an Imaging asset is resolved in the Log the icon ![]() will change to show the asset type that will play.
will change to show the asset type that will play.
 Macro
Macro
Clicking the Note or Scripts icons, in the On-Air module and Logs window, will display the Notes preview window.
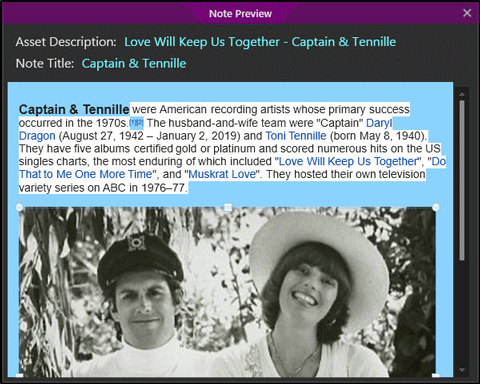
The events following the currently playing event display the Intro in brackets before the duration of the event. The Intro displayed is the longest Intro defined in the Marks Editor for the audio. If an Intro is not defined for the audio then no Intro value is shown.

When a Spot Block or Macro is played, the On-Air Module will show the number of events played and the number of total events, while the Log shows the progress of the Spot Block or Macro and the Spot or Macro event playing. When the Fill Length and Control Text are set for the Spot Block. The Log event will show the Fill: Fill Length | Ctrl: Control Text next to the Spot Block title.
![]()
Spot Blocks, Shows and Macros can be displayed expanded or extracted, with header or without using the Parent/Child events options in the Preferences Configuration.
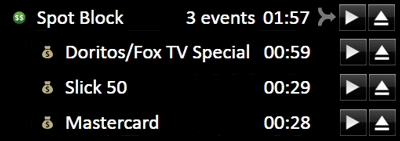
The Play Controls section of the On-Air Module controls the playback of events On-Air. To Audition assets use the right-click menu or simply middle-click the asset title.
 |
Play Next - The large play button located at the far right of the On-Air Module is used to start the next cued event. |
 |
Play - The small Play button located in line with the event will play the event. If an event is played out of order, the event will be moved to the correct position in the On-Air module and the Logs module and the currently playing event(s) will be faded. |
Right-click anywhere in the On-Air module to show the hidden context menu for the On-Air Module.
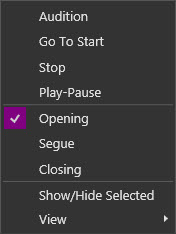
This menu allows the user to show/hide the selected controls and use the audition options.
The Audition options are typically in the first two section of the right-click context menu. These audition options are configured in the Context Menu Customization section of the Auditioning tab in the Preferences Configuration window. The audition section of this menu is used to play the audio on an audition play stream. The default options in this menu are Audition, Go To Start, Stop, Play-Pause, Opening, Segue and Closing. The top options are used for playback of the audio and the bottom options are used to select the marking point at which the audio will play. Clicking a marking point from the menu will play the audio from the point selected. The By Default Audition from option is the checked option in the list of marking points. This means when Audition is clicked, the default action is to audition the asset from this checked marking point. If the default marker is not set for the selected asset the audio will start from the Opening. This default can be changed temporarily by right-clicking on the context menu option that is to be set as default. This will change the default for all of the Audition context menus in Zetta for this users Zetta session. Optionally, the user can simply middle-click the title of the asset to be auditioned and the asset will be auditioned based on the default marking point. See the Audition Module section of the guide for more information on auditioning assets.
The Controls pane is hidden by default but can be displayed by right-clicking the On-Air module and selecting Show/Hide Selected or by clicking View then selecting the tab to view. If all the tabs are selected in the View menu option, simply click the Show/Hide Selected option. All tabs are selected, but hidden by default when the On-Air module is opened. These tabs can be positioned using the docking and undocking options and then saved to a Layout.
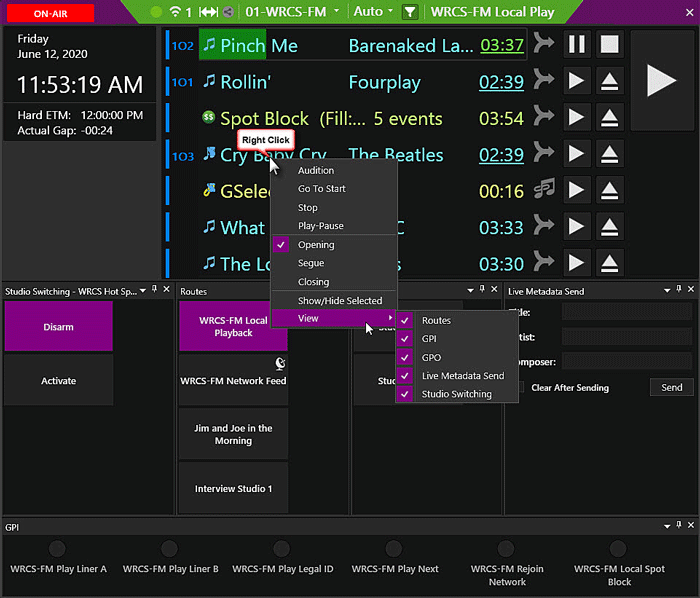
The Routes tab shows the routes that have been configured in the GPIO/Routes tab for the Computer and assigned in the Network tab for the station. To change a Route's state manually, simply click the button in the pane. When a route is on it is shown in green. The button with the Location icon in the upper right corner is the route selected as the Local Route for the station. The button with the Network icon in the upper right corner is the route selected as the Network Route for the station.
The GPO tab shows the Outputs that have been configured in the GPIO/Routes tab for the Computer and assigned in the Network tab for the station. To change a GPO's state manually, simply click the button in the pane. See the Network Mode feature topic for additional information on using the Controls pane of the On-Air module.
The GPI tab shows the Inputs that have been configured in the GPIO/Routes tab for the Computer and assigned in the Network tab for the station. When an input is received from the configured GPIO device the GPI control window will flash green for the corresponding input. See the Network Mode feature topic for additional information on using the Controls pane of the On-Air module.
The Live Metadata Send tab works similarly to the Live Metadata Send Module. It can be used to manually send a Live Metadata message for the specified station. Zetta will use the defined Live Metadata instances in the Live Metadata tab of the System Configuration to send the Live Metadata message. Where multiple Live Metadata instances exist for a station, the message will be sent to all active instances for the station. This Live Metadata Send messaging is independent of the sequencer Live Metadata messages.
The Studio Switching pane is used to Arm/Disarm and Activate/Deactivate a Hot Spare. The computer must have a Hot Spare selected in the Hot Spare for Studio Switching field of the Details tab of the Computer Configuration window, the current station must be assigned as an Assigned Station to the Hot Spare in the Hot Spare Configuration window and the user account must have the rights to Open the Studio Switching window for the Studio Switching option to be visible in the Controls pane of the On-Air window.
When the pane is open an Arm and Activate button will be shown. When the Arm button is selected, Zetta will arm the Hot Spare and the Hot Spare will play the audio from the stations log that the currently active sequencer is playing, so they will both be playing the same audio at the same time. This allows for a smoother transition when activating the Hot Spare. The Hot Spare status also changes in the On-Air header. The Arm button will change to a different color and show the word Disarm.
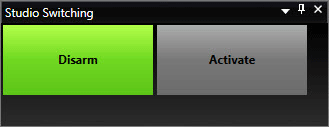
Clicking the Disarm button will disarm the Hot Spare and return the button to its original state.
Selecting the Activate button will activate the Hot Spare. If the Hot Spare has not been armed it will not start to play audio until the next event starts. When the Hot Spare is activated, the Activated button changes to green with the wording Deactivate and the Arm button is disabled. The Hot Spare status also changes in the On-Air header. Selecting the option Arm Station Stream Groups when activated, in the Hot Spare Configuration, will tell Zetta to automatically arm the (Station Stream Groups) for the original computer when the Activate option is selected. This can be used to keep Station's default Stream Groups armed after a Hot Spare has been activated.
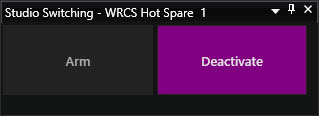
Clicking the Deactivate button will Deactivate the Hot Spare while arming and activating the original (Station Stream Groups). The button will return to its original state and the Arm button will once again be available for use.
This section includes step-by-step information on common tasks performed from the On-Air Module.
In this section: show/hideshow/hide
Selecting the Station/Viewing Station Status
Add an Asset to the On-Air Module
|
|
To select a station to view in the On-Air Module, perform the following steps: |

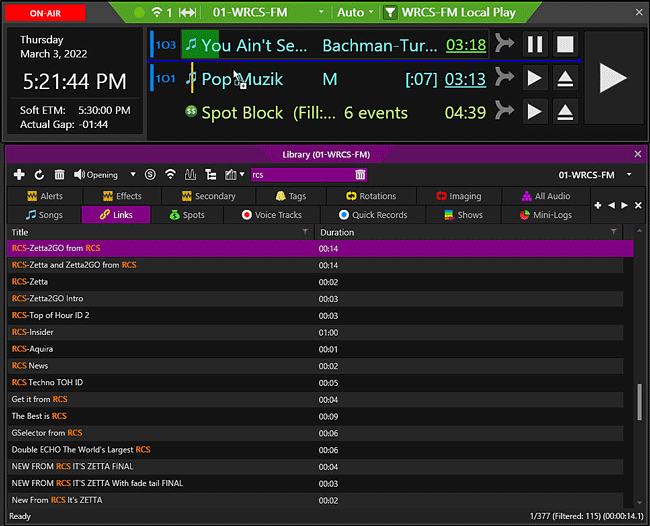
Typically, the entire list of events that will play are provided by GSelector® or Log load from Flat File Assignment. In the event of a manual log change, without accessing GSelector or the Logs Module the song can be added directly from the Library Module.
|
|
To add assets to the On-Air module, follow these steps: |
|
|
To delete an event from the current On-Air list, perform the following steps: |
 button. The event is removed from the list and given a status of skipped.
|
|
To change the Station Mode in the On-Air Module, perform the following steps: |

Welcome < Modules Overview < On-Air Module
© 2007-2024 RCS. All Rights Reserved.