Welcome < Configuration < Working with Security < Roles Configuration
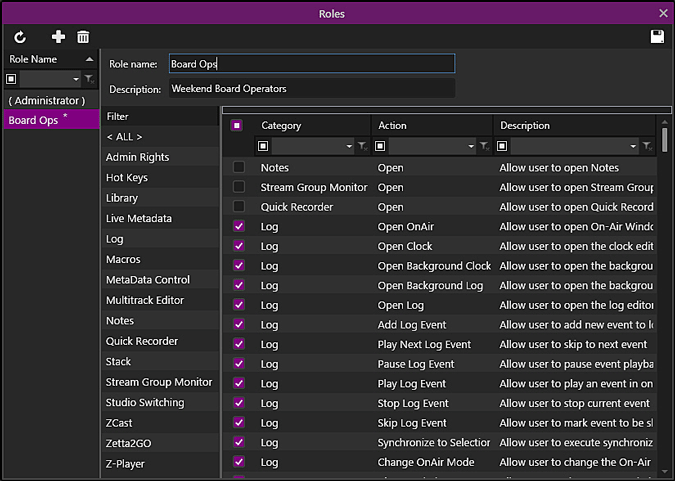
Everyone knows the importance of security, Roles can be used to set up groups of users and then limit their access to specific Zetta® functions. The Administrators role is created on install with ALL rights to Zetta. Users are assigned a Role when creating an Account. The left pane of the Roles configuration window lists the roles that can be selected for viewing and editing. The right pane of the Roles configuration window is used to identify and configure the parameters for each Role.
Click any area in this image for help

Click any area in this image for help
In this Topic: show/hideshow/hide
 |
Refresh Roles - The Refresh Roles button will refresh the screen to its last saved state, undoing any changes that have been made. |
 |
Add Role - Use the Add Role button to create a new role. |
 |
Remove Role – User the Remove Role button to delete the selected role. |
 |
Save – Use the Save button to save the configuration. |
The pane to the left displays the configured Roles by Role Name. This list can be sorted in ascending or descending order by clicking the column heading. The Custom Filtering field below the column header can be used to filter the list. Simply type into the field to narrow the list to the role needed. See the Custom Filtering section of the guide for additional help using the filtering.
The Role Name should be something descriptive to define the function of the users to be added to the role.
Use the Description field to describe further the role of users.
See the Working with Security topic for more information on the specific rights listed.
Filter
The filter column is used to select the different aspects of Zetta to display the defined privileges that can be changed. This allows the user to view ALL privileges or just the privileges for a specific category such as the Log module or the MetaData Control for the assets.
Privileges
The privileges section is divided into the following columns that can be filtered using the filter mentioned above or by using Custom Filtering. The columns can also be sorted using Grouping by clicking the thick line above the column headings or in ascending or descending order by clicking on the heading.
Select All – The Select All column can be used to select or deselect all the items displayed in the list.
Category – The category column lists all the modules and the tools interface that have defined privileges.
Action – The Action column display the action that is being allowed when the privilege is selected.
Description – The description column give an expanded explanation of what is being allowed when the item is selected.
This section will provide step-by-step instructions for tasks in the Roles window of the Configuration menu.
In this section: show/hideshow/hide
|
|
To create User Roles, perform the following steps: |
 button

It is a good idea to create Station Groups before assigning a Role to an Account.
|
|
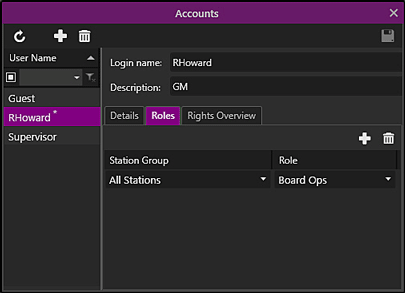
To assign a user to a Role, perform the following steps: |
 button
 Button.
Welcome < Configuration < Working with Security < Roles Configuration
© 2007-2024 RCS All Rights Reserved.