Welcome < Configuration < Preferences
The Preferences window is used to set application preferences for users. The Preferences window and the User Preferences window look slightly different but have the same preference settings.
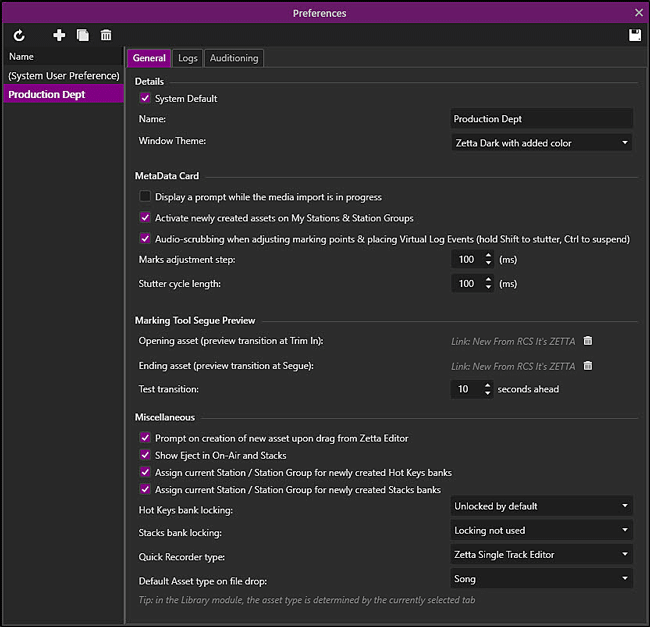
The Configuration Preferences window is accessed from the Configuration menu and allows a system supervisor to create Preferences of application options that can be assigned to user accounts. A preference can be assigned to a single user or multiple users in the Configuration | Accounts window. The Preferences window has a left pane that shows the created preference names and a right pane for customizing the preferences created. The bar between the two panes can be used to adjust the size of the panes as needed.
Click any area in this image for help

Click any area in this image for help
The Configuration Preferences window has the following toolbar options:
|
|
Refresh User Preferences - The Refresh User Preferences will refresh the window to its last saved state, discarding all unsaved changes. |
|
|
Add New User Preference – The Add New User Preference button is used to create a new user preference |
|
|
Copy User Preference – The Copy User Preference is used to create a copy of the highlighted user preference to a new User Preference. |
|
|
Delete User Preference – The Delete User Preference is used to remove the highlighted user preference. |
|
|
Save User Preference – The Save User Preference is used to save the changes to the Preferences. |
The User Preferences window is for the current logged in user and is accessed from the User Name drop-down in the title bar of the main application window. This window does not show the left pane nor does it have the ability to make additional preferences. The window that is open displays the General tab and the Auditioning tab of the window with the users name in the title header at the top of the window. This window is used to change the current logged in user's preferences only.
Click any area in this image for help
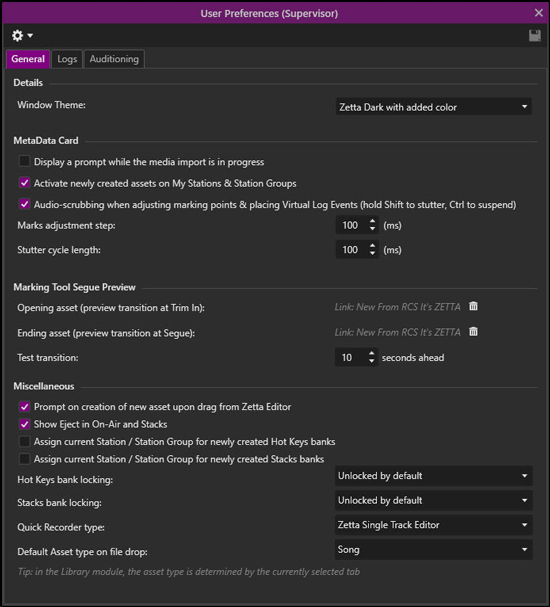
Click any area in this image for help
A Preference is assigned to the user in the Details tab of the Accounts Configuration window. The Allow the User to Customize User Preferences option must be enabled in the users account for the User Preferences menu option to be shown in the User Name drop-down menu.
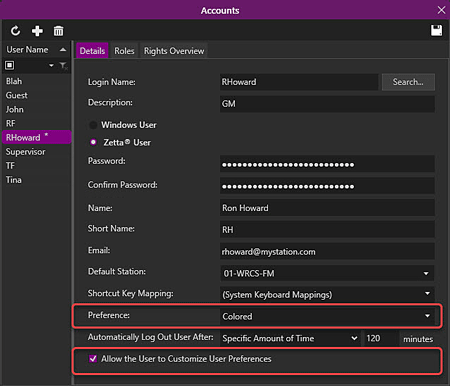
When the 'Allow the User to Customize User Preferences' option in the Accounts Configuration window is enabled, the user can make changes to a copy of the assigned preferences. The User Preferences window can be reset to the original assigned preferences by clicking the Reset User Preferences toolbar button or by disabling the 'Allow the User to Customize User Preferences' option, saving the account changes and then re-enabling the option.
In this Topic: show / hide show / hide
The User Preferences window has the following toolbar options:
|
|
Reset User Preferences - The Reset User Preferences will reset the User Preferences back to the original assigned Preferences, discarding all changes. |
|
|
Save User Preference – The Save User Preference is used to save the changes for the current User Preference. |
The General tab is used to change general preferences for the Zetta application.
In this Topic: show/hideshow/hide
System Default - Used in Configuration Preferences only
Name - Used in Configuration Preferences only
The System Default option is shown in the Configuration Preferences window and will make the user preference the default for all new accounts created. The (System User Preference) is the checked as the System Default for new systems. Click the checkbox in a different Preferences configuration to change the default preference for all newly created users.
The Name field is shown in the Configuration Preferences window and is used to name or describe the preference. This is the name that will be shown when the Preference is assigned to the user in the Accounts Configuration window.
The Window Theme drop-down option allows the user to change the themes for the windows in Zetta. See the Theme & Appearances topic for more information on creating Themes. The Metal theme is the default theme and gives all the windows a metal look.
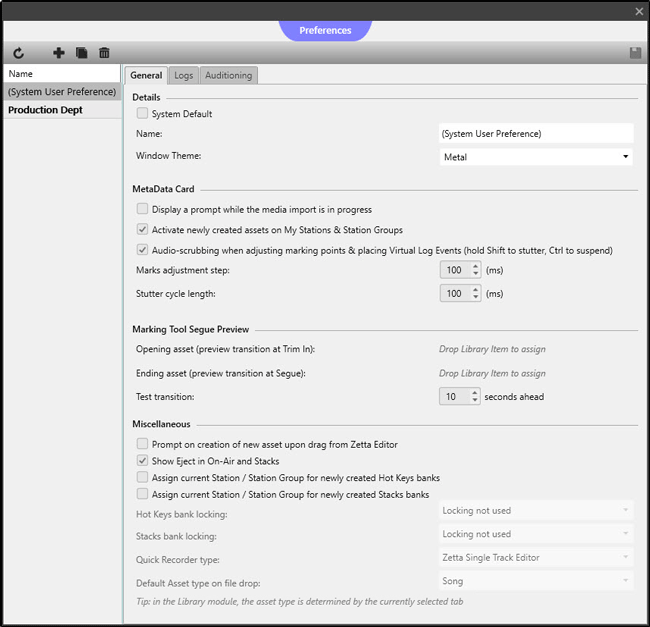
The Zetta Dark theme (used throughout the help guide) makes all the windows dark with white font.
The Zetta Light theme makes all the windows light with dark font.
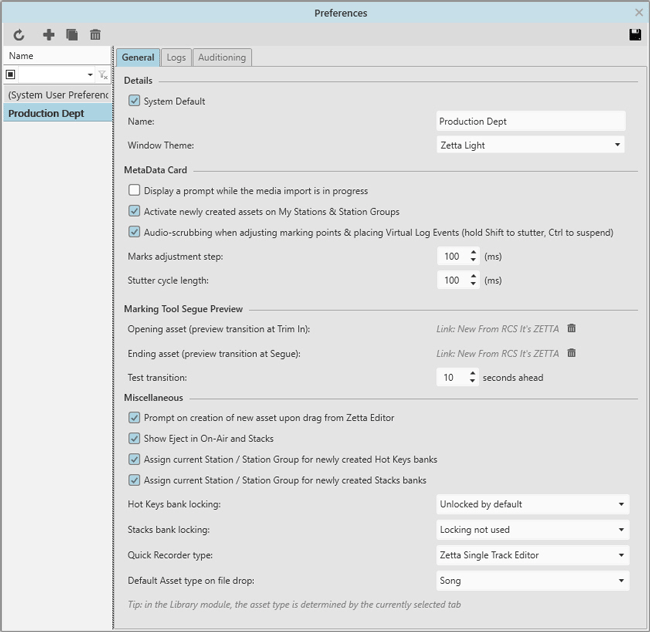
The Window Theme in the User Preferences window will default to the originally configured Window Theme when the Reset User Preference  button is clicked in the User Preferences toolbar.
Display a prompt while the media import is in progress - This option is used to enable a prompt to show a pop up during media import on a Metadata card. If this option is enabled, Zetta will show a prompt when the user clicks Save in the toolbar of the Metadata card. This prompt will go away when the import process (asset creation, analysis, conversion, content management...) is successfully finished and the asset is ready to be used. Should a user decide he does not want to wait for the process to finish and let the operation finish in the background a Background button is available in the pop up prompt.
Activate newly created assets on My Stations & Station Groups - This option is selected by default. When this option is enabled, if the user selects a Special Filter or Station Group from the Library toolbar, when the user adds a new asset it will be automatically set as active for the stations included in the filter. If this option is not enabled the new asset will only be set to active if a user selects a specific station. If the user selects a Special Filter or Station Group the asset will not be set to active for any station.
Audio-scrubbing when adjusting marking points & placing Virtual Log Events (hold Shift to stutter, Ctrl to suspend) - This option when enabled will play the audio in-line with the location of the mouse cursor when dragging an asset or marker in the audio graph. This allows the user to drop the asset or marker in the correct location. To have the audio stutter when the marker is held in place, simply hold the SHIFT key while dragging. To turn off all audio play while dragging, hold the CTRL key. To disable the play of audio while dragging, deselect this option.
Marks Adjustment step (ms) - The 'Marks Adjustment steps' setting is used to change the step value that is used when the Marks Adjustment up and down arrows are used to adjust the time of a set transition marker in the Marks Editor.
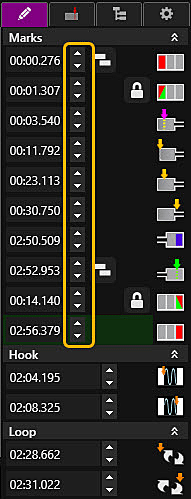
Stutter cycle length (ms) - This setting is used to control the stutter cycle length when dragging an asset or marker in the audio graph in the metadata card. The default value is 100 milliseconds.
The following settings are used to setup assets to be used for previewing the transition markers, Trim In and Segue, from within the Marks Tool of the Metadata card.
Opening asset (preview transition at Trim In) - The Opening asset is the audio that will be played when previewing the Trim In transition marker for a selected asset in the Marks Tool. This asset will need to have a defined Segue marker. Drag and drop the desired asset from the Library that will be played as the opening asset when previewing the Trim In marker in the Marks Tool. Use the Clear Library Item  button to remove the asset from being used.
Ending asset (preview transition a Segue) - The Ending asset is the audio that will be played when previewing the Segue transition marker for a selected asset in the Marks Tool. This asset will need to have a defined Intro marker. Drag and drop the desired asset from the Library that will be played as the ending asset when previewing the Segue marker in the Marks Tool. Use the Clear Library Item  button to remove the asset from being used.
Test transition xx seconds ahead - The Test Transition is the number of seconds of audio ahead of a defined segue marker that will play when previewing the segues of an asset in the Marks Tool. When previewing the Trim In, xx seconds of audio will play ahead of the segue of the opening asset. When previewing the Segue, xx seconds of audio will play ahead of the segue for the current asset before the ending assets audio begins to play.
Prompt on creation of new asset upon drag from Zetta Editor - If the 'Prompt on creation of new asset upon drag from Zetta Editor' is checked, when an audio drag/drop is performed from the Multitrack/Single Track Editor, a popup is shown at the drop location for users to change the Title, Asset Type, Days to Keep (kill date) and Station.
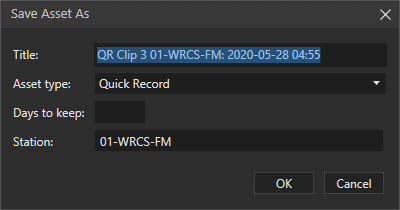
The popup is also shown when CTRL is pressed while dragging irrespective of whether this user preference is checked. The user can quickly press Enter on the keyboard to accept the default settings in the popup and bypass the change if needed. If the Cancel button is pressed on the popup, the drop operation is cancelled.
Show Eject in On-Air and Stacks - The 'Show Eject in On-Air and Stacks' option is enabled by default. When this option is deselected the Eject  button is not visible in the On-Air and Stacks modules.
Assign current Station / Station Group for newly created Hot Keys banks - This setting will populate the Station and Station Groups fields in the New Hot Keys window with the corresponding Station or Station Group(s). By default, this option is unchecked. When unchecked the Stations & Station Groups fields in the New Hot Keys Bank window will be blank. When this setting is enabled (checked), if a 'specific station' is selected in the modules toolbar, the station selected will be used to populate the 'Stations' field in the 'New Hot Keys bank window. If 'All banks' is selected in the modules toolbar, the 'Station Groups' field will be populated with Station Group(s) derived from the current user's Station Group assignments (under Configuration | Accounts | Roles).
Assign current Station / Station Group for newly created Stacks banks - This setting will populate the Station and Station Groups fields in the New Stacks Bank window with the corresponding Station or Station Group(s). By default, this option is unchecked. When unchecked the Stations & Station Groups fields in the New Stacks Bank window will be blank. When this setting is enabled (checked), if a 'specific station' is selected in the modules toolbar, the station selected will be used to populate the 'Stations' field in the 'New Stacks bank window. If 'All banks' is selected in the modules toolbar, the 'Station Groups' field will be populated with Station Group(s) derived from the current user's Station Group assignments (under Configuration | Accounts | Roles).
Hot Keys Bank Locking - The Hot Keys Bank Locking allows the user to lock the hot keys bank to prevent accidental edits to the bank. There are three options for this settings:
Locking not used - The Locking Not Used will allow the user to make any changes without first unlocking the bank. The user will not see the lock and unlock icons in the toolbar and right-click menu of the Hot Keys.
Unlocked by default - The Unlocked by default will allow the user to make any changes without first unlocking the bank. The user will see the lock and unlock icons in the toolbar and right-click menu of the Hot Keys. The user can lock and unlock the banks as needed.
Locked by default - The Locked by default will require the user to unlock the bank before making any changes to the bank. The user will see the lock and unlock icons in the toolbar and right-click menu of the Hot Keys. The user can lock and unlock the banks as needed.
Stacks Bank Locking - The Stacks Bank Locking allows the user to lock the stacks bank to prevent accidental edits to the bank. There are three options for this settings:
Locking not used - The Locking Not Used will allow the user to make any changes without first unlocking the bank. The user will not see the lock and unlock icons in the toolbar and right-click menu of the Stacks.
Unlocked by default - The Unlocked by default will allow the user to make any changes without first unlocking the bank. The user will see the lock and unlock icons in the toolbar and right-click menu of the Stacks. The user can lock and unlock the banks as needed.
Locked by default - The Locked by default will require the user to unlock the bank before making any changes to the bank. The user will see the lock and unlock icons in the toolbar and right-click menu of the Stacks. The user can lock and unlock the banks as needed.
Quick Recorder Type - The 'Quick Recorder Type' is a drop-down with a list of the recorders available in Zetta. The Zetta Single Track Editor will open a new Single Track Editor Project in the Zetta Editor. The Zetta Editor (Legacy) is the legacy quick record module that was available in previous versions of Zetta. When Zetta Single Track Editor is selected from the Edit Audio menu, found throughout Zetta, the Quick Recorder Type selected here will be launched. The default Quick Recorder is the Zetta Single Track Editor.
Default Asset type on file drop - The 'Default Asset type on file drop' is the Asset type to use when dropping an audio file into the Zetta modules. Use the drop-down to select what Asset type to assign to the audio that is dragged and dropped, from the desktop or other application, into a Zetta module. However, in the Library module, the asset type is determined by the currently selected asset tab. The default setting is Song.
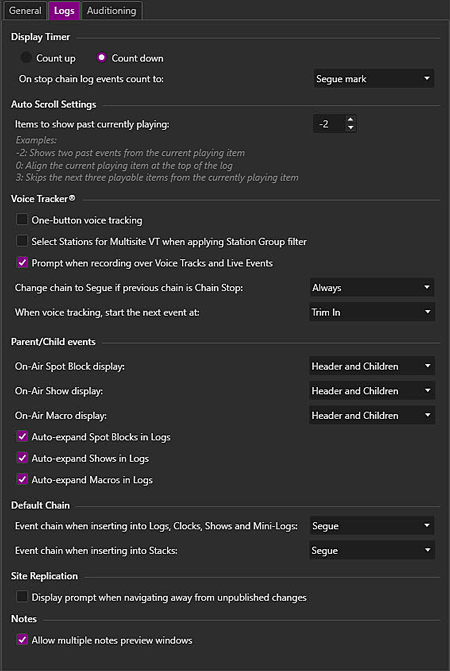
The Logs tab is used to change preferences for the Logs Module.
In this Topic: show/hideshow/hide
Count Up – The Display Timer Count Up will display the time elapsed and the total time of the song.

Count Down - The Display Timer Count Down will display the time remaining in an event.

On Stop Chain log events, count to: Segue Mark or Trim Out Mark - In the On-Air and Logs module when an event has a Stop Chain the duration shown by default is to the Segue Mark. Using this option the user can change this to show the duration to the Trim Out Mark.
The Auto Scroll Settings are for setting the number of displayed items when the Auto scroll  button is clicked in the Logs Module. Selecting a negative number shows more items from the past that have played. Selecting a positive number skips future events in the log. Selecting 0 displays the currently playing event at the top of the log.
|
Important Note! |
When calculating the offset event Zetta only takes into account, playable items that show in the on-air module, so if an ETM, TOH or Comment is in the queue that event will not be used to calculate the offset. |
One Button Voice Tracking - The 'One Button Voice Tracking' option will change the Play Control button configuration in the Voice Tracker to allow users to use one button to control the progression through creating a voice track in Zetta.

Default Play Controls

One Button Voice Tracking
Select Stations for Multisite VT when applying Station Group filter - When Zetta is setup to use Station Groups to filter or group stations this option can be used to have Zetta automatically select the stations grouped in the selected Station Group for voice tracking in the Multisite VT window.
Prompt when recording over Voice Tracks and Live Events - When this option is selected the user will receive a prompt when recording over a Voice Track or Live Event in the Voice Tracker, asking them if they would like to replace the existing Voice Track or Live Event. When this option is deselected the prompt will not be displayed.
Change chain to Segue if previous chain is Chain Stop - The 'Change chain to Segue if previous chain is Chain Stop' setting allows the user to decide if they want the Chain Type changed after Voice Tracking or adjusting tracks in the Segue Editor. The following options are available for this setting.
When voice tracking start the next event at - This setting sets when the event after the voice track will start during voice tracking. If Trim In is selected, the event after the voice track will start at the Trim In marker. If the Trim In marker does not exist the event will start at the beginning of the audio. If Mix In is selected, the event after the voice track will start at the Mix In marker. If the Mix In does not exist the event will start at the beginning of the audio. The default setting is Trim In.
On-Air Spot Block display - Use the 'On-Air Spot Block display' drop-down to select how the spot block will be displayed in the On-Air module. The Header Only will display the spot block title and the number of events in the spot block in the On-Air Module. The Children Only will display only the child events of the spot block in the On-Air Module. Header and Children will display the title and child events of the spot block in the On-Air Module.
On-Air Show display - Use the 'On-Air Show display' drop-down to select how the show will be displayed in the On-Air module. The Header Only will display the show title and the number of events in the show in the On-Air Module. The Children Only will display only the child events of the show in the On-Air Module. Header and Children will display the title and child events of the show in the On-Air Module.
On-Air Macro display - Use the 'On-Air Macro display' drop-down to select how the macro will be displayed in the On-Air module. The Header Only will display the macro title and the number of events in the macro in the On-Air Module. The Children Only will display only the child events of the macro in the On-Air Module. Header and Children will display the title and child events of the macro in the On-Air Module.
Auto expand Spot Blocks in Logs - The 'Auto expand Spot Blocks in Logs' option is used to have the Spot Blocks automatically display in the expanded form when working with Logs/Clocks. This option is also passed to the Zetta2GO Logs module.
Auto expand Shows in Logs - The 'Auto expand Shows in Logs' option is used to have the Shows automatically display in the expanded form when working with Logs/Clocks. This option is also passed to the Zetta2GO Logs module.
Auto expand Macros in Logs - The 'Auto expand Macros in Logs' option is used to have the Macros automatically display in the expanded form when working with Logs/Clocks. This option is also passed to the Zetta2GO Logs module.
Event chain when inserting into Logs, Clocks, Shows and Mini Logs - The 'Event chain when inserting into Logs, Clocks, Shows and Mini Logs' option allows the user to select the default chain type that will be set on Assets and Events inserted into Logs, Clocks, Shows and Mini Logs. The default setting is Segue. This option is supported for assets and events of the following types:
Asset types:
Event types:
All four chain types are selectable for this setting. However, for those assets and event types that do not support Auto-Post or Link-Song, Zetta will set the chain type to Segue.
For Example: In a scenario when the Preference is set to Auto-Post or Link-Song and a user inserts an asset or event such as a Song or Spot into a Log, Clock, Show or Mini Log, Zetta will set the chain type to Segue.
A Chain Override can be set on each asset, in the Extra tab of the asset metadata card, so the asset will always use the same chain type when insert into a Logs, Clocks, Shows and Mini Logs.
|
Important Note! |
Zetta2GO does not follow these preference settings at this point. |
Event chain when inserting into Stacks - The 'Event chain when inserting into Stacks' option allows the user to select the default chain type that will be set on Assets and Events inserted into Stacks. The chain type options available for Stacks are Segue and Stop. The default setting is Segue. A Chain Override can be set on each asset, in the Extra tab of the asset metadata card, so the asset will always use the same chain type when insert into a Stack. Since Stacks only supports Segue and Stop chains, if the Chain Override is set to Auto-Post or Link-Song when the asset is inserted into Stacks, then the chain type will be automatically set to Segue.
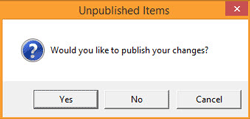
Display prompt when navigating away from unpublished changes - When the 'Display prompt when navigating away from unpublished changes' option is enabled, if the user makes changes in one of the replicated modules but does not publish the changes using the Publish through Site Replication  button, then the user will be prompt to publish the changes. Click Yes to publish the changes, No to leave the window without publishing the changes or Cancel to return to the log module window.
Allow Multiple Notes Preview Windows - If the 'Allow Multiple Notes Preview Windows' option is selected the user will be allowed to open more than one Note Preview windows at a time. If the Note Preview window is already open and a second note/script is selected the newly selected note/script will be opened in a new Note Preview window. If this option is deselected only one Note Preview window can be opened. If the Note Preview window is already open and a second note/script is selected the newly selected note/script will replace the previously opened note.
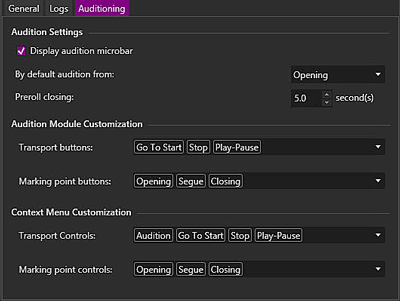
The Auditioning tab in the Preferences Configuration window is used to set the auditioning preferences for the user. The Auditioning Preferences are applied at login which means the user must logout and back in to see any changes to these preferences.
In this section: show/hideshow/hide
Display Audition Microbar - The 'Display Audition Microbar' is enabled by default. This is the microbar in the Zetta header of the main application window.

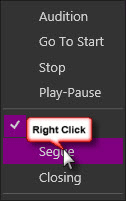
By default Audition from - The 'By Default Audition from' drop-down shows the list of options selected in the Marking Point Controls field. The option selected is the default marking point from which the audio will be played when it is auditioned. Therefore, if Opening is the option selected then Zetta will start auditioning the audio at the Opening of the audio. This default can be changed temporarily using this drop-down menu or from any context menu by right-clicking on the context menu option that is to be set as default. This will change the default for all of the Audition context menus in Zetta for the Zetta session.
Preroll Closing x second(s) - The 'Preroll Closing' allows the user to set the amount of audio to play before the Closing of the audio.
The Audition Module Customization section is used to control what buttons are shown in the Audition Module.
Transport Buttons - The 'Transport buttons' are the buttons used to control the playback of the audio. The default Transport buttons available in the module are the Go To Start, Stop and Play-Pause. The buttons are shown in the module in the order they are place in this field. The Transport buttons available are: Fast Forward, Go To End, Go To Start, Pause, Play, Play-Pause, Play-Restart, Play-Stop, Rewind and Stop. To remove a transport button right-click the name of the button and click Remove.
Marking Point Buttons - The 'Marking Point Buttons' are the buttons shown to the right of the Transport buttons in the Audition Module. The default Marking Point buttons are Opening, Segue and Closing. The buttons are shown in the module in the order they are place in this field. The Marking Point Buttons available are: Closing, Early Segue, Fade In, Fade Out, Hook, Hook In, Hook Out, Intro, Intro 1, Intro 2, Intro 3, Loop, Loop In, Loop Out, Mix In, Opening, Segue, Trim In and Trim Out. To remove a Marking Point button right-click the name of the button in the field and click Remove.
The Context Menu Customization section is used to control what menu options are shown in the drop-down menu of an Audition context menu found throughout Zetta. This menu can be shown by right-clicking an asset in a module. It is also found in the Audition toolbar button of most modules, to the left of the Audition Microbar and to the left of the Transport buttons in the Audition Module.
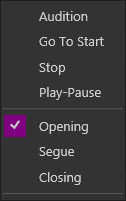
Transport Controls - The 'Transport Control' options are used to control the playback of the audio. The default Transport Control options available in the module are Audition, Go To Start, Stop and Play-Pause. The control options are shown in the context menu of the module in the order they are place in this field. The Transport Controls available are: Audition, Fast Forward, Go To End, Go To Start, Pause, Play, Play-Pause, Play-Restart, Play-Stop, Rewind and Stop. The Audition option simply plays the audio of the asset from the default marker. To remove a transport control right-click the name of the control in the field and click Remove.
Marking Point Controls - The 'Marking Point Controls' are the options shown in the drop-down menu to the left of the Transport buttons in the Audition Module. The control options are used to select the marking point at which Zetta will start auditioning the audio when the Audition button/menu option is selected. The default Marking Point Controls are Opening, Segue and Closing. The control options are shown in the context menu of the module in the order they are place in this field. The Marking Point Controls available are: Closing, Early Segue, Fade Out, Fade In, Hook, Hook In, Hook Out, Intro, Intro 1, Intro 2, Intro 3, Loop, Loop In, Loop Out, Mix In, Opening, Segue, Trim In and Trim Out. To remove a marking point control right-click the name of the control in the field and click Remove.
This section will provide step-by-step instructions for tasks in the Preferences window of the Configuration menu.
**To assign a Preference to a user account, see the Accounts section of this guide.
In this section: show/hideshow/hide
|
|
To create a new user preference, perform the following steps: |
 button
 button.
|
|
To edit an existing user preference, perform the following steps: |
 button.
|
|
To copy a user preference, perform the following steps: |
 button
 button.
|
|
To delete a user preference, perform the following steps: |
 button
Welcome < Configuration < Preferences
© 2007-2024 RCS All Rights Reserved.