Welcome < Features < Zetta Splits
Many radio stations broadcast over a geographically wide area on more than one frequency / transmitter, broadcasting a common program to all transmitters. However, to maximize revenues they sell localized commercials which are broadcast to specific transmitters / regions. Thus the main transmitter might be broadcasting one spot block to Region "A" while the split transmitter would be simultaneously broadcasting a different spot block to Region "B".
The splits feature lets a master station send a signal, using TCP, UDP, or Serial, to the stations to play their own local spots and links, and then it rejoins the master station after the break. Splits stations can be used for Internet Streaming stations, Network Programming or Simulcasting.
Splits in Zetta® is a subscription based model, which means that any Split Client can subscribe and listen for Split Master control events. A subscription based system has a Master, which is an independent station that sends information out to its subscribers, the Client, which is also an independent station. The Client will receive the subscription messages from the Master when the client station is in Split Player Mode. The Split Client then decides based upon the given information what to play. What is played on the Split Client station is determined by the Split Master's Split Behavior, the Assets in a Tag or Imaging for the Split Client, and the Operation Mode of the Split Client station at the time of the Split.
A Zetta station can be setup as a Splits Master, a Splits Client or both. The Splits design allows for “cascaded splits”, where Master station A drives Split station B, which in turn can be a Master station for Split station C. A “Split” can either be a sequence of events wrapped into a Spot Block OR a standalone asset such as a link, song or spot with a split behavior. The main requirement for splits is that the Split Master and the Split Client breaks START and END simultaneously; they must be the same length, this can be achieved by a combination of time stretching/squeezing and/or filling. The target length is declared by the length of the Spot Block OR individual asset on the Master Station. The firing of Assets with a Split Behavior are also supported in the Hot Keys and Stacks modules.
The Splits feature is enabled in the Configuration | System | General tab. The Splits feature is available on stations within a single database or across multiple Zetta sites.
In this Topic: show/hide show/hide
Stream to Stream Group Mappings
Splits Across Multiple Zetta Sites
Zetta Splits Step-by-Step Topics
Configuring Single Site Splits
Configuring External Splits for Zetta Sites
A Split Master is a station that will signal a subscribed Split Client. Split messages from Master station(s) are only received when the split station is in Split Player Mode, otherwise they are ignored. Split messages to queued / play / pause / stop a split event are driven by the Split Behavior; Master Audio, Master Silence or Master Monitor, of an asset scheduled on a Master Station. The Split Client will decide, based on the split behavior, the Splits Name Matching and asset, whether to split from the master or not; if, for example, the Splits Name Matching is set to Tag and there are no assets tagged and a Fill Category is not selected for the station, the Split Client will not split from the Master. The Split Master station and Split Client station can be scheduled using GSelector Integration or through Flat File Load using the V15Native Traffic Load (Splits Only) template.
The mechanism used to route audio to specific streams is based on the Split Behavior property of an Asset or a Spot Block. When an Asset on a Master Station is played with a Split Behavior, the audio on the Master Station is routed in the following manner:
|
Split Behavior |
Route |
|
None |
Routes to Regular (non-Splits) Playback Streams |
|
Master Silent |
Routes to Silent streams (plays silence on the Master Station) |
|
Master Audio |
Routes to Master Audio / Splits Player streams |
|
Master Monitor |
Routes to Master Monitor streams |
When a Split station is in Split Player Mode all log events are routed to the Stream Groups Split streams for that station.
A Split Behavior is set on the Assets or Spot Block that are scheduled on the Split Master Station where a split is to occur. The Split Behavior is respected in the On-Air, Hot Keys and Stacks modules. The Split Behavior of an asset is set in the Station Specific tab of the assets Metadata card. The Split Behavior of a Spot Block is set when scheduling the Spot Block either using GSelector Integration or Clocks. The Split behavior of an asset or Spot Block can be configured in GSelector. When a Spot Block has a Split Behavior it will override any Split Behavior of an asset scheduled within the Spot Block and ignore any tagging on the assets within the Spot Block. The master station will however send the fill length of the Spot Block to the Split Client. If a Split Behavior is only set on the assets within the Spot Block and these assets are tagged a message is sent to the splits client to queue and play an asset with a matching tag.
A Split Behavior of tells the Master station how to play the asset and to send a signal to the subscribing Split Clients to play a Tag or Imaging asset on the client station. By default, it should try to resolve as a Tag first, then Imaging. This can be changed in the splits stations configuration using the Splits Name Matching option.
None - A Split Behavior of None will play the asset through a stream enabled as Regular (non-split) in the Stream Group. Nothing will be sent to the Split Client.
Master Audio - A Split Behavior of Master Audio tells the Master station to play the audio and send a signal to the subscribing Split Clients to play a Tag or Imaging asset on the client station. If the asset is not in a tag or imaging asset, the Split Client station will play the same asset as the Master Station, if the asset is active on the subscribing station. When an asset's Split Behavior is set to Master Audio, a Master Audio  icon will be visible in the Split Behavior column of the Log.
Master Silent - A Split Behavior of Master Silent tells the master station to play silence and send a signal to the subscribing Splits Clients to play a tag or imaging asset on the client station. If the asset is not in a tag or imaging asset, the Split Client station will play the asset scheduled on the Master station, if the asset is active on the subscribing station. When an asset's Split Behavior is set to Master Silent, a Master Silent  icon will be visible in the Split Behavior column of the Log.
Tip: The Silent Log Event Progress Bar option in Themes & Appearances changes the color of the progress bar for an event that is silent. This includes Spot Block headers, Master Silent Assets, Macro headers etc. This color change is shown in the Log, On-Air, Stacks, Hot Keys and Z-Player Modules.
Master Monitor - A Split Behavior of Master Monitor will route the audio for the asset to the configured Master Monitor streams of the Stream Group for the Master Station and send a signal to the subscribing Splits Clients to play a tag or imaging asset on the client station. If the asset is not in a tag or imaging asset, the client station will play the same audio asset that is scheduled on the Master Station, if the asset is active on the subscribing station. Master Monitor allows the user to hear the audio locally for the Master Station even though nothing is playing over the air for the Master Station. When an asset's Split Behavior is set to Master Monitor, a Master Monitor  icon will be visible in the Split Behavior column of the Log.
A Station becomes a Split Client when a Split Master is selected; this can be done in the Station Configuration Splits tab, with an Execute Command Event or a Command Mapping to a Keyboard or a GPIO event using the Sequencer.SetSplitMaster command. A Split Client will receive information from the Split Master when the Split Stations On-Air module is in Split Player to: mode. The Station Mode can be changed using the Mode drop-down in the On-Air module, with an Execute Command Event or a Command Mapping to a Keyboard or GPIO event using the Sequencer.SetMode command. The Split stations log can be scheduled using GSelector Integration, Clocks, ZCast or through Flat File Load.
When the Split Client receives the splits message, that an individual asset is to play on the Master Station, it will first look for an event with the same Tag or Imaging name as the Master Station; if there is no Tag or Imaging asset and the Split Station is on the same site database, it will play the same asset as long as the asset is active and approved for the Split Station. When an Asset is inserted into the log of the Split Station it is inserted into the same hour as referenced in the Master station below any queued log events. If no queued event is found the asset is placed below the last played event; if none then it is placed below the Top of Hour marker.
When the Split Client receives the splits message, that a Spot Block with a split behavior is to play on the Master Station, it will try and locate an existing Spot Block log event which matches the Split Log Date, Hour and position, if no Spot Block is found nothing will happen on the split station.
|
Master Station |
Split Station |
|
1st Spot Block: Master Silent (Split #1) |
Spot Block (Split #1) |
|
2nd Spot Block |
|
|
3rd Spot Block: Master Silent (Split #2) |
Spot Block (Split #2) |
|
4th Spot Block |
|
|
5th Spot Block: Master Silent (Split #3) |
Spot Block (Split #3) |
Tagging can be used to tell the Split Client stations what to play when a Split Master Station plays an asset with a Split Behavior. When the Split Client receives a message from the Split Master that a Split is queued, the Split Client will first check for a Tag; if a Tag is found the Split Client will locate the asset, assigned to its station, with the same Tag and schedule it in the log. This is useful to play local imaging links on the splits stations. A Tag is created by clicking the Add new media  button in the Library Module | Tags tab.

To add assets to the Tag, simply drag and drop the desired assets into the new Tag window. The assets selected for the Split Master and the Split Client should have approximately the same length. Zetta will use the Maximum stretch/squeeze value, specified in the Playback tab of the Station Configuration window, to achieve an exact length to allow the Split Client to rejoin the Split Master at the correct time. If the assets cannot be stretched or squeezed to match, a warning error  will appear in the Tag window for the asset. The Station column in the Tag window is used to select the Station that will use the Asset. A warning error will appear if the asset is inactive for a selected station. For the most part a Tag will contain one asset for the Split Master and one asset for each Split Client; however more complex Tagging can be done such as one to many, many to many or many to one. When one of these more complex methods is used, Zetta will use a weighted scoring logic to select an asset to play on the Split Clients. The Metadata card can be accessed for an asset from the Tag window by simply double-clicking the Asset.
Imaging assets are similar to Tags. However, imaging assets have a fallback order that allows assets to be added that are only used in the event the normal asset is unavailable or invalid. The Fallback order pane shows the levels and order that the asset will play. In Level 1 Zetta checks the Current Shift and then the Default Shift. If there is nothing to play in Level 1 at the station shift level, Zetta will move to Level 2 the Station Rotation level. If there is nothing to play in Level 2, Zetta will move to Level 3 the Shared Rotation (Global) level. If there is nothing to play at Level 3 Zetta will move the Level 4 Shared Rotations (Station Groups) until Zetta finds something to play. Each Station Group in the Shared Rotations (Station Groups) Level can be given a priority order using the Imaging resolution priority field in the Station Groups Configuration window. The Shared Rotations (Station Groups) level follows the Imaging resolution priority given to the station group. Each Level can have any number of assets assigned to the image. Each level shows the number of assets associated with each sub-level. Each Level can have any number of assets assigned to the Imaging asset. An Imaging asset is created by clicking the Add new media button in the Library Module | Imaging tab.
The grid to the far right of the window shows the associated assets in the Imaging asset. Select a Station, Virtual station, Station Group or the Shared Rotation (Global) from the Assignment context list. Drag and drop assets into this grid from the Library module to assign the asset to the Imaging asset. When a Station is selected and if a shift exists for the station, assets can be added at the shift level by selecting a shift in the Fallback order list. Optionally, assets can be moved from one Fallback order to another by dragging and dropping the asset on the fallback order name in the list. Additionally, assets can be dropped on the Station name in the Assignment context to add the asset to the Level 2 - Station Rotation Fallback order.
See the Imaging topic for additional details.
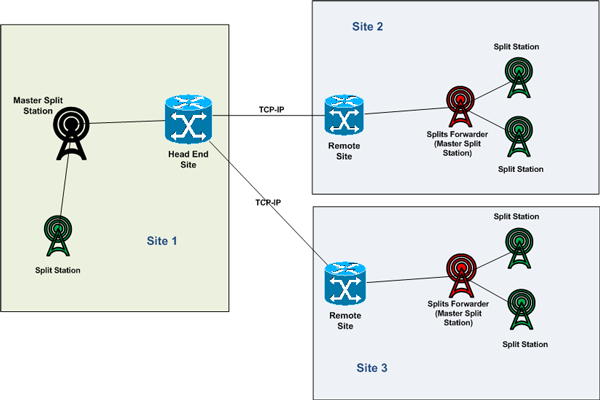
There is two ways of setting up splits for Site to Site Splits configuration, External Splits and ZCast Splits.
External Splits: External Splits will use the Serial/TCP/UDP GPIO connection to communicate between the Master and the Split Forwarder.
ZCast Splits: ZCast Splits will use a ZCast Split Forwarder connection to communicate. ZCast connections use an Outbound ZCast connection at the head end site for the Master station communication and an Inbound ZCast connection at the remote site for the Split Forwarder.
The Split Forwarder is a Virtual Station that is the Master Station at the remote site for any local subscribed split clients. If using Tags or Imaging, the tags/imaging must exist at both sites and must be named the same.
Configuring Spits across multiple Zetta sites requires the configuration of Virtual Stations with External Splits or ZCast Splits. The following diagram shows Zetta Local and External Splits over a TCP-IP connection.
Tags are not used for Spot Blocks with a split behavior. When the Split Client receives the splits message, that a Spot Block with a split behavior is to play on the Master Station, it will try and locate an existing Spot Block log event which matches the Split Log Date, Hour and position. The split station will then play the spots scheduled in the Spot Block, if no Spot Block is found nothing will happen on the split station. However, if the Auto Create Spot Blocks if Missing is enabled for the Splits station, Zetta will create any Spot Blocks that are missing on the Splits Stations so the number of spot blocks match the Master Station. The selected Fill logic will then be used to fill the newly created spot block.
|
Master Station |
Split Station |
|
1st Spot Block: Master Silent (Split #1) |
Spot Block (Split #1) |
|
2nd Spot Block |
|
|
3rd Spot Block: Master Silent (Split #2) |
Spot Block (Split #2) |
|
4th Spot Block |
|
|
5th Spot Block: Master Silent (Split #3) |
Spot Block (Split #3) |
Before proceeding with the following Steps configure the Computer(s) Play Devices that will be used for the Master and Splits stations.
In this section: show/hide show/hide
Configuring Single Site Splits
Configuring External Splits for Zetta Sites
The following steps will assist in the configuration of splits for a site.
In this section: show/hide show/hide
Step One: Enable the Splits Service
Step Two: Configure the Stream Groups for the Master Station
Step Three: Configure the Stream Groups for the Splits Client Station
Step Four: Configure the Master Station
Step Five: Configure the Splits Station
Step Six: Setting the Split Behavior for an Asset
Step Seven: Create Tags and Imaging for Splits Name Matching
If the Zetta Splits service is not enabled other Splits features will not be visible.
|
|
To enable the Splits Service, follow these steps: |
 button to save the changes.
|
|
To configure the Stream Groups for the Master Station, follow these steps: |
button to create a new Stream Group. button for the desired number of streamsRegular (non-Splits) - By default the Regular option is selected for normal Play on the station.
Master Audio/Splits Player - The Master Audio/Splits Player option is used for both Master Splits and Splits Player Stations. When an asset or spot block for the master station is assigned the Split behavior, Master Audio or Master Monitor, this signals the splits player station to play an asset using an assigned Master Audio/Splits Player stream. The asset may be the same or different depending on the Asset Tagging.
Master Monitor - The Master Monitor option is used to designate what stream should be used by the Master Splits Station when an asset plays on the Mater station with a Split Behavior of Master Monitor.
Select Master Audio for the Streams that are to be used with the Master Audio Split Behavior. Splits are supported in the On-Air, Hot Keys and Stacks modules. Select Master Monitor for the Monitor streams.
 button to verify the players are functioning; the status column will display a green check mark
  if the player is online and is available to Zetta. If the Player is not online or not functioning a red
  is visible in the Status column. to save the added the Player.
|
Stream Group |
Description |
Recommended Streams |
|
On-Air |
Used for On-Air station play. Add 3 Master Audio/Splits Player streams and 3 Master Monitor streams for Splits Event Routing. |
9 Streams |
|
Audition |
Used for Local Playback |
3 Streams |
|
Hot Keys® |
Frequently used audio control room events saved to Hot Keys. Optionally add 3 additional streams for Splits Event Routing. |
3 Streams |
|
Stacks |
Used to play a stacked selection of audio control room events. Optionally add 3 additional streams for Splits Event Routing. |
3 Streams |
|
Z-Player |
User to play audio in the Z-Player Module. |
3 Streams |
|
|
To configure the Stream Groups for the Splits Client Station, follow these steps: |
button to create a new Player. button for the desired number of streams if the player is online and is available to Zetta. If the Player is not online or not functioning a red is visible in the Status column. to save the added the Player.
|
Stream Group |
Description |
Recommended Streams |
|
On-Air |
Used for On-Air station play and Splits Player |
3 Regular (non-Split) Streams and 3 Splits Event Routing Streams |
|
Audition |
Used for Local Playback |
3 Streams |
|
Hot Keys® |
Frequently used audio control room events saved to Hot Keys |
3 Streams |
|
Stacks |
Used to play a stacked selection of audio control room events |
3 Streams |
|
Z-Player |
User to play audio in the Z-Player Module |
3 Streams |
A Master Station is simply a Station that is assigned to a splits client as its master station. See the Create a Station instructions if a new station is needed for the Master station.
|
|
To configure the Master Station, follow these steps: |
button to save the station settings.
A Splits Station is simply a Station that is assigned to a Splits Master station. See the Create a Station instructions if a new station is needed for the Splits station.
|
|
To configure a Splits Station, follow these steps: |
button to save the station settings.
|
|
To set the Split Behavior of an Asset, follow these steps: |
Click Save to save the changes to the Asset.
|
Important Note! |
The Split Behavior can also be set by accessing the metadata card from within the Tag window when creating a Tag. Simply double-click the Tagged asset to access the metadata card. |
|
|
To create a Tag, follow these steps: |
button|
Important Note! |
The assets selected for the Split Master and the Split Client should have approximately the same Runtime. Zetta will use the Maximum Stretch and Maximum Squeeze values to achieve an exact length to allow the Split Client to rejoin the Split Master at the correct time. If the assets cannot be stretched/squeezed to match an error |
button to save the changes to the Tag.
|
|
To Add an Imaging, follow these steps: |
button
 button to save the changes to the Imaging.
The Split Behavior for a Spot Block can be set in the Clocks/Logs or in GSelector using GSelector Integration. To set the Split Behavior in GSelector, see the GSelector Help Guide
|
|
To Set the Split Behavior on a Spot Block in a Clock or Log, perform the follow steps: |
The Final Steps are to Schedule the Logs for the Stations, this can be done with GSelector Integration, Clocks or through Flat File Load. Then open the On-Air module for each station and set the Spilt Clients to Split Player to: mode. In Splits Player mode the title header of the On-Air module will be purple by default and will show a status  for the master station. The color of the title header can be changed in the On-Air section of the Themes and Appearances window. When the Show Master Log Events in Split's On-Air Module option is checked, for the Splits Station, the events playing on the master station will be shown in the On-Air module of the splits station. This allows users to see events playing from the master station with the splits player events in the On-Air module of the splits station. When the Sequencer is in Splits Player mode the Master Log Events will be shown with a Master
  icon and the title header of the On-Air module will show a filter
  icon. This filter can be used to switch the view between showing and not showing the master log events.
The color of the stripe on the left of this icon  can be changed by modifying the 'Split Master Event color' option in Themes & Appearances.
External Splits will use the Serial/TCP/UDP GPIO connection to communicate between the Master and the Split Forwarder.
The following assumes that Splits is enabled at both sites, the Stations, Players and RS232, TCP or UDP Splits GPIO device have been created and configured.
The following steps can be used to configure Zetta sites for External Splits:
In this section: show/hide show/hide
External Splits: Configure the Master Station
External Splits: Configure a Virtual Station at the remote site as the Split Forwarder
Setting the Split Behavior for the Assets
See the Create a Station instructions if a new station is needed for the Master station.
|
|
To configure the Master Station sending site, follow these steps: |
button to save the station settings.
See the Create a Virtual Station instructions if a new virtual station is needed as a Splits Forwarder at the remote site. The Virtual Station configured here will be the Splits Forwarder for the Master Station at the head end site.
|
|
To configure the virtual station at the remote site, perform the following steps: |
 button to save the virtual station settings.
The Split Client Stations should already be created at the remote site. See the Create a Station instructions if a new station is needed.
|
|
To configure the Splits Stations at the remote site, follow these steps: |
Click the Save button to save the station settings.
The Final Steps are to Schedule the Logs for the Stations, this can be done with GSelector Integration, Clocks or through Flat File Load. Then open the On-Air module for each splits station and set the mode to Split Player to: mode. In Splits Player mode the title header of the On-Air module will be purple by default and will show a status for the master station. The color of the title header can be changed in the On-Air section of the Themes and Appearances window. When the Show Master Log Events in Split's On-Air Module option is checked, for the Splits station, the events playing on the Master station will be shown in the On-Air module of the Splits station. The External Splits Station's On-Air Module will show the Master Log Events with a Master icon but the event progress will not be shown. However, the event that is playing on the Master Station will be shown with a blue border. When the Sequencer is in Splits Player mode the title header of the On-Air module will show a filter icon. This filter can be used to switch the view between showing and not showing the master log events.
ZCast Splits will use a ZCast Split Forwarder connection to communicate. ZCast connections use an Outbound ZCast connection at the head end site for the Master station communication and an Inbound ZCast connection at the remote site for the Split Forwarder.
The following assumes that Splits is enabled at both sites, the Stations and Players have been created and configured.
The following steps can be used to configure Zetta sites for ZCast Splits:
In this section: show/hide show/hide
ZCAST: Configure the Master Station
ZCAST: Configure a Virtual Station at the remote site as the Split Forwarder
ZCAST: Configure the Split Forwarder in Splits Station as the Master Station at the remote site
ZCAST: Create a Master Station to Split Forwarder ZCast Connection
Setting the Split Behavior for the Assets
See the Create a Station instructions if a new station is needed for the Master station.
|
|
To configure the Master Station sending site, follow these steps: |
button to save the station settings.
See the Create a Virtual Station instructions if a new virtual station is needed as a Splits Forwarder at the remote site. The Virtual Station configured here will be the Splits Forwarder for the Master Station at the head end site.
|
|
To configure the virtual station at the remote site, perform the following steps: |
 button to save the virtual station settings.
The Split Client Stations should already be created at the remote site. See the Create a Station instructions if a new station is needed.
|
|
To configure the Splits Stations at the remote site, follow these steps: |
button to save the station settings.
This option of sending/receiving Master Splits messages can be used if the External Splits is not used for communication. The On-Air module for the Splits station will not show the Master Log Events for ZCast Splits. But the Status icon will show if the Master station is Online.
|
|
The following steps can be used to setup a ZCast connection between two Zetta sites. |
button
 to save the ZCast Connection.
 to export the ZCast Connection configuration to a file.
 button to import the ZCast Connection configuration file.
 to save the ZCast Connection.
The Final Steps are to Schedule the Logs for the Stations, this can be done with GSelector Integration, Clocks or through Flat File Load. Then open the On-Air module for each splits station and set the mode to Split Player to: mode. In Splits Player mode the title header of the On-Air module will be purple by default and will show a status for the master station. The color of the title header can be changed in the On-Air section of the Themes and Appearances window.
When the Master Station is communicating correctly with the Local Split Stations the status icon will be green and a Listening icon with a number will appear in the On-Air title bar of the Master Station. A tooltip will show what stations are listening when the mouse is hovered over the number.
Use the GPIO History at each site to verify the External Splits are communicating.
The Splits IN and OUT messages are logged with the Sequencer processes and stored on the local computer (..\ProgramData\RCS\Zetta\!Logging\Debug\xx_<ComputerName>_Zetta.SequencerLauncher.exe_ProcessID.xlog). The first two characters of the file name is the date the file was created. The date is followed by the Windows name for the computer. This file can be viewed by opening it in the xLogViewer application found in the RCS program group on the local computer. The New messages that should appear will look similar to the examples below:
4-23 09:33:01.596 | Seq | SPLITS | A - Split 1 | SPLIT_OUT [ZETTA_SPLITSMASTER]: SEQUENCER_DATA - INVALID, Split Id: 0,
4-23 09:33:01.665 | Seq | SPLITS | S - Split 2 | SPLIT_OUT [ZETTA_SPLITSMASTER]: SEQUENCER_DATA - INVALID, Split Id: 0,
4-23 09:33:06.492 | Seq | SPLITS | WRCS-FM | SPLIT_OUT [ZETTA_SPLITSMASTER]: SEQUENCER_DATA - INVALID, Split Id: 0,
4-23 09:33:06.494 | Seq | SPLITS | S - Split 2 | SPLIT_IN [ZETTA_SPLITSMASTER]: SEQUENCER_DATA - INVALID, Split Id: 0,
4-23 09:33:06.495 | Seq | SPLITS | A - Split 1 | SPLIT_IN [ZETTA_SPLITSMASTER]: SEQUENCER_DATA - INVALID, Split Id: 0,
4-23 09:33:16.622 | Seq | SPLITS | A - Split 1 | SPLIT_OUT [ZETTA_SPLITSMASTER]: SEQUENCER_DATA - INVALID, Split Id: 0,
4-23 09:33:16.702 | Seq | SPLITS | S - Split 2 | SPLIT_OUT [ZETTA_SPLITSMASTER]: SEQUENCER_DATA - INVALID, Split Id: 0,
4-23 09:33:21.658 | Seq | SPLITS | WRCS-FM | SPLIT_OUT [ZETTA_SPLITSMASTER]: SEQUENCER_DATA - INVALID, Split Id: 0,
4-23 09:33:21.660 | Seq | SPLITS | S - Split 2 | SPLIT_IN [ZETTA_SPLITSMASTER]: SEQUENCER_DATA - INVALID, Split Id: 0,
4-23 09:33:21.660 | Seq | SPLITS | A - Split 1 | SPLIT_IN [ZETTA_SPLITSMASTER]: SEQUENCER_DATA - INVALID, Split Id: 0,
4-23 09:33:31.652 | Seq | SPLITS | A - Split 1 | SPLIT_OUT [ZETTA_SPLITSMASTER]: SEQUENCER_DATA - INVALID, Split Id: 0,
Welcome < Features < Zetta Splits
© 2007-2024 RCS All Rights Reserved.

