Welcome < Configuration < Computer Configuration < Audio Outputs
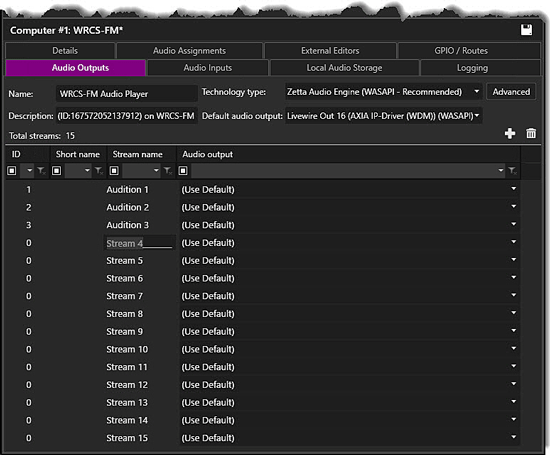
The Audio Outputs tab is used to add or remove Audio Outputs to an audio player. For each audio output installed on the local computer the streams will be defined. The audio outputs for computer B can be assigned to a Stream Group for computer A, as long as Zetta is running and the Audio Player in the startup manager is started on computer B. The columns can be reorganized to fit the user’s needs and Custom Filtering can be used to filter the Audio Outputs.
Click any area in this image for help

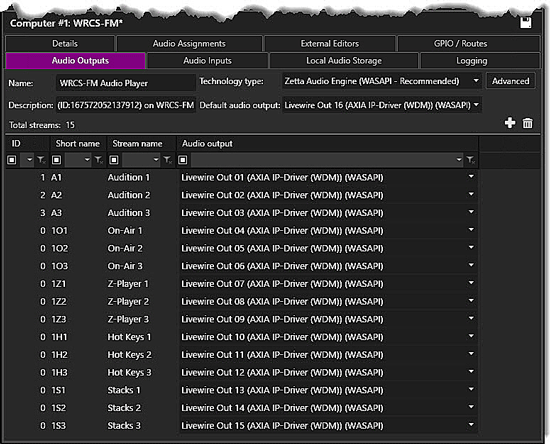
Click any area in this image for help
The following table shows the minimum recommended streams that will need to be configured for a station. Once the Audio Outputs are configured use the Stream Group Configuration to map the streams to the Stream Group for audio playback
|
Stream Group |
Description |
Minimum Recommended Streams |
|
On-Air |
Used for On-Air station play. |
3 Streams |
|
Audition |
Used for Local Playback |
3 Streams |
|
Hot Keys® |
Frequently used audio control room events saved to Hot Keys® |
3 Stream |
|
Stacks |
Used to play a stacked selection of audio control room events |
3 Streams |
|
Z-Player |
User to play audio in the Z-Player Module |
3 Streams |
|
Important Note! |
At least one additional stream/output will be needed if the Station is to play back an Asset which will pause and execute future Spot Blocks during the paused state. |
In this Topic: show/hideshow/hide
The Name field is for naming the Audio Player, this is the name that will be selected in other areas of the Zetta application. The default name when a player is added is 'MACHINE_NAME Audio Player' (no apostrophes).
The Description is used to give further detail about the audio player. (Optional)
Zetta allows the user to select the Technology Type to use for playing audio. The Zetta Audio Engine (WASAPI - Recommended) is the default option and is recommended for most audio devices. This technology type is the recommended type with these operating systems. The Zetta Audio Engine (ASIO) option is used for specific audio cards, consult the audio card manual before using this option. The Zetta Audio Engine (DirectSound) option is for older audio devices, enable only under RCS Supervision.
When the Zetta Audio Engine (ASIO) option is used additional instructions are provided for configuration of the device and Feed Through Routing.

|
Important Note! |
Changing the Technology Type of the audio player will require a restart of the Audio Player launcher in the Startup Manager. |
Use the Advanced button to open the Advanced Configuration window. The options available in this window vary based on the Technology Type selected. The Advanced Configuration window gives access to the Audio Device Buffer Size, the Audio Device Buffer Refresh Period and the In-Memory Buffer Size per Stream. The Zetta Audio Engine (WASAPI - Recommended) Technology type also has a Lock audio device in exclusive mode option, this allows only Zetta to play to the device, preventing windows and other applications from playing to the selected device.
If Zetta Audio Engine (WASAPI - Recommended) is selected as the Technology Type, the Advanced Configuration window will look like the following illustration.

If the Zetta Audio Engine (DirectSound) option is selected as the Technology Type, the Advanced Configuration window will look like the following illustration.

If the Zetta Audio Engine (ASIO) option is selected as the Technology Type, the Advanced Configuration window will look like the following illustration.

Note: The Audio device buffer size for the Zetta Audio Engine (ASIO) is a drop-down containing the available values where '(use default)' is 0:
The Default audio output is the 'Use Default' audio output that Zetta® will use if nothing is defined in the Streams.
Total Streams is the number of audio output streams added to the configuration.
 |
Add New Stream – Use Add New Stream to add a stream to the Audio Output channel of the device. |
 |
Delete Selected Stream – Use Delete Selected Stream to remove a selected stream. |
|
Purge Unavailable Audio Outputs - The Purge button will remove all the Unavailable audio outputs from the Audio Output drop-down. These outputs will be shown with a red x in the audio output column and will show as Unavailable in the drop-down list of Audio Outputs. |
The following columns can be reorganized to fit the user’s needs and Custom Filtering can be used to filter the Audio Outputs.
ID – The ID is the Stream ID that is shown in the Modules if a Short Name does not exist for the stream.
Short Name - The Short Name column can be used to set the displayed number or name that will be displayed in the On-Air screen and Stacks Module. It is also used to identify the stream to use in the Module Stream field of the command mappings for Hot Keys and Z-Player. Simply double-click the field and type a 1-3 character name. If the short name is not defined Zetta will use the ID instead.
Stream Name – The Stream Name is the name of the stream associated with the selected Audio Output. This name will be shown in the Stream Group Configuration window.
Audio Output – The audio output is the output channel of the installed device to use for the stream. Selecting the same audio output for multiple streams can cause audio to be played from the same audio output simultaneously. Zetta sequencer chooses the stream to use based on the last output channel used by the sequencer and then the order of the defined streams for the Stream Group.
Occasionally an audio output may become unavailable in the Audio Outputs column due to a failed sound device/card or sound device/card replacement. When this occurs, an error icon is shown before the audio output name and an Advanced button is displayed in the toolbar. Selecting the Purge Unavailable Audio Outputs ![]() button next to the output will purge the selected unavailable audio output. Clicking the Advanced
button next to the output will purge the selected unavailable audio output. Clicking the Advanced  button allows the user to select 'Purge unavailable audio outputs', this will purge ALL the unavailable audio outputs.

Click the drop-down for the audio output to view a list of devices, notice the unavailable device with an error icon before the description and a Purge  button to the right of the description. Select this purge button to purge only this selected audio output.
|
|
To add audio outputs to a configured Computer, perform the following steps: |
 button, 16 streams is the default setting for a single device. For this example, we will use fifteen streams. The following chart shows the recommended Streams for each Stream Group. The Audition streams are created automatically when using the computer wizard at initial login on a new computer.
|
Stream Group |
Description |
Recommended Streams |
|
On-Air |
Used for On-Air station play |
3 Streams |
|
Audition |
Used for Local Playback |
3 Streams |
|
Hot Keys® |
Frequently used audio control room events saved to Hot Keys® |
3 Stream |
|
Stacks |
Used to play a stacked selection of audio control room events |
3 Streams |
|
Z-Player |
User to play audio in the Z-Player Module |
3 Streams |

|
Important Note! |
When configuring Axia drivers, be sure to select the Axia IP-Driver (WDM), selecting the Axia Wave driver will prevent the play of multiple items simultaneously. For additional help with WheatNet IP audio outputs see the RCS Knowledge Base article 1099. |

 icon.
icon.|
Important Note! |
Anytime an audio output is changed the Audio Player in the Startup Manager will need to be restarted. |
|
|
To configure an ASIO audio Output, perform the following steps: |


 button, 16 streams is the default setting for a single device. For this example, we will use fifteen streams. The following chart shows the recommended Streams for each Stream Group. The Audition streams are created automatically when using the computer wizard at initial login on a new computer.
|
Stream Group |
Description |
Recommended Streams |
|
On-Air |
Used for On-Air station play |
3 Streams |
|
Audition |
Used for Local Playback |
3 Streams |
|
Hot Keys® |
Frequently used audio control room events saved to Hot Keys® |
3 Stream |
|
Stacks |
Used to play a stacked selection of audio control room events |
3 Streams |
|
Z-Player |
User to play audio in the Z-Player Module |
3 Streams |
 icon.
icon.|
Important Note! |
Warning: Feed Through Routing and Audio Recording cannot be configured simultaneously on the same computer. |
Welcome < Configuration < Computer Configuration < Audio Outputs
© 2007-2024 RCS All Rights Reserved.