Welcome < Features < ZCast
ZCast
ZCast in Zetta® enables sites to share Audio Assets, Tags, Rotations, Logs, Hot Keys, Stacks, Voice Tracks with Heads/Tails, Segue Transitions and Splits between stations and databases. When an asset is ZCast from one Zetta site to another the global metadata and the audio are sent using an HTTP / REST communication connection. Station specific data is also sent for stations selected in the Outbound connection. ZCast is a service that can run on any machine configured in the Zetta database. When the ZCast Service is enabled in the General tab, the ZCast tab, ZCast Connections and ZCast Transfers windows will be visible in Zetta. Once the ZCast Connections are configured, a ZCast button will be available in the Library toolbar for all Asset tabs. When a ZCast Transfer is initiated Zetta will check the File Checksum of the audio on both sides; if the audio has not changed then only the metadata changes will be sent.
|

Important Note!
|
Although File Checksum calculations are not required for ZCast, it is highly recommended that the Full Analysis option is run on all audio before transferring audio using ZCast.
Warning: for this optimization to work properly, both sending and receiving Zetta systems should either use the same system managed audio format, or the receiving Zetta should use the (None) option for the format.
If the receiving Zetta converts the audio file, the File Checksum for the file will be different than that of the file stored on the sender. To troubleshoot and / or verify this is happening, inspect and compare file Checksum values (for the same asset) between the sender and the receiver.
|

In this Topic: show/hide show/hide
ZCast Tab
The ZCast tab is located in the System configuration window when the ZCast Service is enabled in the General tab.

ZCast Address - The ZCast Address is the address of the computer assigned to run the ZCast Service and the port used when communicating with other Zetta® systems. This field is automatically populated with the correct computer name and the default port of 3135, however this field can be changed, contact RCS Support for assistance. Use the Test button to verify the connection to the ZCast Service.
Capture Communication - The Capture Communication option, when enabled, will add verbose logging for Zetta.ExternalServiceLauncher.exe. Every call that is made from a ZCast client and to the ZCast server will be logged to a file XX_WANCAST_COMMUNICATION_Zetta.ExternalServiceLauncher.exe (the first numbers of the file name will be the day of the current month). Each entry will show what URL call was made, the parameters passed in and the response to that call. Contact RCS Support for assistance.
Max Number Of Retries - The Max Number Of Retries setting is the maximum number of times that Zetta will retry sending the data before it stops trying and fails the send request. The default setting is 60 retries.
Time till retry after failure - The Time till retry after failure is the time in seconds that Zetta will wait before it retries to send the data again. The default setting is 60 seconds.
Limit Outbound Bandwidth to - This option will limit the outbound network bandwidth used by ZCast. The default setting of zero means Zetta will use all bandwidth detected in the sending of ZCast packets to ZCast connections. Deleting the entry will default to zero. This setting can also be controlled on the fly using the Command Mapping ZCast.OutboundLimit in an Execute Command in a log, background recorder or macro.
Limit Inbound Bandwidth to - This option will limit the inbound network bandwidth used by ZCast. The default setting of zero means Zetta will use all bandwidth detected in the receiving of ZCast packets from ZCast connections. Deleting the entry will default to zero. This setting can also be controlled on the fly using the Command Mappings ZCast.InboundLimit in an Execute Command in a log, background recorder or macro.
External ID handling on Incoming Assets - The External ID handling can be used to set how Zetta is to handle the External ID of incoming assets. This can be useful when receiving ZCast data from a site who does not share the exact same External ID arrangement to prevent duplicate External ID's.
Accept External ID - There are seven ways of handling external ID's during a ZCast import. These settings are used on the inbound side:
Accept Always - This option always imports the external ID that comes from the import, regardless of whether the asset is new or not. Also, does NOT check for conflicts. This is how versions prior to 2.9 of Zetta handle the External ID.
Accept when no conflicting External ID, otherwise keep External ID - This option imports the external ID that comes from the import IF the external ID given is not set on a different asset. If the same external ID is found on a different asset Zetta will accept the asset, but clear the external ID on import of the new asset. This means the new asset will not have an External ID. If the same external ID is found on an existing matching asset then the asset will be updated and the External ID will remain the same.
Accept when no conflicting External ID, otherwise make External ID unique - This option imports the external ID that comes from the import IF the external ID given is not set on a different asset. If the same external ID is found on a different asset Zetta® will accept the asset, but change the external ID to a unique number on import if it is a new asset. If the same external ID is found on an existing matching asset then the asset will be updated and the External ID will be changed to a unique number. The unique number will have the word DUPLICATE in it for easy searching in the Library module (ExternalID_DUPLICATE_AssetID_RandomNumber).
Accept and clear External ID on conflicting assets - This option imports the external ID that comes from the import IF the external ID given is not set on a different asset. If the same external ID is found on a different asset, Zetta will clear the external ID on the EXISTING assets that have the external ID. In other words, the asset that is getting imported will retain the external ID given, and conflicting assets with the same external ID will no longer have an External ID.
Accept and make External ID unique on conflicting assets - This option imports the external ID that comes from the import IF the external ID given is not set on a different asset. If the same external ID is found on a different asset, Zetta® will make the external ID unique on the EXISTING assets that have the external ID. In other words, the asset that is getting imported will retain the external ID given, and conflicting assets with the same external ID will get a new unique external ID. The unique number will have the word DUPLICATE in it for easy searching in the Library module (ExternalID_DUPLICATE_AssetID_RandomNumber).
Ignore External ID - This option tells Zetta to never accept the given external ID from the import. Zetta will clear the external ID on the importing asset if it is a new asset, and will leave the external ID alone when updating an existing asset.
Fail transfer when conflict found - This option will fail the import of the asset if the External ID conflicts with an existing asset.
ZCast Connections
The ZCast Connections window is where the Inbound and Outbound connections are configured. The ZCast Connections window is located in the Configuration menu.
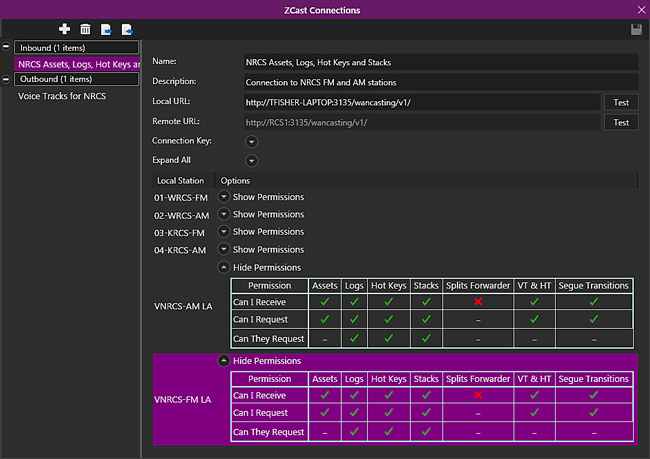
Creating a Site to Site ZCast Connection
|

|
The following steps can be used to setup a ZCast connection between two Zetta sites.
|
- On the Receiving site, click ZCast Connections from the Configuration menu.
- Click the Add Connection
 button
- Select Inbound for the Connection Type
- Enter a Name to describe the connection.
- Optionally, enter a Description of the connection.
- Click the Create Connection Key button.
- Select the Permissions for the Local stations.
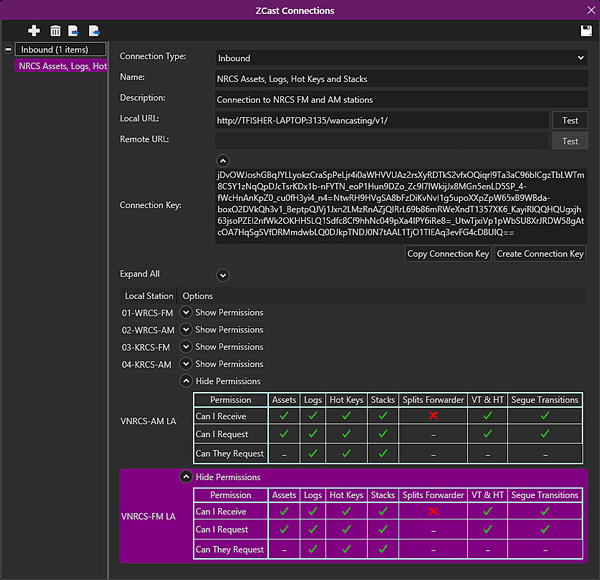
- Click Save
 to save the ZCast Connection.
- Click Export
 to export the ZCast Connection configuration to a file.
- Transfer the file to the sending site via Email, shared folder or other means.
- On the Sending site, click ZCast Connections from the Configuration menu.
- Click the Import
 button to import the ZCast Connection configuration file.
- The Connection Type is automatically set to Outbound.
- Edit the Name if desired.
- Optionally, edit or enter a Description.
- Select Test
- Select the Local Station that has access to Send and request data from the Remote Station.
- Select the Permissions for the connection.
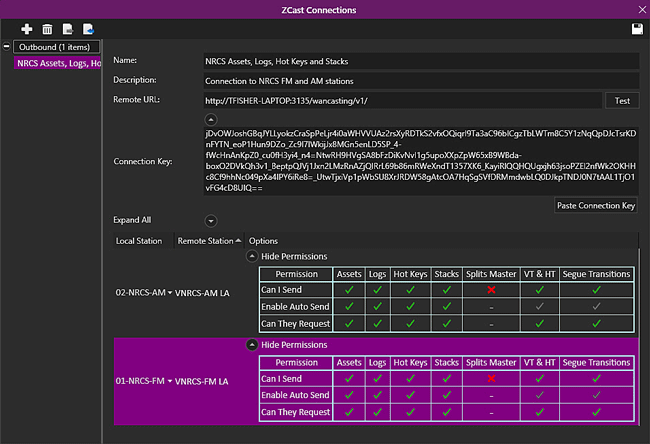
- Optionally, select Enable Auto send. Assets activated and changes to Logs, Hot Keys, Stacks, VT&HT and Segue Transitions on this station will be automatically sent to receiving station on this connection when there is a green check in the permission grid. This option is available when Can I Send is enabled. If this option is selected for Logs the Enable Auto Send is automatically selected for VT&HT and Segue Transitions. The time that Zetta will wait before the auto ZCast of a log change is 1 minute, assets are sent immediately.
- Click Save
 to save the ZCast Connection.
- Repeat to send ZCast data the other direction as needed.
ZCast Library Assets
The ZCast button in the Library toolbar is used to send the selected library assets to an Outbound ZCast Connection.
|

|
To ZCast an Asset to an Outbound Connection, perform the following steps:
|
- Create a Site to Site ZCast Connection, at the sending site select Allow Sending Assets for the station. Select Auto Send to allow changes to assets to be automatically sent to remote stations. If the Auto send audio is selected and an asset is deleted or deactivated this change will be sent to the remote station automatically. At the remote site select Allow Receiving Assets from the sending station.
- Open the Library module from the Modules menu.
- Select the type of Asset to ZCast
- Select the Assets to Send, use the CTRL or SHIFT keys to select multiple assets.
- Select the Send selected media to ZCast site
 .
.

- This will open the Manual ZCast window, select the station to send the selected asset.

- Optionally, select the Priority Send to set the assets as High Priority. Assets by default have a send time of now + 24 hours, selecting the Priority Send will change this default to send now instead of within the next 24hours.
- Click the Go button at the bottom to send the assets.
ZCast a Station Log
Station logs can be sent in any direction between any combination of primary and/or virtual stations. ZCast logs can be used for simulcasting, if both ends are primary stations. The ZCast button in the Log toolbar can be used to Send a Log, Request a Log, Reconcile a Log or Request Missing Assets based on a configured ZCast Connection. This feature will replace the Log date and hour selected in the Manual ZCast window it will not merge with an existing Log.
|

|
To ZCast a Station Log, perform the following steps:
|
- Create a Virtual station at the sending site to match the primary station at the remote site.
- Create a Site to Site ZCast Connection, at the sending site select Can I Send for Logs for the virtual station just created. At the remote site select Can I Receive for Logs from the virtual station to the primary matching station. To ZCast the original log from the primary station to the new virtual station create another Site to Site connection to Allow Sending Logs from the remote primary station and Allow Receiving Logs at the virtual station from the remote primary matching station.
- At the Remote site where the primary station resides, open the Logs module from the Modules menu.
- Select the Primary Station
- Select the Log date to send to the virtual station
- Select the ZCast selected logs
 .
.

- Use the action drop-down to select the allowed action. This is based on the Connection Permissions selected during the configuration of the ZCast Connection.
- Use the Start and End field to send a date/hour range of logs for the station
- Ensure the correct station(s) are selected to send the log to at the receiving site.
- Click Go
- Use the ZCast Transfers window from the Tools menu to view the transfers Progress

- Open the Log for the Virtual Station created in step one. Click Modules | Logs then select the Virtual Station from the Station Selection drop-down.
- Select one of the Days logs that was received and edit it as needed.
- Select the ZCast selected log
 .
.
- Send the Log back to the Primary station by clicking Go
- Use the ZCast Transfers window from the Tools menu to view the transfers Progress.
The Permission Can They Request for Logs can optionally be enabled to allow the virtual station to request a log from the primary station and vice versa. Use the Can They Request for Assets permission to Request Missing Audio using the Manual ZCast window.
Supported log event types
The following log event types are supported when Logs are ZCast in Zetta.
Assets - When a Log is sent via ZCast, the assets in the Log are also sent. Zetta will then create the asset on the other end if it does not exist, but no audio will be sent. If the audio is required at the receiving end the sending site can send the audio or the receiving site can request the missing audio.
Macros - When a Log is sent via ZCast, the Macros in the Log are also sent, however the contents of the macro is not sent. Zetta will match on Macro name; if Macro does not exist, an empty macro with the description will be created. The Macro description can be used when creating the macro on the sending side to inform receivers of what the macro should do.
Comments
Pause
Unscheduled Link
Unscheduled Song
Empty VT Slot
ETM
Spot Block (including contents)
External
NOT supported log event types:
The following log events are not supported when Logs are ZCast in Zetta.
Execute commands - When a Log is sent via ZCast, any Execute Commands in the log become Comments at the receiving site.
Record Events - When a Log is sent via ZCast, Record Events become empty Record events at the receiving site.
Note: You can however REFERENCE a macro on the receiving side by its name, so if you have a "Macro 1" in the log on the sender, Zetta will try and look up the macro of the same name on the corresponding station at the destination site, and use it if found. If not found Zetta will create an empty macro with the same name.
ZCast Hot Keys
The ZCast button in the Hot Keys toolbar is used to send the selected Hot Keys bank to an Outbound ZCast Connection. Hot Key banks that are received via ZCast will be set to a Visibility of Public and will be owned by the Supervisor account.
|

|
To ZCast a Hot Keys bank to an Outbound Connection, perform the following steps:
|
- Create a Site to Site ZCast Connection, at the sending site select Allow Sending Hot Keys for the station. Select Auto Send to allow changes to Hot Keys banks to be automatically sent to remote stations. If the Auto send audio is selected and a hot key bank is changed, then this change will be sent to the remote station automatically. At the remote site select Allow Receiving Hot Keys from the sending station.
- Open the Hot Keys module from the Modules menu.
- Select the bank to ZCast
- Select the ZCast current Hot Keys bank
 button.
- This will open the ZCast Hot Keys bank window, select the ZCast Connection to use.
- Use the action drop-down to select the allowed action. This is based on the Connection Permissions selected during the configuration of the ZCast Connection.
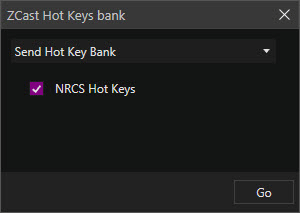
- Click the Go button at the bottom to send the Hot Keys bank.
ZCast Stacks
The ZCast button in the Stacks toolbar is used to send the selected Stacks bank to an Outbound ZCast Connection. Stacks banks that are received via ZCast will be set to a Visibility of Public and will be owned by the Supervisor account.
|

|
To ZCast a Stacks bank to an Outbound Connection, perform the following steps:
|
- Create a Site to Site ZCast Connection, at the sending site select Allow Sending Stacks for the station. Select Auto Send to allow changes to Stacks banks to be automatically sent to remote stations. If the Auto send audio is selected and a Stacks bank is changed, then this change will be sent to the remote station automatically. At the remote site select Allow Receiving Stacks from the sending station.
- Open the Stacks module from the Modules menu.
- Select the bank to ZCast
- Select the ZCast current Stacks bank
 button.
- This will open the ZCast Stacks bank window, select the ZCast Connection to use.
- Use the action drop-down to select the allowed action. This is based on the Connection Permissions selected during the configuration of the ZCast Connection.
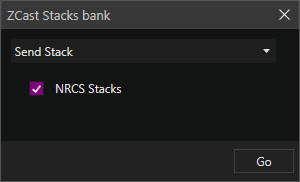
- Click the Go button at the bottom to send the Stacks bank.
ZCast Voice Tracks
The following sections will provide instructions on the ZCast connections for Voice Tracks.
In this section: show/hide show/hide
Create a Virtual Station at the site that will be sending the voice tracks
|

|
To create a virtual station, perform the following steps:
|
- In the Configuration Menu, click Virtual Stations.
- Click the Add New Virtual Station
 icon.
icon.
- Enter the Station Name to identify the station, something that identifies this station is a virtual station for the actual station being voice tracked.
- Enter a Description to describe the station (optional)
- Click the Save
 button to save the station settings.
Create an Inbound ZCast Connection for the Virtual station
|

|
To create an Inbound Connection for a virtual station to receive Logs to be voice tracked, perform the following steps:
|
- On the site with the Virtual Station, click ZCast Connections from the Configuration menu.
- Click the Add Connection
 button
- Select Inbound for the Connection Type
- Enter a Name to describe the connection.
- Optionally, enter a Description of the connection.
- Click the Create Connection Key button.
- Expand the Permissions for the Virtual Station created.
- Select the following permissions.

- Click Save
 to save the ZCast Connection.
- Click Export
 to export the ZCast Connection configuration to a file.
- Transfer the file to the sending site via Email, shared folder or other means.
- On the Sending site, click ZCast Connections from the Configuration menu.
- Click the Import
 button to import the ZCast Connection configuration file.
- The Connection Type is automatically set to Outbound.
- Edit the Name if desired.
- Optionally, edit or enter a Description.
- Select Test
- Select the Local Station that has access to the Remote Station.
- Select the following permissions.

- Optionally, select Enable Auto send. Assets activated and Logs, VT&HT and Segue Transitions changes on this station will be automatically sent to receiving station on this connection when there is a green check in the permission grid. This option is available when Can I Send is enabled for Assets and Logs. If this option is selected for Logs the Enable Auto Send is automatically selected for VT&HT and Segue Transitions. The time that Zetta will wait before it auto sends a log change is 1 minute, assets are sent immediately.
- Click Save
 to save the ZCast Connection.
- Create additional Connections going the other direction. An inbound connection is needed at the voice track receiver to receive voice tracks and an outbound at the voice track sender to send voice tracks.
Send the Log to the Virtual Station
|

|
To ZCast a Station Log, perform the following steps:
|
- At the site where the primary station resides, open the Logs module from the Modules menu.
- Select the Primary Station
- Select the Log date to send to the virtual station
- Select the ZCast selected log
 .
.
- Select the Send Log With VTs and Heads/Tails

- Use the Start and End field to send a date/hour range of logs for the station
- Ensure the correct station(s) are selected to send the log to at the receiving site.
- Click Go
- Use the ZCast Transfers window from the Tools menu to view the transfers Progress
Voice Track the Log and send the Voice Tracks and Segue Transition changes
|

|
To Voice Track the Log in the Virtual Station and send back the Voice Tracks and Segue Transition changes, perform the following steps:
|
- At the site where the virtual station resides, open the Logs module from the Modules menu.
- Select the Primary Station
- Select the Log date to Voice Track
- Select an Empty Voice Track Slot and create the voice track.
- When satisfied with the voice track click Save.
- Click the ZCast
 button in the Segue editor.
- Select the ZCast Connection to send the Voice Track and Segue Transitions back to the Primary Station.
ZCast Transfers
The ZCast Transfers window is located in the Tools menu and is used to view Inbound and Outbound ZCast Transfers. From this window the user can see Pending, Completed, Failed and In Progress transfers. There is a Cancel button available to cancel Pending and In Progress transfers of both inbound and outbound transfers. Once a transfer is complete the user can double-click the asset from the ZCast Transfer window to open the Metadata Card for the asset.

|

Important Note!
|
To view the Splits IN, OUT and FORWARD transfer messages use the GPIO History window from the Tools menu.
|
Welcome < Features < ZCast
© 2007-2024 RCS All Rights Reserved.


 button
 to save the ZCast Connection.
 to export the ZCast Connection configuration to a file.
 button to import the ZCast Connection configuration file.
 .
.


