Welcome < Zetta Quick Setup < Adding Library Media
Adding Library Media
There are several ways to add assets to the Zetta® Library; one way is to import the metadata from GSelector®. The second is to import the assets using the Media Import Tool. A third is discussed with the Auto Load option configured in the System Configuration section.
In this Topic: show/hideshow/hide
GSelector Assets
If there is an existing GSelector library, the asset information can be pushed to Zetta, provided Zetta has access to the shares and filenames referenced in the Library. See the Configure GSelector Integration section if it has not already been done.
|

Important Note!
|
The use of Audio Paths in GSelector is currently not supported in GSelector Zetta Integration.
If Audio Paths are currently being used in GSelector, the filename will need to be entered in the Media Filename field of the song metadata card in Zetta and then exported to GSelector. See the Adding Media Filename to metadata card for GSelector Asset topic of this guide.
|
|

|
To add Assets from GSelector, follow these steps:
|
- Using GSelector, click the Tools menu.
- Click Interfaces… This will open the interfaces window.
- Click the Setup Zetta button. This may have been done. If so the Setup Zetta button will be hidden as this option should only be used once to setup Zetta.
- Enter the Administrator password if prompt.

- Click Execute
- Close the Interfaces window.
- Optionally, use the Sync Asstes with GSelector in the Toolls menu to check the synchronization.
Adding Media Filename to Song Metadata Card for GSelector Asset
After the Media data has been pushed to Zetta from GSelector, if Audio Paths are currently being used in GSelector, the filename will need to be entered in the Media Filename field of the song and link metadata card in Zetta and then exported back to GSelector. To determine if GSelector is using Audio Paths go to the Setup | Station | General tab in GSelector for each station and look at the Audio Paths section. If there are values in these fields proceed with the following steps. If Audio Paths are not used in GSelector, proceed to Importing Media or Playing Audio On-Air.
|
|
To change from audio paths to filenames in the metadata card, perform the following steps:
|
- In the GSelector | Station | General tab, clear the defined Audio Paths for Songs and Links
- In ZETTA | Modules | Library double-click the song or link to edit
- Using the Extra tab of the metadata card, select Play File as the Playback Method.
- Enter the Media Filename or browse to the file.
- The file will be imported into the library and added to the Media Storage defined in the Content Stores setup.
- Click Save

- Close the Metadata Card
- The File Path will be the location where the file is imported from until it is Content Managed.
- Opening the file again will show the audio information and waveform.
- From the Library in Zetta select the Station.
- Highlight the Song(s) or Link(s) that were changed.
- Click the GSelector® Export
 button in the toolbar.
- The Filename is then exported to GSelector as seen below.

Importing Media into Media Library
Before importing assets into Zetta, it is important to set the desired metadata scope and audio format that will be used for each type of asset. Then the asset can be imported into the configured content store and activated.
In this section: show/hide show/hide
Assigning an Audio Format for Imported Assets
Zetta can convert the imported audio for each type of asset. See the Audio Format topic for details on supported audio formats.
|
|
To define an Audio Format for assets imported into Zetta, perform the following steps:
|
- From the Configuration menu, click System.
- Click the Audio Format tab
- Click the Add Defined Format
 button
- Enter a Name for the format
- Select the Audio Format
- Select the Bit Rate
- Select the Sample Rate
- Select the Channels
- Click Save
- Repeat for each desired format.
- If using Content Stores, assign the created or default format to the desired asset in the System Managed Formats section of the window. When these values are set the VBR Files and the CD Extraction of the Content Converter values seen in the next step will be ignored. To keep the audio format of the original file set the format for the asset to (None).

- If the above options are set to None or Content Stores are not configured, assign the created or default format to the VBR Files and the CD Extraction of the Content Converters section of this window. If Content Stores are configured, the file path fields will not be visible. To keep the audio format of the original file set the format for the asset to (None).

- Set the File Drop format to the format needed for files exported by using drag and drop from Zetta to windows or an external application.
- Click Save
- Restart Zetta and the Startup Manager to implement the new settings.
See the Audio Format tab section of the System topic for more information on the above settings.
Audio Processing Settings
Zetta can process the audio that is imported into the system. The Audio Processing tab in the System Configuration allows the user to set up parameters that will automatically be set on audio imported, captured and recorded into the library. It is recommended that all audio files are “trimmed” at the beginning and end so that only valid audio, not silence, is played out from Zetta. See the Audio Processing section for more information on this feature. For additional information on how audio is processed and normalized in Zetta see the Audio Processing and Normalization topic in the Features section.
|
|
To configure how the audio for imported assets are processed, follow these steps:
|
- Using the Configuration menu, click System
- Click the Audio Processing tab
- Choose the desired Method. Marks Analysis is Recommended. If No Analysis is selected, Normalization and Marks Analysis can be done later using the Audio Utility
 found in the Library toolbar.

- Enter the desired dB levels for Marks Analysis.
- Optionally, select Determine Intros.
- Click the Save to finish.
Setting the Metadata Scope for Asset Types
If the system is integrated with GSelector this section can be skipped. GSelector Integration only uses the Metadata Scope of Station. Go to Configuring External ID to continue with this topic.
Create Custom Asset Types for the Library Module
|
|
To set the Metadata Scope for the default Asset Types in Zetta, perform the following steps:
|
- From the Configuration Menu, click System
- Select the Asset Types tab.
- Select the Add New button
- Enter a Name for the new asset type in the Name column.
- Optionally double-click the Description column for the new asset type and add a description.
- Select the Search Method. See the Asset Types topic from more details.
- Optionally, select Search method switchable checkbox to allow users to switch the search method.
- Optionally if visible, set the Metadata Scope using the drop-down. This optional is not visible if Zetta is integrated with GSelector.
- Click Save in the System Configuration window.
Configure External ID
The External ID options are used to tell Zetta how to handle External IDs. External IDs can be unique Per Asset Type or Globally unique throughout Zetta. The External ID is an external alpha-numeric identification used by external sources to identify the asset. The External ID in Zetta matches up to the Media ID in GSelector when integration is enabled. The External ID tab in the System Configuration window can also be used to allow Zetta to automatically create an Asset External ID and Cut External ID based on a mask defined using Zetta Variables.
|
|
To setup External IDs in Zetta, perform the following steps:
|
- From the Configuration Menu, click System
- Select the External ID tab

- Select whether the External IDs are unique Per Asset Type or Globally.
- Select the option Automatically generate Asset External ID if you would like Zetta to create the asset's External ID automatically.
- Enter an Asset External ID mask.
|
Important Note!
|
Before enabling Automatically Generate Asset External ID, review any existing assets to ensure they have an External ID as the External ID field is set to read only when this feature is enabled.
|
The Asset External ID mask is a string of characters and variables that define how Zetta is to create the unique Asset External ID.
Example: ABC@{UniqueAssetNum,D9} = ABC000000001
Variables that can be used in an Asset external id mask:
|
Variable
|
Description
|
|
@{UniqueAssetNum,Dx}
|
This sets the External ID to a unique number that is x digits long, starting with 1.
|
|
@YYYY, @M, @D, etc.
|
Date/time in various formats
|
Also see the Zetta Variables section for additional Variables.

- Optionally, If Cuts are being used in Asset Types, the Automatically generate Cut External ID option is visible and can be enabled and the Cut External ID mask can be configured.
|
Important Note!
|
Before enabling Automatically Generate Cut External ID, review any existing assets to ensure they have a Cut External ID as the Cut External ID field is set to read only when this feature is enabled.
|
The Cut External ID mask is a string of characters and variables that define how Zetta is to create the unique Cut External ID.
Example: @{AssetExternalID}-@{UniqueCutNum,D3} = ABC000000001-001
Variables that can be used in a Cut External id mask:
|
Variable
|
Description
|
|
@{AssetExternalID}
|
Returns the Asset's External ID. This is typically used with the @{UniqueCutNum,Dx}to automatically generate a unique cut number.
|
|
@{UniqueCutNum,Dx}
|
This sets the Cut External ID to a unique number that is x digits long starting with 1.
|
|
@YYYY, @M, @D, etc.
|
Date/time in various formats
|
Also see the Zetta Variables section for additional Variables.
- Click the Save button to save the changes.
Importing Assets
There are a number of ways to get Audio Assets in Zetta, using Drag and Drop, CD Ripper and Media Import are just a few. The following steps will show how to quickly add assets to Zetta. The Media Import tool allows the user to import a large number of media files directly into the Media Library. The Media Import utility is accessed from the Tools menu. For more information, see the following sections; Media Import, CD Ripper, Auto Load and browsing to the Audio File from the Metadata Card to Import Audio.
|
|
To import Media into the Media Library using Media Import, follow these steps:
|
- From the Tools menu, click Media Import.
- Enter or browse to the Folder that contains the audio to import.
- Using the File Type drop-down select .mp3 if the audio files are mp3 files or .wav for Wave files.
- Select the Subfolders option to allow the utility to parse subdirectories of the specified folder.
- Select the Default Asset Type of song, spot or link from the drop down.
- The AMU Mapping Template has only the Default Template available on new installs. A template is used to match metadata such as Composer, Arranger and Musician from an XML file to specific fields in Zetta. Contact RCS Support for assistance in creating the template. See the Media Import topic for additional information.
- Set the Match On options to allow Zetta to determine if the media to be imported matches records already in the system. The following is a list of criteria:
- Do Not Match – Will import everything
- Title and Artist/Sponsor – Compares the Title and the Artist with what is already in the library
- File path - Compares the location of the file to be imported from with the file path of the audio that is to be loaded in the library
- External ID – Compares based on the External ID of the file with what is loaded in the library. Automatically Populate External ID is automatically enabled when this Match On option is selected. This option can be used when importing audio from NexGen or V15.
- File CheckSum – Performs a partial checksum analysis of the file to verify the file does not already exist in the database.
- Filename - Will match based on the Windows filename.
- Set the If Match options to tell Zetta what to do if a Match is found based on the Match On criteria.
- Do not import - to skip the file
- Replace - to replace the existing file.
- Replace Audio Only – Use the Replace audio only to replace the existing audio file if match, but do not overwrite the metadata.
- Merge Changed Fields - When the If Match is set to Merge Changed Fields, Zetta will update all and only the fields from the imported file that have non-blank values. For example, if an audio is imported along with its NexGen XML file and the NexGen file gives the title, artist, album, and start date. Zetta will change the existing asset’s title, artist, album, and start date to the values from the file. However, if the NexGen XML did not specify a start date, then Zetta would leave the start date unchanged.
- Replace Station or Cuts Fields - If the imported asset matches an asset already in the database and If Match is set to Replace Station Or Cut Fields, then Zetta will update only those fields found in the Station Specific tab or Cuts Specific tab of the metadata card of the matching assets. For example, if an audio is imported along with its NexGen XML file and the NexGen file gives the title, artist, album, and start date. Zetta will leave the asset’s title, artist, and album unchanged, but will change its start date to the one in the NexGen XML file. The Replace Station or Cut Fields option is only available when the GSelector and ZCast features are both disabled in the General tab of the System Configuration and at least one Asset Type is set to the metadata scope of Cuts.
- Optionally, select Perform Marks Analysis.
- Select Automatically Populate External ID to add the filename, without the extension, as the External ID. This can be used when importing audio from another system.
- Optionally, set the Default Kill Date.
- Optionally, click the Add Station button to select a station to Activate the audio. If no station is selected the assets can be activated later individually or by using the Audio Utility to Mass Change assets.
- The Activate check box, by default, is checked. To add assets to the Default station but not activate the assets to play on all stations, simply deselect the Activate check box.
- Chose a Station from the Activate on station drop-down. Select Default to add the audio assets to all stations.
- Use the Assign Category drop-down to select a created Category. If integrated with GSelector the Categories from the GSelector database will be visible. If Zetta is not integrated with GSelector the Categories will need to be created first.
- Optionally, select a Start Date/Hour and End Date/Hour.
- Optionally, set the Split Behavior of the asset. See the Zetta Splits feature for more details.
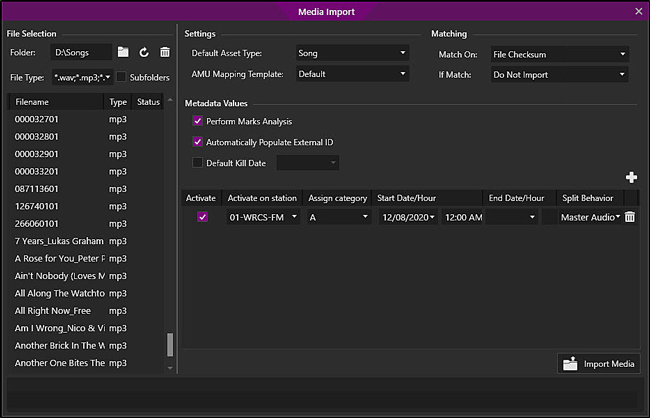
- When satisfied with the Import options, click the Import Media
 button. Audio is imported and then displayed in the Media Library Asset List.
|
Important Notes!
|
The Import can be stopped at any time by clicking the Cancel  Icon. For additional information on importing media into Zetta, see the Library Module section. Icon. For additional information on importing media into Zetta, see the Library Module section.
|
Activating Audio
After Importing audio into Zetta using the import feature, the audio may need to be activated for the desired stations if not done in the import process. Audio will not play on a station until it is active. The Audio can be activated in Zetta or GSelector. GSelector and Zetta both offer a multi-song changer option that allows the user to activate many songs at one time.
Activating Assets in Zetta
If assets are not activated when importing, they can be activated individually as seen below or they can be activated using the Audio Utility.
|
|
To activate audio in Zetta, follow these steps:
|
- Select Library from the Modules menu.
- Double-click the desired Song to open the metadata card
- Select the Station from the Stations tab.
- Select the Station Specific, Cuts Specific or Global tab. The tab available is dependent on the Metadata Scope of the selected Asset Type, the default is Station Specific.

- Select the Active check box
- Select additional fields as needed.
- Click Save
- Close the metadata card window
- Repeat steps for each song that needs to be active for the station
Approving & Activating Multiple Assets in Zetta using the Audio Utility
|
|
To activate and approve audio in Zetta, follow these steps:
|
- Select Library from the Modules menu.
- Optionally, select a Station.
- Select the desired Asset tab
- Use the drop-down filter to filter the asset if desired. Example: Selecting the Inactive Only Songs from the drop-down filter can be used to view all the media that is inactive.
- Select the All
 button in the toolbar to filter the assets to those that are Waiting Approval.
- Select the desired Assets use the SHIFT or CTRL keys to select multiple assets
- Click the Launch Audio Utility button. The actions available are dependent on the assets selected, the metadata scope of the assets and the Approval flag in the Station Configuration.
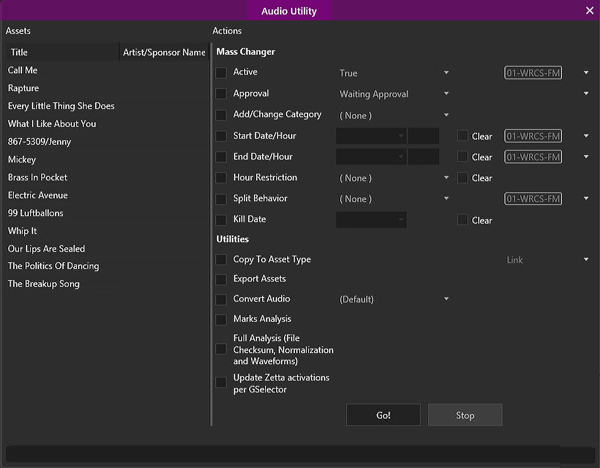
- Select the Active check-box
- Select True from the action drop-down
- Select the Station from the station drop-down, to activate the audio for all stations select the Default option.
- Select the Approval check-box if necessary. See Station Configuration Playback tab for more information on this setting.
- Select Approved from the action drop-down
- Select the Station from the station drop-down, to approve the assets for all stations select the Default option.
- Click Go!
- Repeat steps to Approve and Activate additional audio assets.
Activating Media in GSelector
|
|
To activate songs in GSelector, perform the following steps:
|
- In GSelector, click the Library tab
- Click the Browse tab
- Click Advanced Search

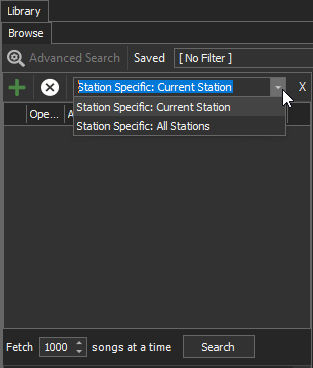
- Click the Add
 button
- For the Attribute Active change the Search Type to False
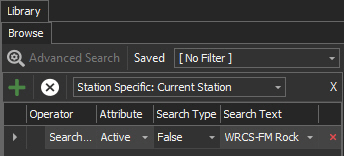
- Click the Search button
- The Inactive Songs will appear in the right window as selected. Use CTRL+Select to deselect the song(s) that are not to be activated.
- Select the Multi Song Changer Tab
- Under the Station Coding section, select the Active radio button
- Select the Category radio button
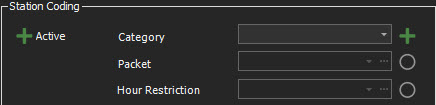
- Select a Category from the drop-down menu
- Click Save

- Click Yes to confirm the changes to the Song(s)
- Click Library | Browse
- Click Close Advanced Search
- Repeat for Links using the Linker | Browse | Advanced Search button.
© 2007-2024 RCS. All Rights Reserved.