Welcome < Modules < Library Module < Imaging
Imaging
Imaging is commonly used with Network Mode in Zetta. Imaging is station and shift specific audio used for Talent/Shift scheduling in Network mode, such as for Liners, Legal IDs, and station promotions. Imaging is also used with Zetta Splits, when a Split Client is configured with Split Name Matching of Imaging. The assets selected for the Split Master and the Split Client should be approximately the same length. Zetta will use the Maximum stretch/squeeze value to achieve the Target Length to allow the Split Client to rejoin the Split Master at the correct time. If the assets cannot be stretched/squeezed to match a warning error  will appear in the Imaging window for the asset. A warning error
  will also appear if the asset is inactive for a selected station. Imaging assets are not stored in GSelector when using GSelector Integration; however, they can be scheduled in GSelector. Imaging can be dragged and dropped into the Log, Hot Keys, or Stacks module and will resolve to the Next to Play asset before it is played. The Metadata card can be accessed for an asset from the Imaging window by simply double-clicking the Asset in the right pane. Imaging assets in Zetta are denoted by a red imaging icon
  throughout the system. Use the Themes & Appearances configuration window to change the color of the Imaging
  icon.
icon.
Click any area in this image for help

Click any area in this image for help
In this Topic: show/hide show/hide
Imaging Toolbar
The Imaging Toolbar has the following options:
 |
Save – Save is used to save any changes made to the Imaging.
|
 |
Refresh - The Refresh button will refresh the data displayed in the Imaging window. This can be used to pull any data changes that may have occurred in GSelector or on another computer while the Imaging window is open.
|
|

|
Audition – The Audition button will allow the user to listen to a selected piece of audio locally without it going over the air. Using the arrow drop-down, the user can select the play action or the marking point of the audio to start playing based on the preferences specified in the Auditioning tab of the Preferences Configuration window. An Audition Stream Group and stream must be defined and an audio event must be selected. When Imaging assets are auditioned from the Library, Logs or Clocks, the Next to Play asset for the current shift from within the selected Imaging asset will be auditioned. Optionally, simply middle-click the title of the asset and the asset will be auditioned based on the default marking point (shown on the button). If the default marker is not set for the selected asset the audio will start from the Opening. To stop the play of the audio simply middle-click the same asset or click the Audition button again. See the Audition Options section of this topic and the Audition Module topic of this guide for more information on auditioning assets.
|
Imaging Name
The Imaging Name is defined just below the toolbar. It is a description of what type of assets are contained in the Imaging.
External ID
The External ID displays an external alpha-numeric identification used for the asset by an external source. This is used when working with a third party music/traffic scheduling system and for referencing when loading an asset via a Flat File load. The External ID can be used to identify the Imaging when scheduling a Zetta Imaging Control event in GSelector.
Routing Behavior
The Routing Behavior drop-down is used to select whether to set the Network Route to OFF or ON when the audio is played by the sequencer. The default setting is Network Route OFF. When the Network Route OFF option is selected, Zetta will mute the current Network Route while the sequencer is playing Assets(s). The Network Route will turn back ON at the Segue point of the playing Asset. When the Network Route ON option is used the Network Route will be enabled while the Asset(s) are played by the sequencer.
Target Length/Warning
The Target Length is the length the assets will be stretched or squeezed to meet an ETM when resolved in the station log. If the assets runtime cannot be stretched/squeezed to meet the target length a warning error  will appear in the Warning column for the asset. To apply a maximum time stretch window, use the Maximum Stretch/Squeeze setting in the Playback options of the Station Configuration window. The Runtime of the asset is the Trim In to Segue (Trim Out in no segue or End of audio no Trim out). A warning
  /
/  is displayed if there is an issue with the asset, such as the asset is not active for the station. Simply hover the mouse over the warning icon to view a tooltip explaining the warning.
Kill Date
The Kill Date field displays a calendar control when the down arrow is selected.

Use the Right and Left arrows next to the Month and Year to switch between months to select a Kill Date. Use the Today field at the bottom of the calendar control to switch back to the current date.
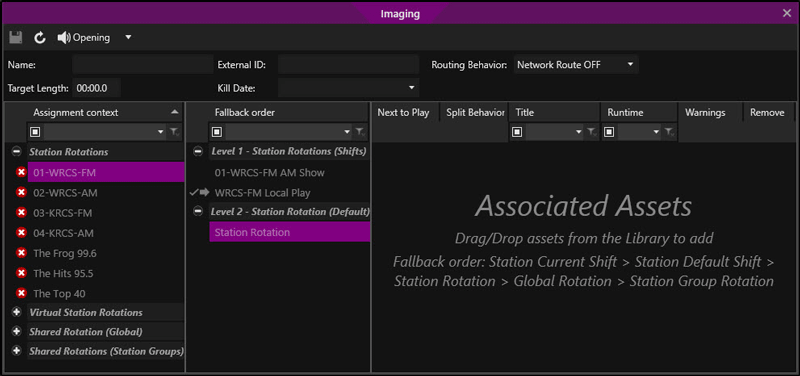
Assignment context
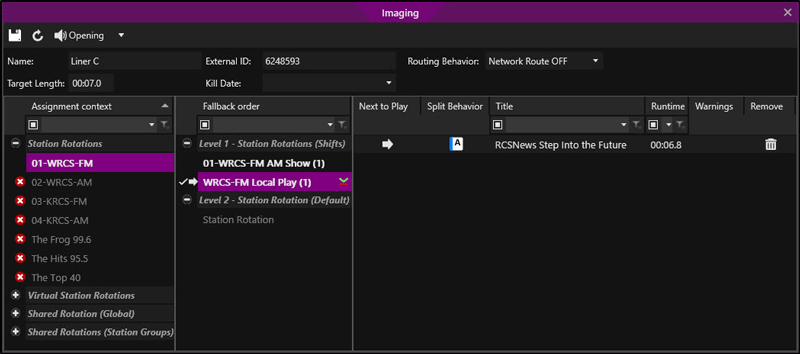
The Assignment context pane is used to select a Station, Virtual station, Station Group, or the Shared Rotation (Global) to add assets to the Image. Drag and drop assets into this grid from the Library module to assign the asset to the Imaging asset. Optionally, assets can be dropped on the Station name in the Assignment context to add the asset to the Level 2 - Station Rotation Fallback order. When a Station is selected and if a shift exists for the station, asset can also be added to the shift level by selecting a shift in the Fallback order list.
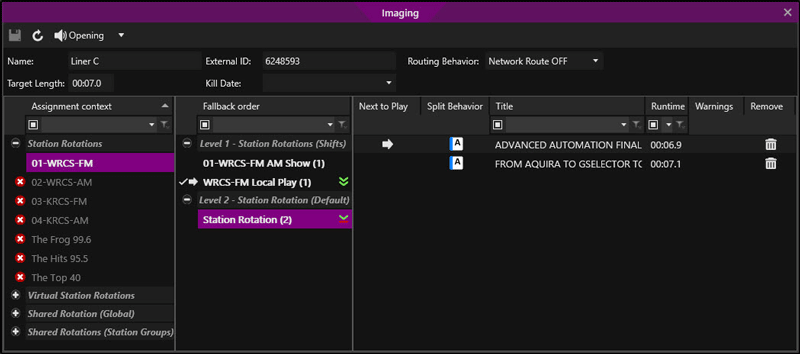
Fallback order
The Fallback order pane shows the levels and order that the asset will play. In Level 1 Zetta checks the Current Shift and then the Default Shift. If there is nothing to play in Level 1 at the station shift level, Zetta will move to Level 2 the Station Rotation level. If there is nothing to play in Level 2, Zetta will move to Level 3 the Shared Rotation (Global) level. If there is nothing to play at Level 3 Zetta will move the Level 4 Shared Rotations (Station Groups) until Zetta finds something to play. Each Station Group in the Shared Rotations (Station Groups) Level can be given a priority order using the Imaging resolution priority field in the Station Groups Configuration window. The Shared Rotations (Station Groups) level follows the Imaging resolution priority given to the station group. Each Level can have any number of assets assigned to the image. Each level shows the number of assets associated with each sub-level.

Select a station or group in each level and drag and drop assets into the Imaging grid to the right of this pane.
Imaging Grid
The grid to the far right of the window shows the associated assets for the Imaging asset. Select a Station, Virtual Station, Shared Rotation (Global) or Shared Rotation (Station Group) from the Assignment context list. Drag and drop assets into this grid from the Library module to assign the asset to the Imaging asset. When a Station is selected and if a shift exists for the station, assets can be added at the shift level by selecting a shift in the Fallback order list. Optionally, assets can be moved from one Fallback order to another by dragging and dropping the asset on the fallback order name in the list. Additionally, assets can be dropped on the Station name in the Assignment context to add the asset to the Level 2 - Station Rotation Fallback order.

Right-click in the column headers to Insert, Replace and Remove columns in the grid. Columns can be added, removed, and reorganized to fit the user’s needs. Custom Filtering can be used to filter the contents of the pane. Optionally, use the column to search the contents of the Imaging window. Right-click in the Grid to view the Audition Options and the Next To Play options.

Audition options
The Audition options are typically in the first two sections of the right-click context menu. These audition options are configured in the Context Menu Customization section of the Auditioning tab in the Preferences Configuration window. The audition section of this menu is used to play the audio on an audition play stream. The default options in this menu are Audition, Go To Start, Stop, Play-Pause, Opening, Segue and Closing. The top options are used for playback of the audio and the bottom options are used to select the marking point at which the audio will play. Clicking a marking point from the menu will play the audio from the point selected. The By Default Audition from option is the checked option in the list of marking points. This means when the Audition button in the toolbar is clicked, the default action is to audition the asset from this checked marking point. If the default marker is not set for the selected asset the audio will start from the Opening. This default action can be changed temporarily by right-clicking on the context menu option that is to be set as default. This will change the default for ALL of the Audition context menus in Zetta for this users Zetta session. Optionally, the user can simply middle-click the title of the asset to be auditioned and the asset will be auditioned based on the default marking point. See the Audition Module section of the guide for more information on auditioning assets.
Next To Play Selection
The Next to Play column displays the asset that will play when the Imaging event is queued in the Log. As each asset is played the pointer in the Next To Play column for the list of assets will change displaying the asset that will play next for the shift. Using the mouse, the Next to Play asset can be changed, simply right-click, in the column, the row to change and choose the Set as Next To Play for Current shift.
Split Behavior
The Split Behavior column shows an icon when a split behavior is selected for the scheduled asset. The Split Behavior column is visible when Splits are enable in the System Configuration | General tab. An asset that has a Split Behavior and is configured for the Master Station, an icon is shown showing the split behavior
Remove
To remove an Asset from an Imaging window, simply select the remove  icon in the remove column of the Imaging window.
Add an Imaging
|

|
To Add an Imaging, follow these steps:
|
- Configure Shifts for each of the stations to have Imaging
- Click Modules | Library
- Select the Imaging tab
- Click Add new media
 button
- Give the Imaging a Name
- Insert an External ID
- Optionally, change the Routing Behavior. The default is to Mute the Network Route.
- Set the Target Length for the Imaging assets to be added.
- Optionally, select a Kill Date using the Calendar Control.
- In the Assignment context pane select a Station, Virtual station, Station Group or the Shared Rotation (Global).
- If a Station is selected the Fallback order pane will show any defined shifts in Level 1. Select a shift to add assets to that shift.
- Drag and Drop asset from the Library Module to assign them to the shift.

- Select the Station Rotation in Level 2
- Drag and Drop asset from the Library Module to assign them to the shift.

- Select the Splits Station to drag and drop assets to add for play during splits mode.
- Optionally select the Shared Rotation (Global) Assignment to drag and drop assets to include in the Imaging.
- Optionally select a Station Group Assignment to drag and drop assets to include in the imaging.
- Click the Save
 button to save the changes to the Imaging.

Schedule a Zetta Imaging Control Type in GSelector
|

|
To schedule a Rotation using a GSelector Clock, perform the following steps:
|
- In GSelector, go to the Clock or Editor
- Add the Clock Entry
 type Control from the Clocks or Insert a Control using Insert Other
  from the Editor.
- Select Zetta Imaging from the Description column.
- Using the Info drop-down from the Clock or the User Data drop-down from the Editor enter the Zetta External ID of the Imaging to be scheduled.

- Save the changes.
- When Zetta receives the log, the event will be shown in the log as the selected Imaging until the imaging is resolved to a specific asset.
Delete an Imaging Asset
The following instructions can be used to remove an Imaging asset from the Imaging Library. The following steps will not remove the assets from the Library.
|

|
To delete an Imaging from the Imaging Library, perform the following steps:
|
- Click Modules | Library
- Select the Imaging tab
- Highlight the Imaging to delete.
- Click the Delete the Media
 button in Library toolbar.
- Click the Delete Now button to delete the Imaging immediately. This will delete the Imaging and remove it from the Library even if the asset is currently playing. Optionally, click Cancel, to cancel the delete action and close the window.
Welcome < Modules < Library Module < Imaging
© 2007-2024 RCS. All Rights Reserved.
 will appear in the Imaging window for the asset. A warning error
  will also appear if the asset is inactive for a selected station. Imaging assets are not stored in GSelector when using GSelector Integration; however, they can be scheduled in GSelector. Imaging can be dragged and dropped into the Log, Hot Keys, or Stacks module and will resolve to the Next to Play asset before it is played. The Metadata card can be accessed for an asset from the Imaging window by simply double-clicking the Asset in the right pane. Imaging assets in Zetta are denoted by a red imaging icon


 /
/  is displayed if there is an issue with the asset, such as the asset is not active for the station. Simply hover the mouse over the warning icon to view a tooltip explaining the warning.


 icon in the remove column of the Imaging window.
 button

 type
type  from the Editor.