Welcome < Modules < Logs and Clocks < Log Windows
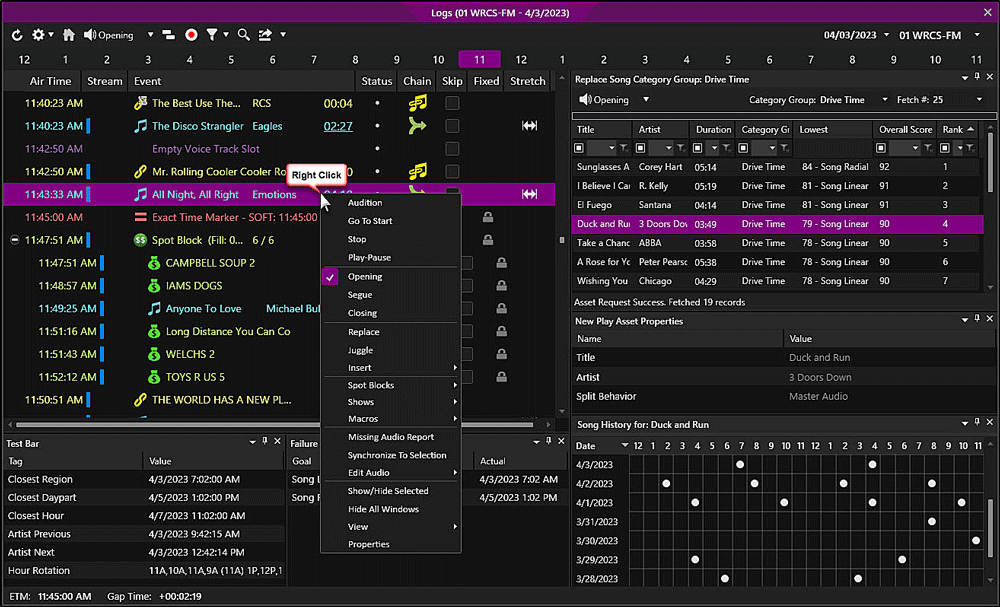
In the Logs and Clocks Modules, additional windows can be accessed when using the right-click menu to Insert or Replace a Song, Link or Event in Zetta®. By right-clicking an event in the Logs or Clocks and selecting one of these options, the Consideration, History and Properties windows will be opened. When Zetta is integrated with GSelector® the Test Bar and Failure Details windows are also available in the Logs Module. These windows are much like the ones found in the GSelector Editor. They can be free floating, docked or pinned to the log window in any position desired. If GSelector integration is enabled the information shown in these windows is pulled directly from GSelector with the exception of the properties window, which is always pulled from the Zetta database. See the section on GSelector Integration for more information on integrating GSelector with Zetta. An Asset can be auditioned from the Consideration window by simply middle-clicking the desired asset, clicking the Audition toolbar button or by clicking a desired play action or play position from the right-click menu. The Show/hide selected, right-click menu option, shows the windows selected in the View submenu while the Hide All windows option, hides all open windows.
Click any area in this image for help
Click any area in this image for help
In this Topic: show/hideshow/hide
The Consideration window opens when selecting to Insert or Replace an event in the log. The window lists various assets or control events the user can consider for use in the log. The Event Type drop-down menu can be used to switch between lists of Event types available in Zetta. The user can select an asset, rotation, tag, imaging or control event. Assets in the consideration window can be auditioned using the Audition options and toolbar button similar to the Logs window. If Tag, Rotation or Imaging are selected as the Event Type the Audition button will play the Next To Play event in the selected Tag, Rotation or Imaging. The columns can be reorganized to fit the user’s needs and Custom Filtering can be used to filter the contents of the pane. The Group by area will allow the user to group the list by the column headers. This makes locating an asset easier. The grouping area is hidden from view, but can be accessed by clicking the thick bar above the column headers.
When the station is not integrated with GSelector, the user can use the Category drop-down menu to select from a song or link from a specific category.

When the station is integrated with GSelector the consideration window works like the consideration window found in GSelector. Songs and Links are ranked and sorted in descending order of Lowest Score. The score values show how close the currently selected item is to meeting the Song or Link Scheduling Goals if placed in the current log position; the greater the deviation from the ideal, the lower the score, the closer to 100, the better. To show more results in this window use the Fetch drop-down to change the number of assets to display. The user can use the Category Group drop-down menu to select from a song or link from a specific category group. See the GSelector Help Guide for more information on Goals.

If the station is integrated with GSelector, the Event Type drop-down is not shown in the Replace window.
Using the mouse to right-click the list in the Consideration window the user can use the Audition options or Refresh Results of the window.

The History window is a visual plot of the days and times the selected Song or Link, or Artist of a Song or Link has been scheduled. The history window can be used to show the artist history or show the asset history by using the right-click menu from anywhere in the history grid. By default the History window shows a 14 day history, to show more use the right-click menu from anywhere in the grid to select Show More. Hover the mouse over the dot or number in the hour to view the time the song or artist will play in the hour. If the asset is assigned an Hour Restriction for the station then the hour restrictions will also show in the Song History. This window is accessed using the View | History option when right-clicking an event in the event list.

Song/Link History

Artist History
The properties window displays the details about the Asset or Control Event. Most of the information about the asset is pulled from the Metadata card for the asset. When the properties of a Spot are selected, Zetta will also show the Traffic System Data for the Spot. When a Control Event is selected the properties window can be used to Edit the Control Events values. This window opens when selecting to Insert or Replace an event in the log or when selecting the properties option from the right-click menu.

Play Asset Properties

Control Event Properties

Spot Properties
The Test Bar shows five critical rotation tests for any selected song or link in the Log or Consideration window. This window is accessed using the View | Test Bar option when right-clicking an event in the event list. These tests are as follows:
Closest Region - The Closest Region tag displays the closest day and time the asset will play or has played in the current Daypart Region. See the GSelector Help Guide for more information on Daypart Regions.
Closest Daypart - The Closest Daypart tag displays the closest day and time the asset will play or has played in the same Daypart.
Closest Hour -The Closest Hour tag displays the closest day and time the asset has played or will play in the current hour.
Vocalist Previous – The Vocalist Previous tag displays the date and time of the closest previous play of the selected artist occurred.
Vocalist Next – The Vocalist Next tag displays the date and time of the closest next play of the selected artist will occur.
Hour Rotation – The Hour Rotation tag is a string of characters representing previous plays within the hours of the current Daypart. The hour in parentheses is the current hour while the hours to the right indicate previous plays.

The Failure Details pane shows exactly how well an item in the Log or the Consideration window has met the scheduling goals for any selected log position. When an item is selected in the Consideration window, all goal scores are listed and sorted in order by contribution to the overall score. Scores in GSelector are used to indicate how well a given asset meets the scheduling priorities. See the GSelector Help Guide for more information on Goals. This window is accessed using the View | Failure Details option when right-clicking an event in the event list.

This section contains step-by-step instructions for using the log windows in the Logs Module.
In this section: show/hideshow/hide
|
|
To Insert events to a station log using the log windows, perform the following steps: |
|
|
To Replace events in a station log in Zetta® follow these steps: |
|
Important Note! |
If the station is integrated with GSelector the Event Type drop-down is not shown in the Replace window. |
|
|
To Pin or auto-hide the windows in the logs module, use the following steps: |


|
|
Once the Log Windows are setup, follow these steps to save the layout of the module to the user’s layout. |
© 2007-2024 RCS. All Rights Reserved.

